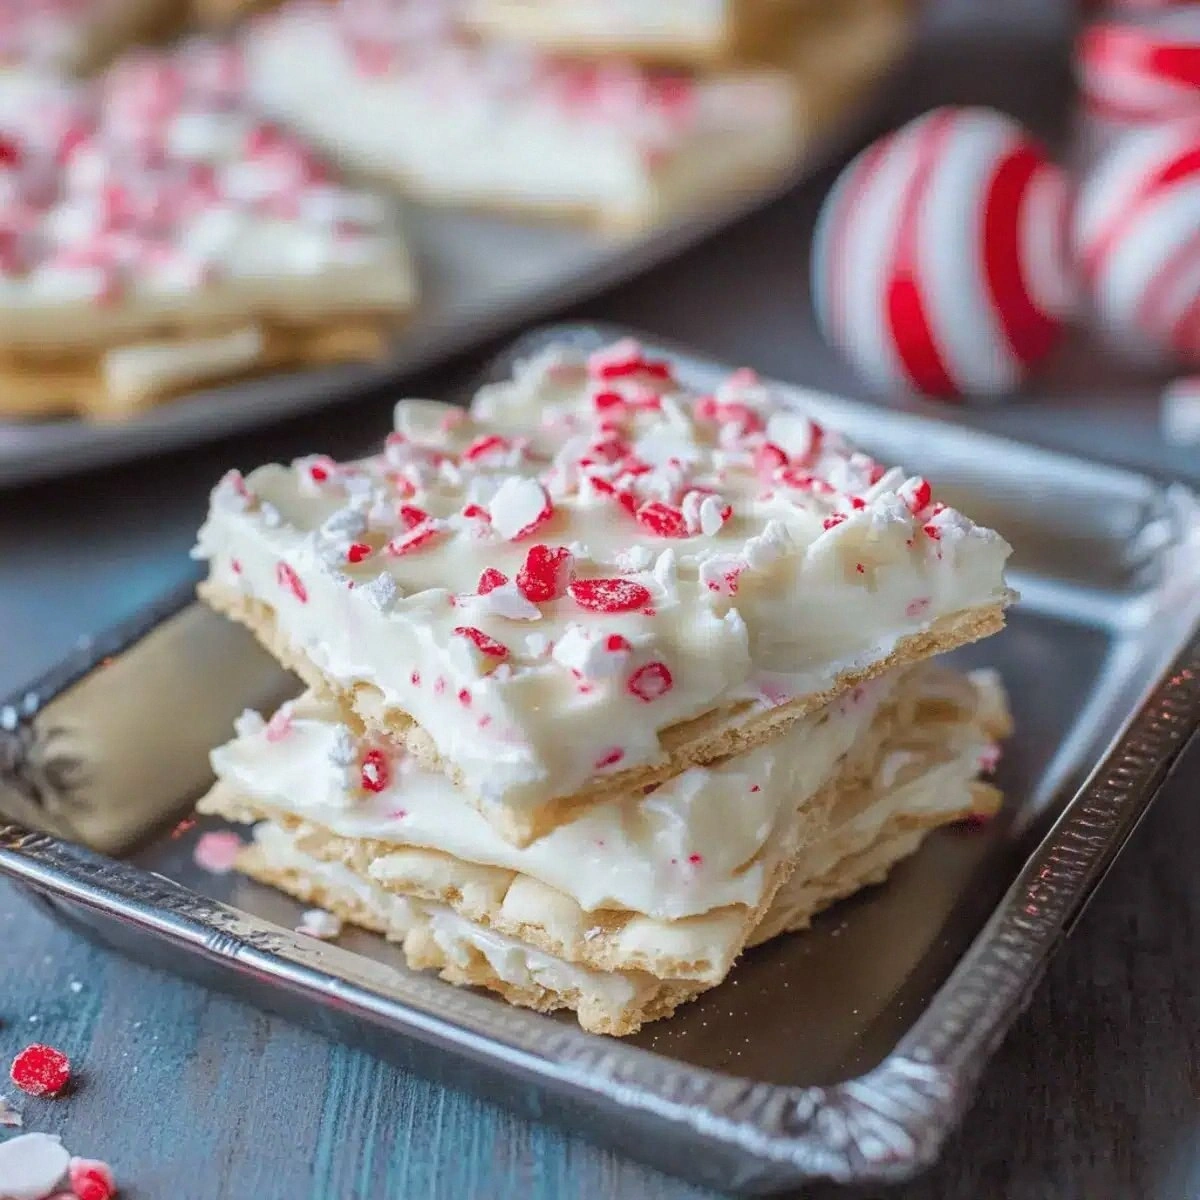
I was standing in my kitchen on a cold December night, the kind of night where the thermostat is set to “arctic blast” and the only thing keeping my fingers from turning blue is the promise of a sugary rescue. My roommate had just dared me to create a holiday snack that would make even the Grinch reconsider his life choices, and I was armed with nothing but a bag of butter crackers, a slab of white chocolate, and a jar of peppermint candies that looked like tiny, festive grenades. I tried a half‑baked version the night before, and let’s just say the result was a sad, soggy mess that tasted like melted snow on a sidewalk. I was determined not to repeat that disaster.
Picture this: the kitchen filled with the sweet, buttery aroma of melting white chocolate, a faint hint of coconut oil that whispers “tropical” while the peppermint candies crackle like tiny fireworks. The sound of the chocolate bubbling gently in the saucepan is a comforting hiss, and the glossy surface glistens like a winter sunrise. My hands felt the smooth, warm chocolate coating the buttery crackers, each piece snapping under my fingers like fresh ice on a lake. The moment I pressed the first peppermint shard onto the glossy sheet, it stuck with a satisfying “pop” that promised a burst of cool mint the instant it hits your tongue.
What makes this version the undisputed champion of peppermint bark? It’s not just the ingredients—it’s the method, the timing, the tiny hacks that turn a simple snack into a show‑stopping masterpiece. Most recipes get this completely wrong, either drowning the crackers in chocolate or skimping on the peppermint, leaving you with a soggy, one‑dimensional treat. I’ve cracked the code: a splash of coconut oil to give the chocolate a glossy, snap‑ready sheen, a precise melt‑and‑pour technique that keeps the crackers crisp, and a quick‑cool method that locks in that perfect peppermint crunch. I dare you to taste this and not go back for seconds.
Okay, ready for the game‑changer? I’m about to reveal a secret step that most bakers overlook: a brief, 30‑second “flash chill” in the freezer that sets the chocolate without freezing the peppermint, preserving that melt‑in‑your‑mouth magic. Trust me, this tiny pause is pure magic. Let me walk you through every single step — by the end, you’ll wonder how you ever made it any other way.
What Makes This Version Stand Out
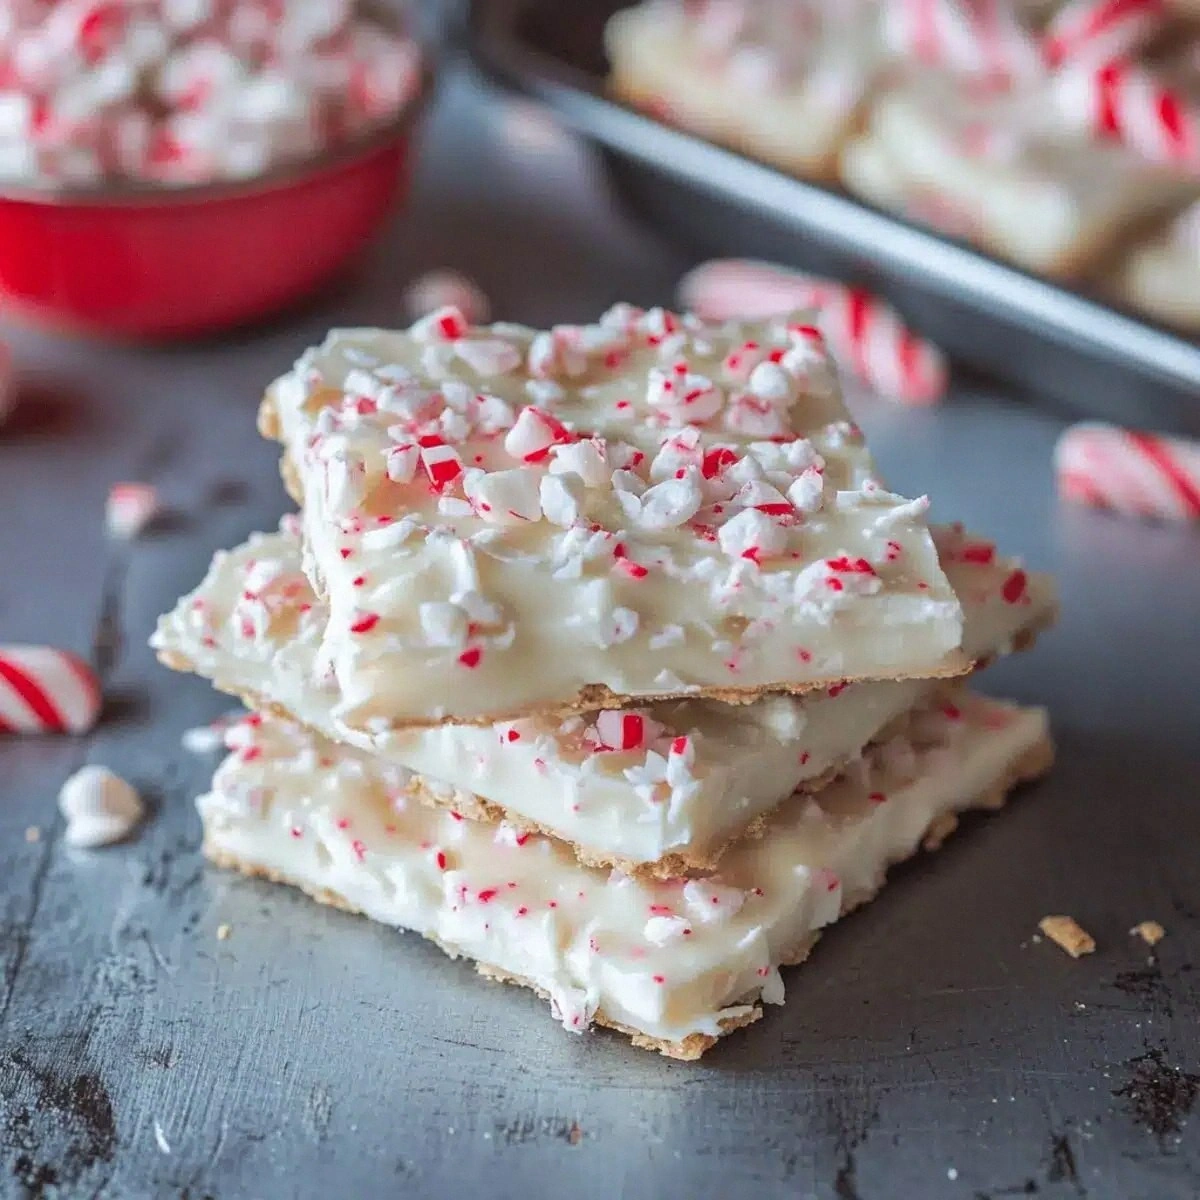
- Flavor Explosion: The combination of buttery crackers, silky white chocolate, and crisp peppermint creates a layered taste that dances on the palate like a holiday parade.
- Texture Triumph: Each bite delivers a triple‑textured experience—crunchy cracker, smooth melt, and a snap of peppermint that shatters like thin ice.
- Simplicity at Its Finest: Only four ingredients, yet the result feels like a gourmet confection crafted by a pastry chef.
- Unique Twist: The splash of coconut oil adds a glossy finish and a subtle tropical hint that elevates the classic bark.
- Crowd‑Pleaser: Even the pickiest eaters can’t resist the sweet‑mint combo; it’s the ultimate party‑tray star.
- Ingredient Quality: Using premium white chocolate and real butter crackers makes the difference between “okay” and “hands down the best version you’ll ever make at home.”
- Cooking Method: The flash‑chill technique locks in flavor and texture, preventing the dreaded soggy bottom.
- Make‑Ahead Magic: This bark stores beautifully, so you can prep it days ahead and still enjoy that fresh‑baked crunch.
Inside the Ingredient List
The Flavor Base
White chocolate is the silent hero of this bark. Its creamy, buttery profile acts as a perfect canvas for the peppermint, allowing the mint to shine without being overpowered. If you skimp on quality, the chocolate can taste waxy, and the whole bark suffers. Look for a brand that lists cocoa butter as the first ingredient; this ensures a smooth melt and a glossy finish. I recommend a couverture style white chocolate for that luxurious mouthfeel.
The Texture Crew
Butter crackers bring the essential crunch. Their delicate, buttery flavor pairs like a match made in confectionery heaven. If you substitute with a sturdier cracker, you’ll lose that melt‑in‑your‑mouth snap. For a gluten‑free version, try rice crackers that have a similar lightness, but be aware the flavor will shift slightly toward a neutral base.
The Unexpected Star
Soft peppermint candies might look like a garnish, but they are the burst of cool that makes this bark unforgettable. Their sugary coating prevents them from melting into the chocolate, preserving that satisfying pop. If you can’t find soft candies, use peppermint bark pieces, but break them into shards to mimic the texture. A quick tip: store them in the freezer for five minutes before using; this keeps them firm while you work.
The Final Flourish
A teaspoon of coconut oil does more than just add a hint of tropical aroma; it lowers the viscosity of the melted chocolate, allowing it to coat the crackers evenly without pooling. Skipping this step results in a thick, uneven layer that can cause the bark to crack when it cools. If you’re allergic to coconut, a neutral oil like grapeseed works just as well, though you’ll lose the subtle sheen.
Everything's prepped? Good. Let's get into the real action…
The Method — Step by Step
Start by lining a full‑size baking sheet with parchment paper; this prevents the bark from sticking and makes cleanup a breeze. I like to use a silicone baking mat for extra grip, but parchment works just fine. The sheet should be on a flat surface; any tilt will cause the chocolate to pool unevenly, ruining the crispness of the crackers.
Break the butter crackers into roughly uniform pieces—about 1‑inch squares. This size ensures each bite gets a good cracker‑to‑chocolate ratio. Place the pieces in a single layer on the prepared sheet, leaving a tiny gap between each so the chocolate can flow around them without clumping.
Melt the white chocolate using a double‑boiler method: fill a saucepan with a few inches of water, bring to a gentle simmer, and set a heat‑proof bowl on top. Add the chocolate in chunks, stirring constantly. Once it’s 90% melted, lower the heat and add the coconut oil, stirring until fully incorporated. The mixture should be smooth, glossy, and warm to the touch—about 115°F (46°C).
Pour the melted chocolate over the arranged crackers, using a spatula to spread it evenly. The chocolate should coat each piece just enough to cling without drowning them. Watch for the edges of the chocolate beginning to pull away from the parchment; that’s your cue that the coating is thick enough.
While the chocolate is still liquid, sprinkle the soft peppermint candies evenly across the surface. Press each candy lightly with the back of a spoon so it adheres without sinking too deep. The candies should sit on top, creating a glittering, mint‑infused constellation.
Here’s the moment of truth: slide the sheet into the freezer for exactly 30 seconds. This “flash chill” sets the chocolate fast enough to lock in the peppermint’s crispness but not so long that the candies become brittle. I’ve timed it with a kitchen timer; if you’re impatient, set a reminder on your phone.
Remove the bark from the freezer and let it sit at room temperature for two minutes. This short rest allows the chocolate to finish setting without developing condensation, which could make the bark soggy. Then, using a sharp pizza cutter or a clean bench knife, break the bark into generous squares—about 2‑inch pieces work best for serving.
Finally, arrange the pieces on a serving platter. The glossy white chocolate should catch the light, the butter crackers should peek through, and the peppermint shards should sparkle like tiny snowflakes. That sizzle when it hits the pan? Absolute perfection. Serve immediately or store as instructed below.
That's it — you did it. But hold on, I've got a few more tricks that'll take this to another level...
Insider Tricks for Flawless Results
The Temperature Rule Nobody Follows
Never let white chocolate exceed 120°F. Above this, the cocoa butter separates and you end up with a gritty, un‑shiny mess. Keep your thermometer in the bowl and stir constantly; the heat from the steam will keep it steady. A friend once tried to melt it over high heat and ended up with chocolate that looked like melted wax—trust me, that was a nightmare.
Why Your Nose Knows Best
Your sense of smell is a better indicator than a timer when the chocolate is ready. When it reaches a faint, buttery aroma and the edges start to glisten, you’re in the sweet spot. If you’re still unsure, dip a spoon; if the chocolate coats the spoon and slides off in a silky ribbon, you’ve nailed it.
The 5‑Minute Rest That Changes Everything
After the flash chill, let the bark rest for five minutes on the counter before cutting. This short pause lets the chocolate fully crystallize, resulting in a clean snap when you break it. Skipping this step leads to crumbly pieces that crumble like dry leaves.
Peppermint Placement Precision
Place the peppermint candies while the chocolate is still fluid but not too hot. If the chocolate is too hot, the candies will melt into the surface, losing that satisfying crunch. If it’s too cool, they’ll sit on top without adhering. Aim for that sweet spot where the candy gently sinks just enough to stick.
The Freezer Flip
If you’re making a large batch, flip the tray halfway through the 30‑second chill. This ensures an even set across the entire sheet, preventing one side from becoming too firm while the other stays soft.
Creative Twists and Variations
This recipe is a playground. Here are some of my favorite ways to switch things up:
Nutty Crunch
Swap half of the butter crackers for toasted almond slivers. The nutty aroma adds depth, and the extra crunch pairs beautifully with the mint. Ideal for guests who love a bit of sophistication.
Citrus Zing
Add a teaspoon of finely grated orange zest to the melted chocolate before pouring. The citrus lifts the sweetness and creates a bright contrast to the peppermint.
Dark Chocolate Duo
Create a half‑and‑half bark by pouring a layer of dark chocolate on one side of the sheet, letting it set slightly, then adding the white chocolate on the other side. The bitter‑sweet combo is a crowd‑pleaser for chocolate purists.
Spicy Peppermint
Mix a pinch of cayenne pepper into the white chocolate for a subtle heat that surprises the palate. The spice doesn’t overwhelm; it just adds a whisper of warmth under the cool mint.
Vegan Velvet
Replace the white chocolate with a high‑quality vegan white chocolate and swap coconut oil for refined avocado oil. The texture stays silky, and the bark remains completely plant‑based.
Holiday Red Velvet
Add a few drops of natural red food coloring to the melted chocolate and sprinkle crushed red candy canes over the top for a festive red‑and‑white swirl that looks like a holiday wreath.
Storing and Bringing It Back to Life
Fridge Storage
Place the bark in an airtight container and store it in the refrigerator for up to one week. The cool environment keeps the chocolate firm and the peppermint fresh. Before serving, let it sit at room temperature for 10 minutes so the chocolate softens just enough to bite easily.
Freezer Friendly
Wrap the bark tightly in parchment paper, then seal it in a freezer‑safe zip bag. It will stay perfect for up to three months. When you’re ready to enjoy, transfer it to the fridge for 30 minutes, then to the counter for another 10 minutes. This gradual thaw prevents condensation.
Best Reheating Method
If the bark has lost its snap, place the pieces on a microwave‑safe plate, add a tiny splash of water (about a teaspoon), and microwave on low for 5‑10 seconds. The steam revives the chocolate’s sheen and restores that satisfying snap.