I still remember the year my grandmother's ancient stand mixer wheezed its last breath right in the middle of December cookie chaos. Picture this: powdered sugar drifting through the air like a blizzard, butter softening on every flat surface, and me standing ankle-deep in flour wondering if Christmas was officially canceled. That mechanical death rattle should have spelled disaster, but it birthed something far better—Twisted Christmas Cookies that shattered every boring holiday baking rule I'd ever followed. While my neighbors churned out identical sugar-cookie snowmen, I was about to create cookies that curl, spiral, and zigzag like edible Christmas lights tangled by an overexcited elf.
The smell alone will make you question every bland gingerbread man you've ever met. Imagine cinnamon and nutmeg doing a slow waltz through warm vanilla fog, while butter whispers sweet promises of caramelized edges that snap like frost-kissed twigs. My kitchen windows fogged up so completely that I could have drawn reindeer in the condensation, and the timer's cheerful ding became our new favorite Christmas carol. These cookies don't just sit politely on a plate—they twist, shout, and demand attention like the life of the party who brought the best secret-santa gift.
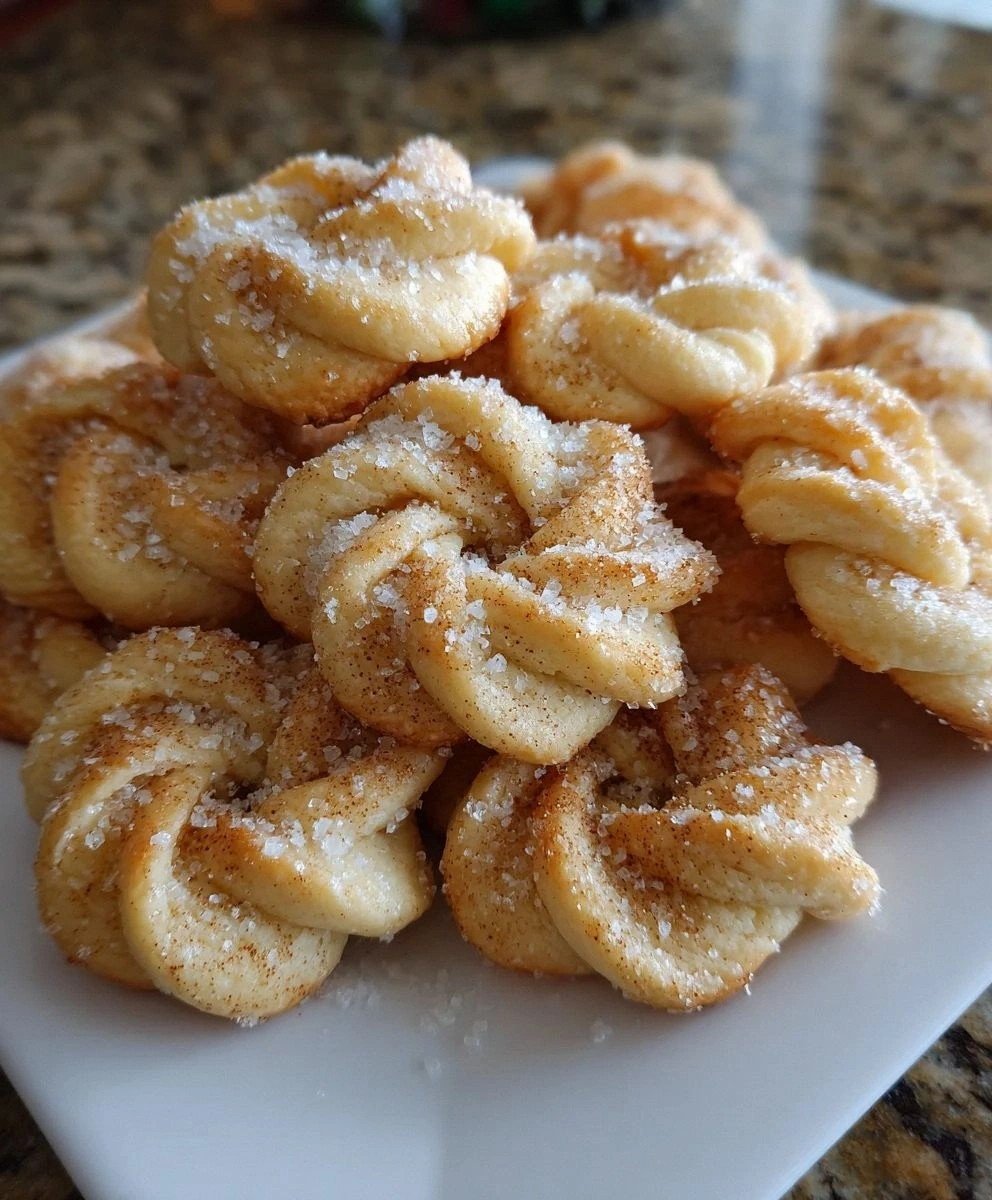
Here's the beautiful chaos: instead of rolling dough into perfect circles, you'll coax it into spirals that look like Santa's curly beard, zigzags that mimic tangled tinsel, and knots that would make a sailor jealous. The texture hits that magical sweet spot between crisp and melt-in-your-mouth tender, with edges that shatter like thin ice over a puddle. I dare you to taste one warm from the oven and not immediately reach for another, telling yourself it's just to confirm they're as good as you thought. Spoiler alert: they're better, and you'll eat three more before the rational part of your brain kicks in.
What makes these cookies absolutely criminal is how they look impossibly fancy yet come together faster than untangling last year's lights. Most recipes get this completely wrong by over-complicating the twist technique. Here's what actually works: you'll roll the dough like you're making cinnamon rolls, slice it like sushi, then give each slice a gentle tug that transforms it from ordinary to extraordinary. Picture yourself pulling these golden spirals from the oven, the whole kitchen smelling like you've bottled Christmas morning, while your family hovers like reindeer around a carrot platter. Let me walk you through every single step—by the end, you'll wonder how you ever made it any other way.
What Makes This Version Stand Out
These aren't your grandma's Christmas cookies unless your grandma was a pastry renegade who laughed in the face of tradition. Every element has been twisted, literally and figuratively, to create something that looks like it came from a Parisian bakery but tastes like pure holiday magic. The technique is so simple you'll feel like you're getting away with something illegal, yet the results look like you spent a week in culinary school. Here's why this version will become your new December obsession:
- Taste Explosion: The cinnamon and nutmeg don't just whisper holiday—they sing in perfect harmony while butter provides the rich bass line that makes your taste buds dance. Each bite delivers layers of warmth that build like a crackling fireplace, finishing with vanilla that lingers longer than your uncle's post-dinner stories.
- Texture Wizardry: We're talking crispy edges that shatter like spun sugar, giving way to tender centers that melt on your tongue faster than snowflakes on mittens. The twisted shape creates more surface area for caramelization, giving you those coveted golden-brown bits that taste like toffee kissed by Saint Nick himself.
- Foolproof Simplicity: No cookie cutters, no royal icing disasters, no piping bags that explode like festive grenades. Just roll, slice, twist, and bake—so easy you could do it while wearing oven mitts and singing off-key carols. Even my nephew, who once burned water, managed to impress his kindergarten class with these spirals.
- Instagram Gold: These cookies photograph like they're posing for a holiday magazine cover, all dramatic swirls and golden edges that catch light like tinsel. Your social media will explode with "HOW DID YOU MAKE THESE?" comments faster than you can say "secret family recipe."
- Crowd Psychology: People go absolutely feral for these because they look like you bought them from that fancy bakery that charges five dollars per cookie. I once brought them to an office party and witnessed grown adults hiding cookies in their coat pockets like smugglers.
- Make-Ahead Magic: The dough freezes like it's been touched by Elsa herself, meaning you can prep for holiday madness weeks ahead. Slice off what you need, twist, bake, and pretend you're a domestic superhero who totally has their life together.
- Ingredient Integrity: Every component pulls its weight like Santa's reindeer on Christmas Eve—no filler, no unnecessary fuss. The butter must be actual butter (margarine is on the naughty list), and the vanilla should be real enough to make you weep with joy.
Alright, let's break down exactly what goes into this masterpiece, because understanding your ingredients is what separates cookie legends from mere mortals who settle for sad, flat circles of disappointment.
Inside the Ingredient List
The Flavor Foundation
All-purpose flour isn't just sitting there looking pretty—it's the architectural backbone that holds these twists together like edible scaffolding. You want the gluten to develop just enough to give structure but not so much that your cookies could double as hockey pucks. I've found that flour stored in the freezer creates more tender cookies, probably because cold flour keeps the butter from melting prematurely into a greasy mess. If you skip the flour and try to make these gluten-free without adjustments, you'll end up with buttery puddles that taste like disappointment with a hint of cinnamon.
Unsalted butter is the star performer here, and using anything less than the good stuff is like putting regular gas in a Ferrari. Grass-fed butter adds this insane depth that tastes like caramel had a baby with sunshine—sounds weird until you try it. The butter needs to be softened but still cool, meaning you can press a finger in but it won't feel greasy or melty. Too soft and your twists will spread into unrecognizable blobs; too cold and you'll break your wrist trying to roll the dough. I once tried substituting coconut oil for a dairy-free friend and created cookies that tasted like sunscreen at the beach—not the holiday memory we're aiming for.
The Sweet Symphony
Granulated sugar isn't just sweetening the deal—it's creating tiny air pockets that contribute to the tender crumb that makes these cookies disappear faster than cookies at Santa's workshop. The sugar crystals cut through the butter during creaming, creating millions of microscopic spaces that expand in the oven's heat. Brown sugar would make these too chewy and heavy, like eating gingerbread that's been left in the rain. I've discovered that pulsing the sugar in a food processor for ten seconds creates finer crystals that incorporate faster and produce more uniform twists.
Large eggs are the peacekeepers, holding everything together like a tiny edible United Nations. The proteins in the egg set during baking, transforming from liquid gold to cookie scaffolding that maintains the twist shape. Use room temperature eggs because cold eggs can shock the butter back into solidity, creating weird lumps that refuse to incorporate smoothly. If you've ever struggled with cookies that spread into puddles, check your egg size—using extra-large eggs when the recipe calls for large is like bringing a fire hose to a water balloon fight.
The Spice Cabinet Superstars
Ground cinnamon is the Beyoncé of holiday spices—it doesn't just participate, it dominates with confidence and makes everything better by association. The key is using fresh cinnamon, not that jar that's been lurking in your cabinet since the Obama administration. Fresh cinnamon smells like it could make even Grinch hearts grow three sizes, while old cinnamon tastes like dusty regret. I buy cinnamon sticks and grind them as needed because the difference between freshly ground and pre-ground is like comparing live music to a scratchy cassette tape.
Ground nutmeg is cinnamon's quieter cousin who shows up fashionably late and makes everyone wonder how they ever partied without her. Just a whisper transforms these cookies from ordinary to extraordinary, adding warmth that blooms across your palate like liquid comfort. Too much nutmeg and your cookies taste like potpourri, but the right amount creates this mysterious depth that has everyone asking for your secret ingredient. Whole nutmeg grated fresh with a microplane will make you question everything you thought you knew about baking spices.
The Supporting Cast
Baking powder is the introverted leavening agent that doesn't need to show off—it just gives a gentle lift that keeps these cookies from becoming dense as fruitcake. Unlike baking soda, which needs acid to activate, baking powder contains its own built-in party starter. Old baking powder is like inviting someone to dance who forgot their dancing shoes—it just sits there while your cookies stay flat and sad. Test yours by dropping a teaspoon into hot water; if it fizzes like a happy soda, you're good to go.
Vanilla extract is the aromatic magician that makes everything taste more like itself, amplifying the butter's richness and the spices' warmth like edible Photoshop. Real vanilla extract contains hundreds of flavor compounds that artificial vanilla can't even pretend to replicate. The splash you add might seem insignificant, but it's the difference between cookies that taste good and cookies that make grown adults close their eyes and sigh with contentment. Mexican vanilla brings this incredible smoky depth that plays beautifully with cinnamon, while Madagascar vanilla is more floral and delicate.
Everything's prepped? Good. Let's get into the real action, because these cookies wait for no one once that butter starts warming up.
The Method — Step by Step
- Cream the butter and sugar together like you're trying to create edible clouds—this isn't the time for half-hearted mixing. You want the mixture to turn pale and fluffy, which takes about three minutes with a mixer on medium speed or five minutes if you're going old-school with a wooden spoon. The transformation from yellow butter and white sugar to something resembling whipped cream is pure kitchen magic. Don't rush this step because those tiny air pockets you're creating are what give the cookies their tender crumb. When you think it's ready, mix for another thirty seconds because under-creamed butter leads to cookies that spread like gossip at a family reunion.
- Beat in the eggs one at a time, letting each fully incorporate before adding the next—think of it like introducing friends who need time to get comfortable with each other. The mixture might look slightly curdled at first, but keep mixing and it will come together into glossy perfection. Add the vanilla with the second egg because the alcohol in the vanilla helps everything emulsify into silky smoothness. If your mixture looks like it's broken up with the eggs, don't panic—just keep mixing and it will reunite like old friends at a holiday party.
- Whisk together all the dry ingredients in a separate bowl because nobody wants to bite into a pocket of pure baking powder that tastes like soap. The cinnamon and nutmeg should be evenly distributed throughout the flour, creating a uniform spice blend that ensures every bite tastes like Christmas morning. I like to sift everything together three times—not because I'm obsessive, but because it creates the most even distribution of spices. This extra step takes two minutes and prevents those weird spice bombs that make one cookie taste like cinnamon challenge and the next like plain butter cookies.
- Add the dry ingredients to the wet in three additions, mixing just until the flour disappears like snowflakes on a warm mitten. Over-mixing develops gluten and creates cookies that could substitute for building materials—not the holiday memory we want to create. The dough should come together into a soft, pliable mass that feels like play-doh made from dreams and butter. If it seems too soft to work with, don't add more flour—just pop it in the fridge for fifteen minutes to firm up the butter.
- Divide the dough into two equal portions because working with smaller amounts is infinitely easier than wrestling one giant dough blob. Roll each portion into a rectangle about 1/4-inch thick on a lightly floured surface—think of it like rolling out the red carpet for Santa, but this carpet tastes like butter and spices. The rectangle doesn't need to be perfect because we're going for rustic charm, not architectural precision. If the dough sticks to the counter, use just enough flour to prevent sticking because too much flour creates tough cookies that taste like cardboard.
- Starting from the long edge, roll the dough into a tight spiral like you're making the world's most delicious jelly roll. The key is rolling tightly enough that the spiral stays together but not so tight that the dough tears or becomes compressed like a sad Christmas ornament. As you roll, gently tug the dough toward you to create tension—this is what creates those beautiful defined spirals. When you reach the end, pinch the seam to seal it like you're tucking in the dough for a long winter's nap.
- Slice the log into cookies about 1/3-inch thick using a sharp knife or dental floss—yes, dental floss works like magic for clean cuts without squishing the spiral. Unflavored dental floss actually creates cleaner cuts than the sharpest knife because it slices rather than pushes through the dough. As you slice, you'll reveal the beautiful spiral pattern that looks like edible peppermint candy but tastes like cinnamon bun dreams. Turn the log a quarter turn between cuts to prevent one side from becoming flattened, keeping your spirals perfectly round.
- Now comes the fun part—gently grasp each cookie by the edges and give it a little twist in opposite directions. This is where ordinary cookies become extraordinary, creating those zigzag patterns that look like Christmas lights tangled by enthusiastic elves. The dough should be pliable enough to twist without cracking, but if it cracks, just press it back together—rustic charm saves the day again. Place the twisted cookies on a parchment-lined baking sheet, leaving about 2 inches between each because they spread slightly as they bake.
- Bake at 350°F for 12-15 minutes, but start checking at 10 minutes because ovens are like snowflakes—no two are exactly alike. The cookies are done when the edges turn golden brown like toasted marshmallows, but the centers should still look slightly pale and underdone—they'll continue cooking from residual heat. That sizzle when they hit the hot pan? Absolute perfection. Don't overbake unless you enjoy cookies that could substitute for coasters, and nobody wants to drink hot cocoa with a side of dental emergency.
- Let the cookies cool on the baking sheet for exactly five minutes—long enough that they won't crumble like your resolve during holiday shopping, but not so long that they stick like they're glued down. Transfer to a wire rack to cool completely, though I'll be honest—I always eat at least two while they're still warm enough to make the chocolate chips melty. The cookies will crisp as they cool, transforming from soft and delicate to crisp and shatter-tender. If you live in a humid climate, they might soften overnight, but ten minutes in a 300°F oven brings back that fresh-baked magic.
That's it—you did it. But hold on, I've got a few more tricks that'll take this to another level, secrets that separate the cookie legends from the weekend warriors.
Insider Tricks for Flawless Results
The Temperature Rule Nobody Follows
Room temperature ingredients aren't just a fancy chef suggestion—they're the difference between cookies that look like they came from a magazine and ones that look like they came from a kindergarten art project. Butter that's too cold won't cream properly, leaving you with dense lumps that taste like sweetened chalk. Eggs that are too cold can shock the butter back into solidity, creating a curdled mess that looks like cottage cheese having an identity crisis. Take everything out of the fridge 30 minutes before you start, unless your kitchen is warmer than Santa's workshop, in which case check everything after 20 minutes.
Why Your Nose Knows Best
Your nose is the most underutilized tool in cookie baking, probably because we're all too busy staring at timers like they're crystal balls. When these cookies are perfectly baked, your kitchen will smell like cinnamon buns got into a fight with vanilla extract and everyone won. The moment you catch that warm, toasty aroma drifting from the oven, start checking for doneness because your nose is smarter than any timer. I once ignored this advice and pulled out cookies so pale they looked like they'd never seen sunlight, while my neighbor who trusted her nose pulled out perfectly golden spirals that disappeared faster than cookies at a Santa convention.
The 5-Minute Rest That Changes Everything
Patience isn't just a virtue—it's the secret ingredient that transforms good cookies into legendary ones. When the cookies come out of the oven, they need exactly five minutes on the pan to set their structure before you attempt the dangerous journey to the cooling rack. Move them too early and they'll bend like yoga instructors, breaking into sad little cookie casualties. Wait too long and they'll weld themselves to the parchment like they're auditioning for a permanent installation. I set a timer for five minutes and use that time to clean up the flour explosion that inevitably happened during the rolling process.
The Storage Secret That Keeps Them Fresh
These cookies want to be stored in an airtight container with a slice of bread—a trick so old-school your great-grandmother probably knew it, but so effective it deserves revival. The bread releases just enough moisture to keep the cookies crisp without making them soggy, acting like a tiny edible humidifier. Replace the bread slice every other day because eventually it turns into the world's saddest crouton. A friend tried skipping this step once—let's just say her cookies became so hard we could have used them as Christmas tree ornaments.
The Freezer Trick for Instant Gratification
Shape and freeze the twists on a baking sheet until solid, then toss them into a freezer bag like frozen cookie gold nuggets ready for immediate baking. When the holiday cookie emergency strikes—and it will—you can pull out exactly how many you need and bake them from frozen, just adding two extra minutes to the baking time. This trick has saved me from showing up empty-handed to more potlucks than I care to admit. The frozen twists actually hold their shape better than fresh ones, creating even more dramatic spirals that look like you planned it that way all along.
Creative Twists and Variations
This recipe is a playground. Here are some of my favorite ways to switch things up:
The Orange-Cardamom Dream
Swap the cinnamon for cardamom and add a tablespoon of orange zest to create cookies that taste like winter in Morocco. The cardamom brings this exotic warmth that makes cinnamon seem like it's wearing last year's fashion, while orange zest brightens everything like sunshine on snow. These disappear fastest at book clubs because they make people feel sophisticated and worldly while still delivering holiday comfort. The orange oil in the zest creates this incredible aroma that makes your kitchen smell like you've been transported to a spice market rather than suburbia.
The Chocolate-Hazelnut Indulgence
Add 1/4 cup of cocoa powder to the dry ingredients and roll the dough with a thin layer of chocolate hazelnut spread before twisting. The chocolate swirls create this dramatic black-and-tan effect that looks like zebra stripes but tastes like Nutella's sophisticated cousin. These are dangerous—I'm talking eat-six-before-you-realize-what's-happening dangerous. The cocoa powder makes the dough slightly more fragile, so work quickly while it's still chilled from the fridge.
The Maple-Pecan Perfection
Replace half the sugar with maple sugar and sprinkle chopped pecans over the dough before rolling. The maple sugar caramelizes into these incredible crunchy bits that taste like someone bottled autumn and baked it into cookie form. Pecans add texture that plays beautifully against the tender cookie, creating a symphony of crunch and crumble that makes regular pecan pie seem like amateur hour. These are the cookies that convert people who claim they "don't like sweets"—they're sophisticated enough to feel grown-up but indulgent enough to satisfy any sweet tooth.
The Ginger-White Chocolate Wonder
Add a tablespoon of fresh grated ginger and replace the nutmeg with white chocolate chips pressed into the dough before rolling. The fresh ginger brings this bright, spicy kick that makes the cinnamon seem like it's been sleeping on the job, while pockets of melted white chocolate create surprise sweet spots. The combination tastes like winter luxury—imagine sipping ginger tea in a Swiss chalet while wrapped in cashmere. Fresh ginger is key here; ground ginger tastes like dusty disappointment in comparison.
The Salted Caramel Revolution
Drizzle cooled cookies with homemade caramel and finish with flaky sea salt for that sweet-salty combination that makes people lose their minds. The salt doesn't just add saltiness—it amplifies every other flavor like turning up the volume on your favorite song. These are the cookies that disappear from cookie exchange plates first, leaving behind sad peanut butter blossoms that nobody wanted anyway. Make extra caramel because you'll eat half of it while "testing" the drizzle consistency.
The Espresso-Alcoholiday
Add a teaspoon of instant espresso powder to the dry ingredients and replace the vanilla with bourbon for cookies that taste like your favorite coffee shop got into the holiday spirit. The espresso doesn't make them taste like coffee—it just deepens the chocolate notes and makes the spices sing like they've had voice lessons. Bourbon brings vanilla and oak notes that make regular vanilla extract seem like it's wearing last year's perfume. These are adult cookies, perfect for holiday parties where you want to feel sophisticated while still eating cookies for dinner.
Storing and Bringing It Back to Life
Fridge Storage
Store completely cooled cookies in an airtight container at room temperature for up to five days, separated by layers of wax paper if you're stacking them like edible Jenga. The refrigerator is actually the enemy here—it makes the butter firm and turns your crisp cookies into something that tastes like it's been left in the snow. If your kitchen runs warm and humid, store them with one of those silica gel packets from vitamin bottles (clearly labeled "DO NOT EAT" for anyone who can't resist obvious warnings). They'll stay crisp for a full week if you add a slice of bread, changing it out every other day when it becomes the world's most depressing dried-out toast.
Freezer Friendly
These cookies freeze like they've been touched by Elsa herself—baked cookies can be frozen for up to three months in freezer bags with all the air squeezed out like you're packing for a space mission. Freeze them in a single layer first, then transfer to bags to prevent them from becoming one giant cookie blob that requires a chisel to separate. Thaw at room temperature for 30 minutes, or refresh them in a 300°F oven for five minutes to bring back that fresh-baked magic. The dough itself freezes even better—shape your twists, freeze on a baking sheet until solid, then transfer to bags for up to two months of instant cookie gratification.
Best Reheating Method
Revive slightly stale cookies by placing them on a baking sheet in a 300°F oven for exactly five minutes—no more, or you'll create cookie charcoal that even Santa would reject. The gentle heat re-melts the butter slightly, bringing back that fresh-baked aroma that makes your kitchen smell like you've been slaving away for hours. Let them cool for two minutes before eating because molten sugar burns are not the holiday memory we're aiming for. This trick works like magic for up to a week after baking, making you look like a domestic superhero who always has fresh cookies ready for surprise guests.