I was standing in my kitchen, half‑asleep, scrolling through a thousand Instagram posts of cinnamon rolls that looked like they were made by angels. My roommate had just dared me to make something that would “melt in your mouth and still be bite‑size enough to pop into a coffee cup.” I laughed, grabbed a bag of graham crackers, and thought, what if I could combine the buttery, caramel‑kissed swirl of a cinnamon roll with the creamy decadence of a cheesecake? The result? Melt In Your Mouth Mini Cinnamon Roll Cheesecakes – a dessert that makes you question every other bake you’ve ever attempted. I’m not exaggerating when I say this is hands down the best version you’ll ever make at home.
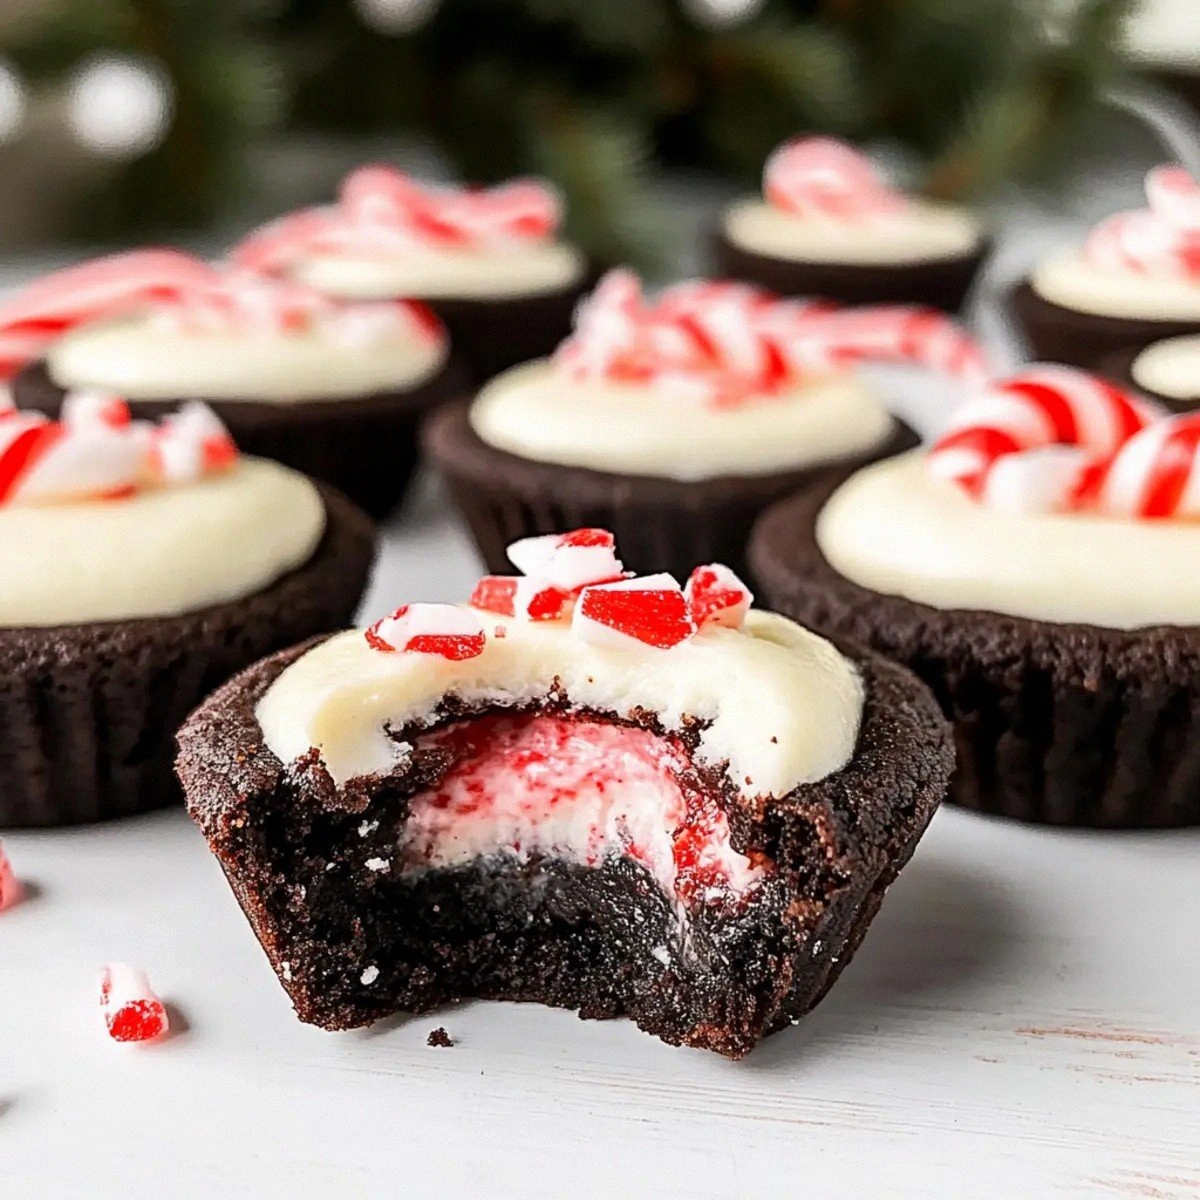
Picture this: the oven door swings open, a warm wave of cinnamon and toasted butter rushes out, and the tiny cheesecakes sit on the tray like golden moons. The scent alone could convince a marathon runner to ditch their post‑run protein shake for a second serving. When you bite in, the crust cracks with a whisper, the cheesecake interior oozes silk‑smooth, and a caramel‑cinnamon glaze drapes over it like a glossy satin shawl. It’s the kind of sensory overload that makes you gasp, “I dare you to taste this and not go back for seconds!”
Most recipes try to shoe‑horn a cinnamon roll into a cheesecake by slapping a swirl of spice on top, but they miss the crucial balance of texture and flavor. Here’s the secret: a buttery graham‑cracker crust that gives a subtle crunch, a cheesecake layer that’s dense yet airy, and a topping that’s a buttery‑brown‑sugar‑cinnamon glaze that caramelizes just enough to create that irresistible snap. The result is a bite that feels like a warm hug from a bakery, but in a perfectly portable, mini form. I’ll be honest — I ate half the batch before anyone else got to try it, and I have no regrets.
You might be wondering what the “game‑changer” is. Spoiler: it’s the double‑cinnamon butter glaze that you brush on after the cheesecakes have set. Most bakers forget to bake the glaze, leaving it soggy; we bake it until it’s glossy and just a touch crisp on the edges. This tiny step turns a good dessert into an unforgettable one. Okay, ready for the game‑changer? Let me walk you through every single step — by the end, you’ll wonder how you ever made it any other way.
What Makes This Version Stand Out
- Texture: A crisp graham‑cracker base meets a velvety cheesecake center, topped with a caramelized cinnamon glaze that snaps like thin ice.
- Flavor Depth: Two layers of cinnamon‑butter butter ensure that every bite is layered with warm spice, sweet caramel, and a hint of buttery richness.
- Simplicity: Despite the gourmet feel, the ingredient list is short, and the steps are straightforward enough for a weekend rookie.
- Portability: Mini‑size means you can serve them at brunch, dinner parties, or even as a sweet office treat without the mess of a full‑sized cake.
- Make‑Ahead Magic: They keep beautifully in the fridge for up to three days, and the glaze even improves after a night of resting.
- Crowd Reaction: Guests often claim they’ve never tasted anything quite like it, and the “I want the recipe!” chorus starts before the last bite.
- Ingredient Quality: Using real butter, good‑quality cream cheese, and fresh cinnamon makes the difference between “nice” and “mind‑blowing.”
- Cooking Method: Baking in a water bath (or “bain‑marie”) guarantees a smooth, crack‑free top that’s the hallmark of a professional cheesecake.
Inside the Ingredient List
The Flavor Base
The first hero is the graham cracker crumbs. At 1.5 cups, they provide a buttery, slightly sweet foundation that mimics the dough of a classic cinnamon roll. If you skip them, you lose that subtle crunch that contrasts the silky cheesecake. Want a gluten‑free version? Swap with finely crushed gluten‑free oat biscuits; the texture remains, and the flavor stays on point.
The Texture Crew
Unsalted butter, melted (0.5 cups) binds the crumbs together, creating a cohesive crust that holds its shape when you pop the mini cakes out of the tin. The butter’s richness also carries the brown sugar and cinnamon, ensuring every bite starts with a caramelized kiss. If you’re watching calories, you can reduce to 0.35 cups, but expect a slightly less buttery crunch.
Brown sugar (0.25 cups for the crust and another 0.5 cups for the glaze) is the sweet glue that caramelizes during baking, delivering that deep molasses undertone. Using light brown sugar will give a milder flavor, while dark brown sugar amps up the richness. Skipping it entirely will leave the crust flat and flavorless.
The Unexpected Star
Cream cheese (16 oz) is the soul of the cheesecake layer. Its high fat content creates that melt‑in‑your‑mouth texture. Choose a full‑fat block; low‑fat versions turn grainy and lose that luxurious mouthfeel. If you can, let the cheese sit out for 30 minutes before mixing – it softens faster and blends without lumps.
Sour cream (0.25 cups) adds a subtle tang that cuts through the sweetness, balancing the overall flavor profile. It also contributes to a smoother batter, preventing cracks. Plain yogurt works as a swap, but make sure it’s full‑fat and unsweetened.
The Final Flourish
The glaze is a double‑dose of unsalted butter (2 Tbsp softened), brown sugar (0.5 cups), and ground cinnamon (1 tsp). This trio is brushed over the set cheesecakes and baked again, forming a glossy caramel crust. If you love a deeper caramel flavor, add a pinch of sea salt to the glaze – it creates a sweet‑salty contrast that’s pure magic.
Lastly, granulated sugar (0.5 cups) and vanilla extract (1 tsp) sweeten and aromatize the cheesecake batter. The vanilla isn’t just a background note; it amplifies the cinnamon’s warmth and rounds out the overall flavor. Skipping vanilla is a mistake you’ll regret when the final bite feels flat.
Everything's prepped? Good. Let's get into the real action...

The Method — Step by Step
-
Preheat your oven to 325°F (163°C). While the oven warms, line a 12‑cup muffin tin with paper liners or grease each cup lightly with butter. This is the moment of truth: a properly heated oven ensures the crust sets quickly, preventing sogginess.
Kitchen Hack: Place the muffin tin on a baking sheet; this makes it easier to transfer in and out of the oven without spilling the delicate batter. -
In a large bowl, combine 1.5 cups graham‑cracker crumbs, 0.5 cups melted butter, 0.25 cups brown sugar, and 1 tsp ground cinnamon. Mix until the crumbs are uniformly coated and the mixture resembles wet sand. Press about a tablespoon of this mixture into each muffin cup, packing it firmly with the back of a spoon.
Bake the crusts for 8‑10 minutes, just until they turn a light golden hue. You’ll hear a faint sizzle as the butter hits the crumbs – that’s the sound of flavor building.
Watch Out: Do not over‑bake the crust; it will become too hard and crack when you remove the cheesecakes later. -
While the crust cools, lower the oven temperature to 300°F (149°C) and prepare a water bath. Fill a larger roasting pan with hot water about halfway up the sides of the muffin tin. This bain‑marie will keep the cheesecake batter moist and prevent a cracked top.
In a stand mixer fitted with the paddle attachment, beat the softened 16 oz cream cheese on medium speed until smooth, about 2 minutes. Scrape down the sides to ensure no lumps remain.
-
Add 0.5 cups granulated sugar and 1 tsp vanilla extract to the cream cheese, beating until fully incorporated. Then add 2 large eggs, one at a time, mixing on low speed after each addition. The batter should be thick but pourable; if it looks too thick, add a tablespoon of sour cream.
Stir in 0.25 cups sour cream (or plain yogurt) and 2 Tbsp softened butter until the mixture is glossy and uniform. This is the secret to that silk‑smooth texture you crave.
Kitchen Hack: Warm the eggs slightly (about 80°F) before adding them; this prevents the batter from curdling and keeps the texture silky. -
Gently spoon the cheesecake batter over each pre‑baked crust, filling each cup about three‑quarters full. The batter should sit level with the rim; any excess will rise during baking and form a beautiful dome.
Place the muffin tin inside the prepared water bath and bake for 25‑30 minutes. The edges should be set while the center still has a slight wobble – this is exactly what you want for a creamy center.
-
Turn off the oven, crack the door open a few inches, and let the cheesecakes cool in the oven for 1 hour. This gradual cooling prevents the dreaded cracks on the surface.
After the hour, remove the tin and let the mini cheesecakes come to room temperature before refrigerating for at least 2 hours (or overnight for best results).
-
While the cheesecakes chill, prepare the cinnamon‑butter glaze. In a small saucepan, melt 2 Tbsp softened butter over low heat. Stir in 0.5 cups brown sugar and 1 tsp ground cinnamon until the mixture bubbles and thickens, about 3‑4 minutes.
Remove from heat and let it cool just enough so it’s thick but still pourable.
-
Once the cheesecakes are fully set, brush a generous layer of the glaze over each mini cake. Return the tin to the oven (still at 300°F) for an additional 5‑7 minutes, just until the glaze turns a deep amber and starts to caramelize.
That sizzle when it hits the pan? Absolute perfection. Let them cool for 5 minutes before removing from the tin.
-
Transfer each mini cheesecake to a serving plate or keep them in the liners for that cute, bite‑size presentation. Dust lightly with a pinch of extra cinnamon if you like a little extra spice on top.
That’s it — you did it. But hold on, I’ve got a few more tricks that’ll take this to another level...
Insider Tricks for Flawless Results
The Temperature Rule Nobody Follows
Never bake a cheesecake at a scorching 350°F unless you’re using a water bath. The lower temperature (300°F) ensures the batter sets evenly without forming a dry outer shell. I once tried 350°F and ended up with a cracked, rubbery top – a lesson learned the hard way.
Why Your Nose Knows Best
When the glaze turns a deep amber and you can smell caramelizing sugar, that’s your cue to pull it out. Trust the aroma more than the clock; ovens vary, and the scent is a reliable indicator of perfection.
The 5‑Minute Rest That Changes Everything
After the final bake, let the mini cheesecakes sit in the oven with the door ajar for 5 minutes. This tiny rest lets the internal temperature even out, preventing a sudden temperature shock when you move them to the fridge.
Butter Temperature is Everything
For both crust and glaze, use butter that’s just softened, not melted, when mixing. Softened butter emulsifies better with sugar, giving you a smoother crust and a glossy glaze. Melted butter can make the crust too greasy and the glaze overly runny.
The “Chill‑Then‑Serve” Trick
If you’re serving these at a party, keep them in the fridge until the last minute, then let them sit at room temperature for 10 minutes before plating. This brings the flavors to the forefront without losing the structural integrity.
Creative Twists and Variations
This recipe is a playground. Here are some of my favorite ways to switch things up:
Apple Cinnamon Swirl
Fold in ½ cup finely diced sautéed apples into the cheesecake batter and increase cinnamon to 1½ tsp. The apple pieces add a juicy burst that pairs perfectly with the caramel glaze. Ideal for autumn gatherings.
Maple Pecan Delight
Replace half the brown sugar in the glaze with pure maple syrup and stir in ¼ cup toasted chopped pecans. The nutty crunch and maple’s earthy sweetness create a sophisticated flavor profile that’s perfect for brunch.
Chocolate Hazelnut Dream
Add 2 Tbsp cocoa powder to the cheesecake batter and swap the graham‑cracker crust for a chocolate cookie crumble. Top with a hazelnut‑infused glaze (hazelnut spread mixed with butter and a pinch of salt). This turns the dessert into a decadent chocolate‑cinnamon hybrid.
Pumpkin Spice Surprise
Incorporate ¼ cup pumpkin puree into the cheesecake batter and add a pinch of nutmeg, cloves, and ginger alongside the cinnamon. The result is a subtle pumpkin flavor that doesn’t overwhelm the cinnamon roll vibe – perfect for a fall twist.
Lemon‑Blueberry Burst
Swap the cinnamon glaze for a lemon‑blueberry compote: simmer fresh blueberries with lemon zest, a splash of lemon juice, and a touch of sugar until thick. Spoon over the cooled cheesecakes for a bright, tangy finish that cuts through the richness.
Storing and Bringing It Back to Life
Fridge Storage
Place the mini cheesecakes in an airtight container and store them in the refrigerator for up to 3 days. The glaze may firm up a bit, but a quick 5‑minute sit at room temperature revives its glossy sheen.
Freezer Friendly
Wrap each cheesecake individually in plastic wrap, then place them in a freezer‑safe zip‑top bag. They’ll keep for up to 2 months. When ready to serve, thaw overnight in the fridge and let them sit at room temperature for 10 minutes before glazing.
Best Reheating Method
To restore that fresh‑out‑of‑the‑oven caramel snap, preheat your oven to 300°F, place the cheesecakes on a parchment‑lined tray, and add a tiny splash (about 1 tbsp) of water to the tray’s edge. Cover loosely with foil and heat for 5‑7 minutes. The steam gently revives the interior while the glaze re‑crispes.