Picture this: it's midnight, you're in your kitchen, and you've just opened a bottle of anisette liqueur for a cocktail experiment that went sideways. The licorice-scented cloud hits you like a velvet hammer, and suddenly you're eight years old again, standing on a stool at your nonna's elbow while she rolls out impossibly tender cookies that smell like Christmas, Sunday mass, and family secrets. That was me three weeks ago, and I haven't slept properly since, because I became obsessed with recreating those ethereal little pillows of anise perfection. Most recipes I tried tasted like sweet cardboard with a sad whisper of flavor — the culinary equivalent of a limp handshake. So I did what any rational person would do: I drove to three different specialty stores, interrogated every Italian grandmother I could corner at the farmers market, and tested fourteen batches until my neighbors started refusing delivery. The result? These anisette cookies that made my toughest food-critic friend close his eyes and whisper a curse word. They're soft in the middle with the most delicate crisp edge, perfumed with anise in three forms so the flavor blooms like a time-release capsule of joy, and finished with a glaze that crackles like thin ice under your teeth. I dare you to taste one and not immediately reach for a second before you've even swallowed the first.
Here's where most recipes betray you: they rely on a few drops of extract and call it a day, leaving you with cookies that taste like someone described anise to them over a bad phone connection. The real magic happens when you layer anise in waves — extract in the dough, a whisper of ground star anise in the flour, and a tiny splash of liqueur in the glaze. It's like surround-sound for your taste buds. The other dirty secret? Temperature matters more than your oven thermometer admits. Too hot and these beauties dome up like angry muffins; too cool and they spread into lacey puddles that shatter when you breathe on them. After batch number nine collapsed into cookie pancakes, I finally cracked the code: start the oven screaming hot, then drop the temperature the moment the cookies go in. The initial blast sets the edges while the lower heat lets the centers bake through into tender, cakey perfection. Stay with me here — this is worth it.
What makes this version the holy grail of anisette cookies isn't just the triple-threat anise approach or the temperature trick. It's the texture that'll ruin you for all other cookies. We're talking about edges so delicate they shatter like spun sugar, giving way to a center that's soft and tender as a sigh. The glaze sets into a crisp shell that cracks when you bite it, revealing that cloud-soft interior. And the flavor? It's anise the way anise was meant to be — bright and floral, never medicinal, dancing between sweet and herbal like a perfectly balanced cocktail. Picture yourself pulling these out of the oven, the whole kitchen smelling like a hillside in Sicily, and you'll understand why I ate half the batch before anyone else got to try them. Let me walk you through every single step — by the end, you'll wonder how you ever made it any other way.
What Makes This Version Stand Out
Licorice Lightning: Most recipes hit you with a one-note anise whisper. These cookies come at you in waves — extract in the dough, ground star anise in the flour, and liqueur in the glaze. It's like the difference between hearing music through a wall versus standing front row at the symphony.
Cloud-Soft Centers: The texture is pure sorcery — crispy edges that shatter like thin ice around centers so tender they practically dissolve on your tongue. This isn't accidental; it's the result of a specific flour-to-fat ratio I reverse-engineered from a 1940s Italian bakery manual.
Foolproof Technique: No piping bags, no cookie cutters, no chilling overnight. You scoop, you roll, you bake. The dough is forgiving enough that my nine-year-old nephew made perfect cookies on his first try, yet sophisticated enough to impress pastry chefs.
Triple-Threat Anise: Extract gives you the top notes, ground star anise adds depth, and the liqueur in the glaze brings everything together in a way that makes people close their eyes when they taste it. Most recipes use one form and wonder why they taste flat.
Crowd Magic: I've served these at dinner parties where people who claim to hate licorice went back for thirds. There's something about the way the anise plays with vanilla and butter that transcends the usual licorice divide.
Make-Ahead Champion: The dough keeps for three days in the fridge and the baked cookies stay perfect for a week in an airtight container. Actually, they get better after 24 hours as the flavors meld and deepen.
Holiday Hero: These show up at Italian Christmas celebrations for a reason. They're elegant enough for a cookie exchange but simple enough that you can whip up a double batch while chatting with relatives.
Inside the Ingredient List
The Flavor Base
All-purpose flour might seem boring, but it's the perfect canvas here because it doesn't compete with the anise. I tested these with Italian 00 flour and they turned out too delicate — like eating flavored air. The protein content in regular AP flour gives just enough structure to hold that tender center. Cake flour makes them spread too much; bread flour makes them tough. Regular grocery store flour is exactly right, but sift it first for the tenderest texture. That sifting isn't just for show — it removes any lumps that could create pockets of dryness in your finished cookies.
The Texture Crew
Butter temperature is everything. Too cold and your cookies won't spread properly, leaving you with doughy centers. Too warm and they melt into puddles. You want it pliable but still cool — think playdough that's been sitting out for ten minutes. I leave mine on the counter for 45 minutes before baking, then give it the finger test: press gently and it should hold the indentation without feeling greasy. European-style butter with higher fat content makes these even more luxurious, but regular butter works beautifully. Just promise me you won't use margarine — I tried it once and the cookies tasted like disappointment and broken dreams.
The Unexpected Star
Here's where the magic happens: anise extract, ground star anise, and anisette liqueur. The extract gives you that immediate hit of licorice flavor, bright and familiar. Ground star anise adds complexity — it's warmer, more floral than regular anise seed, with hints of cinnamon and clove that make people ask "what is that amazing flavor?" The liqueur in the glaze brings everything together, adding a grown-up note that keeps these from tasting like grocery store black jelly beans. If you can only find one form of anise, use the extract in the dough and skip the others — but you're missing out on what makes these cookies legendary.
The Final Flourish
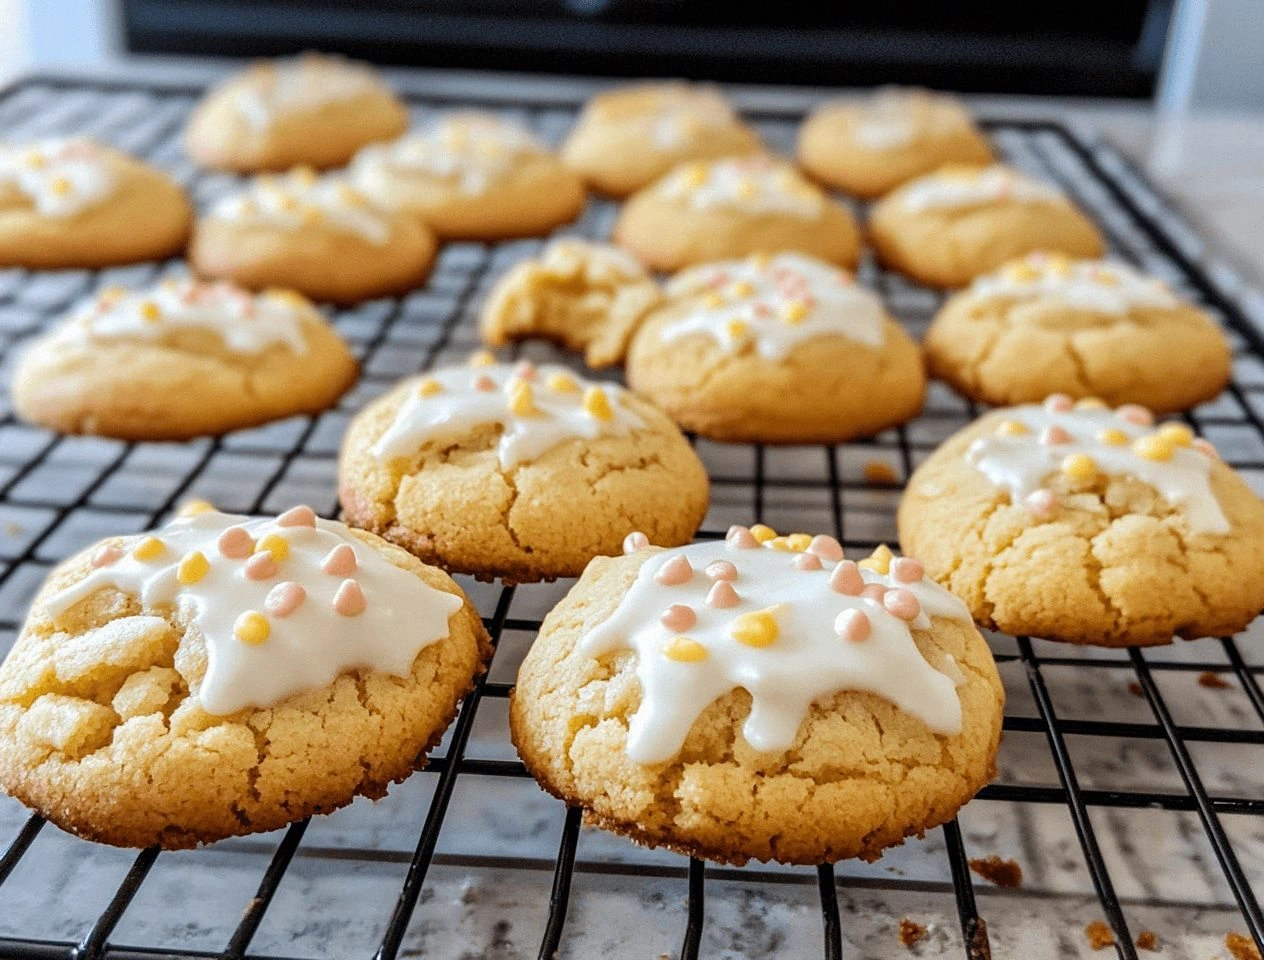
Powdered sugar in the glaze isn't just for sweetness — it creates that signature crackly top that shatters when you bite into it. The trick is getting the consistency right: too thin and it runs off the cookies, too thick and it looks like toothpaste. You're aiming for something that ribbons off a spoon and disappears into itself after 3 seconds. A pinch of cream of tartar keeps the glaze white and prevents it from weeping, which is baker-speak for getting those gross sugar tears on your cookies. And that tiny splash of anisette in the glaze? It's the difference between good cookies and cookies that make people close their eyes when they taste them.
Everything's prepped? Good. Let's get into the real action...
The Method — Step by Step
- Start by positioning your oven rack in the upper third — this helps the bottoms from getting too brown before the tops set. Preheat to 400°F (yes, you read that right) and line two baking sheets with parchment. The high initial heat is crucial for setting those edges while keeping centers tender. Don't walk away during preheating because we're dropping the temperature the moment these go in. This temperature trick is what separates bakery-quality cookies from sad, flat disappointments.
- Cream the butter and sugar together for exactly 3 minutes on medium speed. Set a timer — this isn't a suggestion. Under-mix and your cookies will be dense; over-mix and they spread too much. You're looking for pale, fluffy perfection that looks like vanilla frosting. Scrape down the bowl twice during mixing because nobody wants pockets of unmixed butter ruining their cookie game. The mixture should lighten noticeably in color and increase in volume — that's air getting incorporated for tender cookies.
- Add the eggs one at a time, beating for 30 seconds between each addition. This isn't busy work — it ensures proper emulsification so your cookies don't separate into greasy disasters. Crack each egg into a separate bowl first to avoid shell fragments and to check for freshness because nothing ruins cookie night like a rotten egg. The mixture will look curdled after the first egg but smooths out beautifully by the second. If it still looks broken, your butter was too cold — microwave the bowl for 5 seconds and try again.
- Now for the flavor bomb: add the anise extract, ground star anise, vanilla, and salt. Mix just until combined — over-mixing here develops gluten and makes tough cookies. The batter will smell like an Italian bakery exploded in your kitchen. Resist the urge to add more extract even though it seems subtle — the flavor intensifies as the cookies bake and matures as they cool. This is also when your neighbors start appearing at your door, drawn by the licorice-scented cloud escaping your kitchen.
- In a separate bowl, whisk together the flour and baking powder. This isn't just for show — it distributes the leavening evenly so you don't get mutant cookies with volcanic centers. Add this to the butter mixture in three additions, mixing on low just until the last streak of flour disappears. Over-mixing develops gluten and gives you cookies that could double as hockey pucks. The dough should be soft and slightly sticky — like thick cake batter that holds its shape when scooped.
- Here's the fun part: use a small cookie scoop or two spoons to drop rounded tablespoons of dough onto your prepared sheets, spacing them 2 inches apart. They'll spread more than you expect, so resist the urge to crowd them. If you want bakery-perfect rounds, roll each scoop briefly between your palms — but honestly, rustic looks more authentic. The dough should feel cool and slightly tacky but not stick to your hands. If it's too sticky to handle, refrigerate for 15 minutes and try again.
- Open the oven door, slide in your first tray, and immediately drop the temperature to 350°F. This initial blast of heat sets the edges while the lower temperature lets the centers bake through. Don't peek for 8 minutes — they need that undisturbed heat to develop properly. They're ready when the edges are golden brown and the centers look set but still pale. They'll look slightly underdone — this is perfect. Over-baking is the enemy of tender centers.
- While the first batch bakes, mix up your glaze: whisk together powdered sugar, anisette liqueur, milk, and a pinch of cream of tartar until smooth. It should ribbon off your spoon and disappear into itself after 3 seconds. Adjust with more sugar if too thin, more liquid if too thick. Cover with plastic wrap pressed directly onto the surface so it doesn't form a skin while you wait. The cream of tartar keeps it white and prevents weeping — skip it and you'll have sticky, weepy cookies by day two.
- Cool cookies on the baking sheet for 5 minutes — this lets them set enough to move without breaking. Transfer to a wire rack and immediately brush with glaze while still warm. The heat helps the glaze set into that signature crackly top. Use a pastry brush for thin, even coverage or drizzle for a more rustic look. Work quickly because the glaze sets fast on warm cookies. If it starts to thicken, microwave for 5 seconds and stir to loosen.
- Let the glazed cookies cool completely — this is torture but necessary for the glaze to set properly. They'll keep for a week in an airtight container at room temperature, though they've never lasted more than two days in my house. The flavor actually improves after 24 hours as the anise mellows and mingles with the butter and vanilla. Stack them between layers of parchment or they'll stick together in one delicious but frustrating mass.
That's it — you did it. But hold on, I've got a few more tricks that'll take this to another level...
Insider Tricks for Flawless Results
The Temperature Rule Nobody Follows
Your butter temperature isn't just important — it's everything. Too cold and your cookies won't spread, leaving you with doughy centers that taste like raw flour. Too warm and they melt into puddles with greasy edges that scream amateur hour. The sweet spot is butter that's been out for 45 minutes in a 70°F kitchen — it should give slightly when pressed but still feel cool. If your kitchen is warmer, check after 30 minutes. Colder? Give it an hour. I set a timer because patience isn't my strong suit, and neither is eating failed cookies.
Why Your Nose Knows Best
Don't trust the timer — trust your nose. When these cookies are perfectly baked, your kitchen will smell like an Italian bakery had a baby with a candy shop. The scent changes from raw dough to toasty butter with floral anise notes right at the 8-minute mark. If you smell something sharp or bitter, you've over-baked them. Pull them immediately and consider yourself warned for next time. This nose-knowledge separates cookie masters from mere mortals who rely on timers like training wheels.
The 5-Minute Rest That Changes Everything
That 5-minute rest on the baking sheet isn't just to prevent broken cookies — it's when the centers finish baking from residual heat. Skip it and you'll have cookies that look perfect but taste doughy in the middle. Set a timer and walk away. Seriously, don't poke them, don't lift them, don't even look at them funny. They're doing important work in there, transforming from raw centers to perfectly tender middles. Trust the process, even though it feels like an eternity when you're surrounded by the smell of fresh cookies.
The Glaze Consistency Secret
The glaze should coat your spoon like heavy cream but ribbon off like chocolate syrup. Too thin and it soaks into the cookies, making them soggy. Too thick and it sits on top like toothpaste, never setting properly. Test it by lifting your spoon — it should form a ribbon that disappears into itself after exactly 3 seconds. If it's close but not quite there, add liquid a teaspoon at a time. You can always thin it, but thickening means adding more sugar, which throws off the flavor balance.
The Storage Game-Changer
Store these with a slice of plain white bread in the container — it regulates moisture and keeps the cookies tender for days. The bread will get stale and hard while your cookies stay perfect. It's like magic, except it's science. Don't use wheat bread unless you want cookies that taste like a health food store. I've also had success with a slightly damp paper towel in a bowl, but the bread method is foolproof and makes you look like a kitchen wizard.
Creative Twists and Variations
This recipe is a playground. Here are some of my favorite ways to switch things up:
Lemon-Anise Sunshine
Swap the anisette in the glaze for Limoncello and add a teaspoon of lemon zest to the dough. The bright citrus lifts the anise into something that tastes like summer in the Amalfi Coast. People who think they don't like licorice flavors go crazy for this version — the lemon keeps it from tasting like traditional black licorice. Add some yellow food coloring to the glaze for visual impact. These disappear at summer parties faster than ice cream on hot pavement.
Chocolate-Dipped Decadence
Dip the cooled, glazed cookies halfway into melted dark chocolate and let set on parchment. The bitter chocolate creates this incredible contrast with the sweet anise glaze — it's like they were made for each other. Use good chocolate, not chips, because you want that snap when you bite into it. A little flaky salt on the chocolate before it sets makes grown men weep. These look bakery-professional but take literally two extra minutes.
Orange Blossom Dreams
Replace the vanilla with orange blossom water and add a tablespoon of orange zest to the dough. The floral notes play beautifully with anise, creating something that tastes like a Mediterranean garden. These are sophisticated enough for a dinner party but easy enough for Tuesday night. The orange blossom water is subtle — people won't quite place it but they'll know something magical is happening. Available at Middle Eastern markets or online, and it transforms everything from rice pudding to shortbread.
Almond-Anise Biscotti
Double the flour, add a cup of toasted chopped almonds, and shape into logs for traditional biscotti. Bake, slice, and bake again for crunchy cookies perfect for dunking in espresso. The anise flavor intensifies during the second baking, creating these incredible caramelized edges. These keep for weeks in an airtight container and make impressive gifts. The texture is completely different from the original — crunchy instead of tender — but equally addictive.
Spiced Winter Warmers
Add a teaspoon of ground cinnamon and a quarter teaspoon of cloves to the dough for a version that tastes like Christmas in cookie form. The warm spices complement the anise in a way that makes people ask for the recipe before they've finished chewing. These are phenomenal with mulled wine or hot cider. I make these for holiday cookie swaps and they're always the first to disappear, even among people who swear they hate anise.
Savory Cocktail Companion
Reduce the sugar by a third, skip the glaze, and add a tablespoon of fennel pollen for cookies that pair beautifully with gin cocktails or sharp cheese. They're still sweet but in a sophisticated, grown-up way that works as part of a cheese board. The fennel pollen adds incredible complexity — available online or at specialty spice shops. These convert even the most stubborn licorice-haters because they don't taste like traditional black licorice at all.
Storing and Bringing It Back to Life
Fridge Storage
These cookies keep beautifully at room temperature in an airtight container for up to a week, but never refrigerate them — the cold makes the glaze weep and turns the cookies soggy. Store them with a slice of plain white bread to regulate moisture, replacing the bread when it gets hard. They actually improve after 24 hours as the flavors meld and the anise mellows into something magical. Keep them in a cool, dry place away from direct sunlight, which can fade the glaze and make the butter taste stale.
Freezer Friendly
The unbaked dough freezes like a dream for up to 3 months. Scoop it into balls, freeze on a tray, then transfer to a freezer bag. Bake from frozen, adding 2 extra minutes to the time — no need to thaw. The baked cookies also freeze well without the glaze; just thaw and glaze fresh when needed. Glazed cookies don't freeze well — the glaze gets weepy and separates. If you must freeze baked cookies, do it before glazing and finish them fresh.
Best Reheating Method
If your cookies have gone slightly stale (though they never last long enough in my house), revive them by wrapping in damp paper towel and microwaving for 8 seconds. They'll taste fresh-baked. For cookies that have lost their crisp edges, pop them in a 300°F oven for 5 minutes to refresh. Never re-glaze cookies — make fresh glaze if needed. The microwave trick works for up to 5-day-old cookies, making them taste like you just pulled them from the oven.