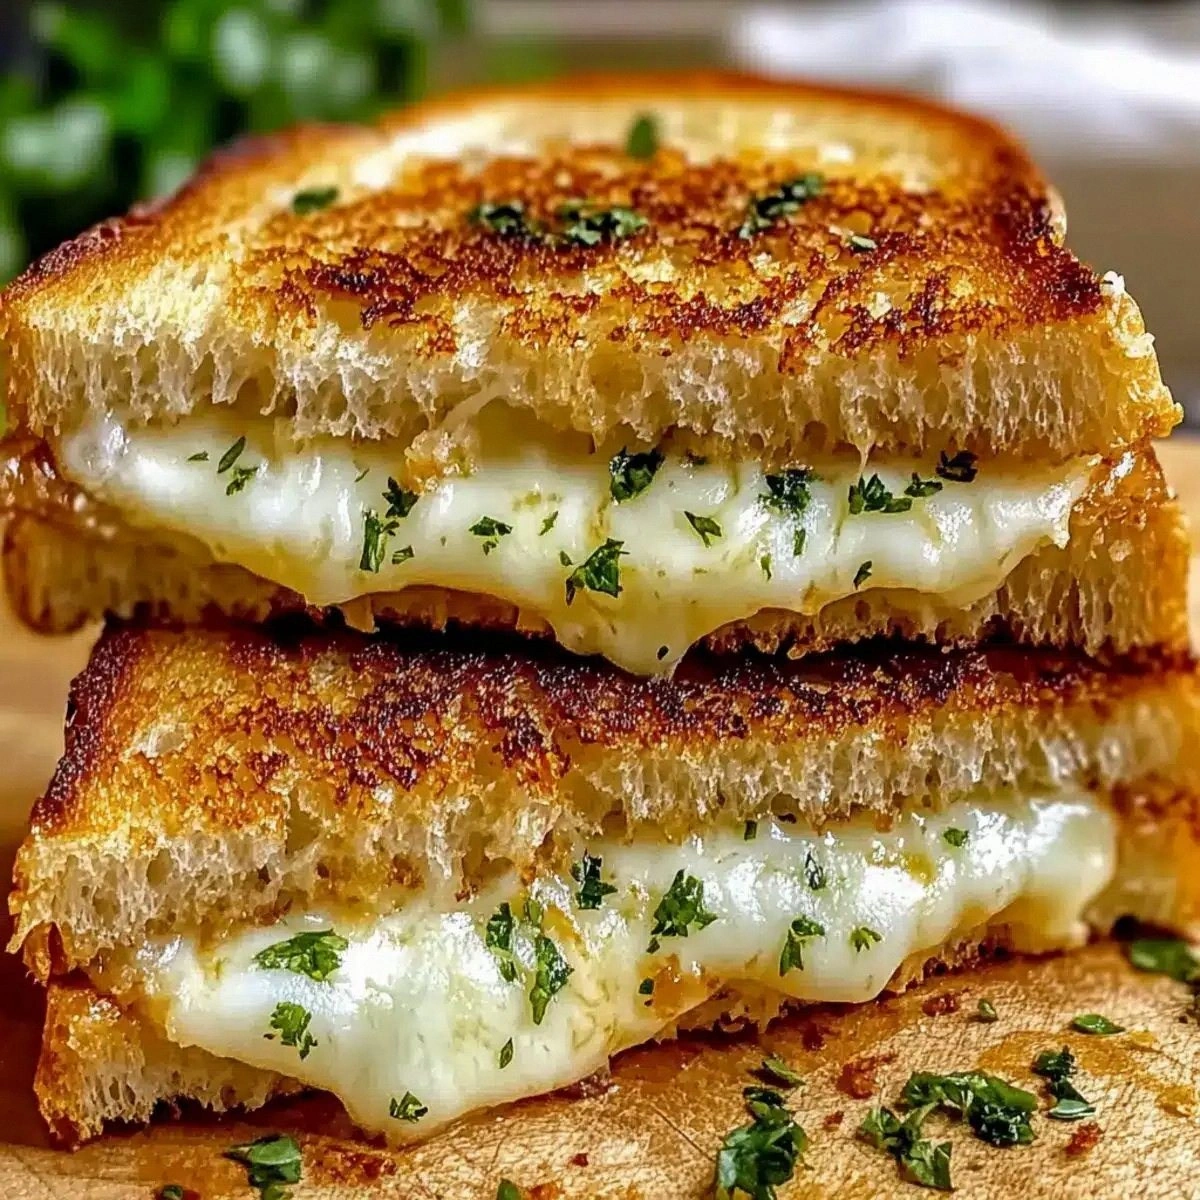
I’m going to be blunt: the moment I first tasted a perfectly golden, buttery, garlic‑infused grilled cheese, I felt like a kid who just discovered the secret menu at a fast‑food joint. It was a dare from a friend who claimed “nothing beats a plain old grilled cheese,” and I answered that dare with a sandwich that would make that claim crumble like stale toast. Picture this: the kitchen humming with the low‑grade roar of a skillet, the scent of melted butter and garlic swirling like a warm summer breeze, and the anticipation building faster than a kid waiting for the ice cream truck. I was standing over a pan, armed with four humble slices of bread, a cup of shredded mozzarella‑cheddar blend, and a secret weapon—a garlic‑butter spread that would turn ordinary bread into a fragrant, crisp masterpiece.
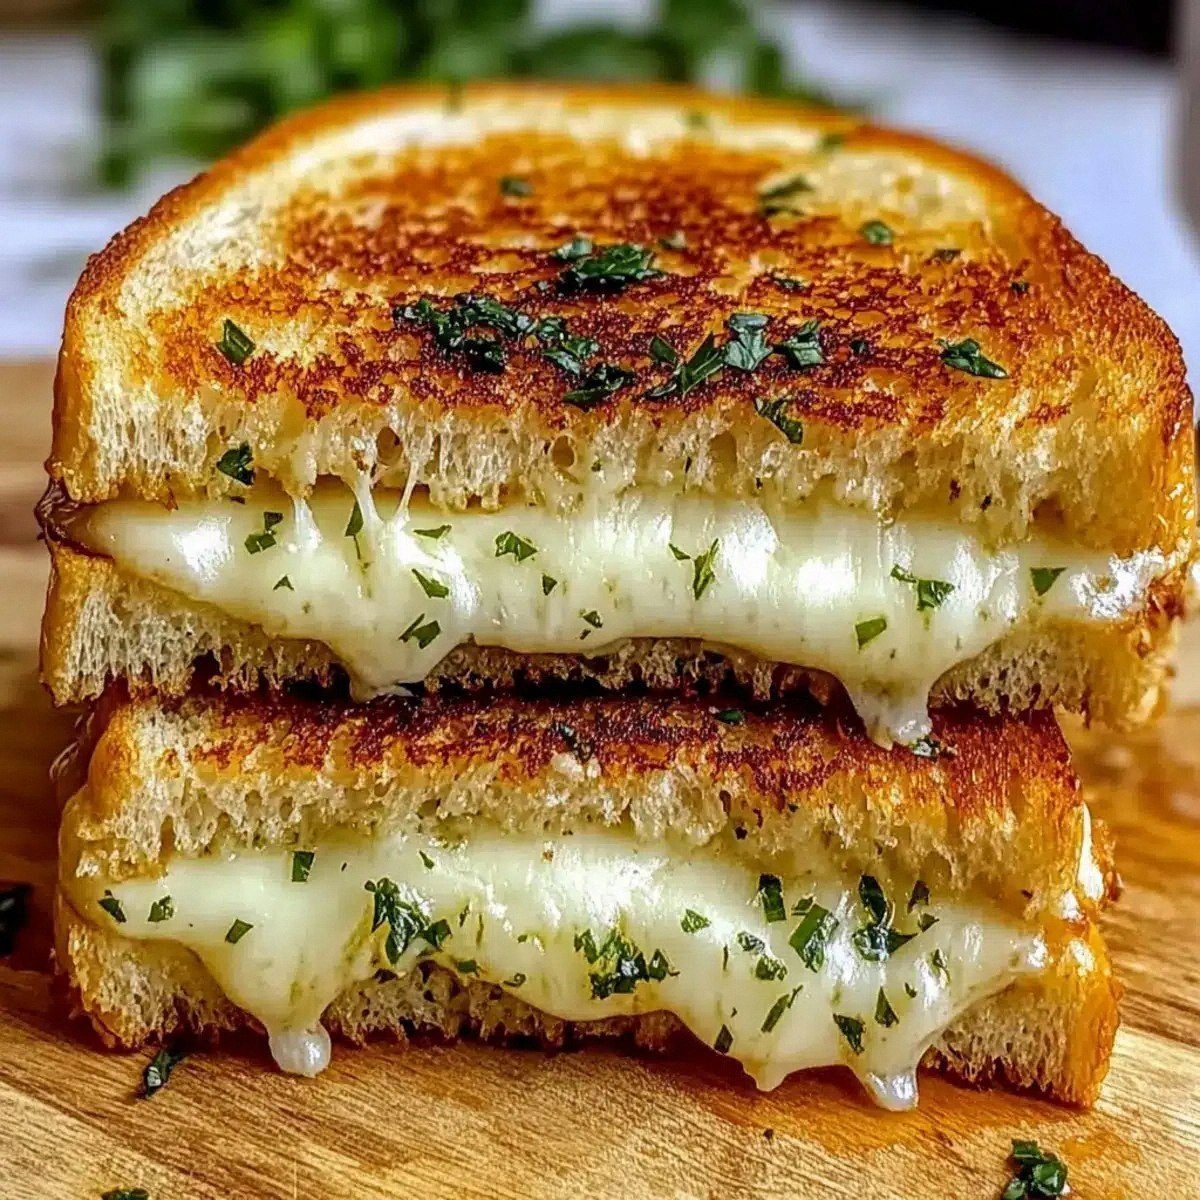
The first bite was an epiphany. The crust snapped with a satisfying crunch that sounded like thin ice shattering under a footstep, while the interior oozed cheese that stretched like a lazy cat waking from a nap. The garlic didn’t just whisper; it sang, wrapping the cheese in a buttery embrace that made my taste buds do a little happy dance. I could hear the cheese sigh as it melted, and the aroma was so intoxicating that the whole house seemed to lean in, as if the walls themselves were inhaling the delicious perfume. The texture contrast—crisp, buttery edges meeting a gooey, silky center—was the kind of culinary yin‑yang that makes you question every other sandwich you’ve ever made.
Most recipes for garlic bread grilled cheese get it wrong by either drowning the bread in butter (resulting in a soggy mess) or skimping on the garlic, leaving you with a bland, forgettable snack. This version, however, strikes the perfect balance: a thin, even coat of garlic‑butter that crisps to a caramelized gold, a generous cheese melt that never leaks out, and a method that guarantees consistency whether you’re a kitchen rookie or a seasoned pro. I’ve tested it on a rainy Tuesday, a sunny Saturday brunch, and even during a midnight snack raid, and each time the result was pure, unadulterated comfort. I dare you to taste this and not go back for seconds; I’ll be honest — I ate half the batch before anyone else got to try it.
One thing that sets this recipe apart is a tiny, almost invisible step that most cooks overlook: letting the butter‑garlic mixture rest for a minute after melting, allowing the flavors to meld like old friends catching up. That pause creates a depth of flavor that makes the final sandwich feel like it was crafted by a chef, not a hurried home cook. And if you think you’ve heard every possible twist on grilled cheese, think again—this version includes a dash of dried parsley that adds a fresh, herbaceous pop without stealing the spotlight. Let me walk you through every single step — by the end, you’ll wonder how you ever made it any other way.
What Makes This Version Stand Out
- Flavor Explosion: The garlic‑butter spread infuses every bite with a savory aroma that’s more intoxicating than a kitchen full of fresh basil.
- Texture Harmony: Crispy, caramelized edges give way to a melt‑in‑your‑mouth cheese core, creating a satisfying contrast that’s both crunchy and creamy.
- Simplicity: Only five ingredients, all pantry staples, mean you can whip this up in under 20 minutes without a grocery run.
- Unique Twist: A pinch of dried parsley adds a subtle herbaceous note that elevates the sandwich from basic to brilliant.
- Crowd‑Pleaser: Whether you’re feeding a single‑person snack attack or a small gathering, this sandwich disappears faster than you can say “cheese”.
- Ingredient Quality: Using real butter (not margarine) and a balanced mozzarella‑cheddar blend guarantees a rich, buttery mouthfeel and a perfect melt.
- Cooking Method: The skillet‑sear technique locks in flavor while giving you that golden‑brown crust without an oven.
- Make‑Ahead Potential: The garlic‑butter can be prepared in advance and stored, shaving minutes off your prep time for busy mornings.
Alright, let's break down exactly what goes into this masterpiece...
Inside the Ingredient List
The Flavor Base
Butter is the cornerstone of any great grilled cheese, and here we’re using 4 tablespoons of real, unsalted butter. Its fat content is what creates that golden crust, and when you melt it with garlic powder, you get a fragrant emulsion that seeps into every pore of the bread. If you skip the butter or replace it with oil, you’ll lose that buttery crunch and end up with a greasy, limp sandwich. For the best result, choose a butter that’s slightly softened at room temperature so it mixes smoothly with the garlic powder.
The Aroma Crew
Garlic powder (1 teaspoon) is the secret weapon that delivers a punch of flavor without the mess of fresh cloves. It distributes evenly, ensuring each bite gets a whisper of garlic without any raw bite. If you’re a garlic lover, feel free to bump this up to 1½ teaspoons, but remember that too much can overpower the cheese. Dried parsley (also 1 teaspoon) adds a fresh, herbaceous lift that brightens the buttery richness. You can substitute fresh parsley—just double the amount and chop finely—but the dried version is more convenient and still gives that pop of green flavor.
The Texture Crew
Four slices of sturdy, preferably slightly thick‑cut bread provide the structural canvas for the cheese and butter. Day‑old bread works best because it absorbs the butter without becoming soggy, while fresh bread can become too soft. If you’re using a baguette or ciabatta, slice it about ½‑inch thick to maintain that perfect bite. The key is to have a slice that can hold the cheese without breaking apart when you flip it.
The Unexpected Star
The cheese blend—1 cup of shredded mozzarella and cheddar—creates the ultimate melt. Mozzarella offers that stretchy, stringy quality we all love, while cheddar adds a sharp, tangy depth that balances the buttery garlic. Using a pre‑shredded blend saves time, but if you have the patience, shredding your own cheese from a block gives a fresher flavor and a better melt. Skip the cheese, and you’ve basically got a buttery garlic toast, which is still good, but not the dream we’re chasing.
The Final Flourish
A pinch of sea salt (optional) can be sprinkled on the buttered side before cooking to enhance the overall flavor profile. It’s a tiny addition that makes a world of difference, especially if you’re using unsalted butter. Also, a light drizzle of olive oil on the pan (just a whisper) helps achieve that even, even browning without the sandwich sticking.
Everything's prepped? Good. Let's get into the real action...
The Method — Step by Step
Melt the butter in a small saucepan over low heat. As soon as it starts to foam, whisk in the garlic powder and dried parsley, letting the mixture bubble gently for about 30 seconds. This is the moment of truth: you should smell a sweet, buttery garlic perfume that makes your kitchen feel like an Italian bistro. Power transition: Okay, ready for the game‑changer?
While the butter is still warm, spread a thin, even layer on one side of each bread slice using a silicone brush. The key is to coat the surface without drowning it; think of a light rain, not a flood.
Kitchen Hack: If you’re making multiple sandwiches, keep the butter mixture in a small squeeze bottle for quick, mess‑free spreading.Place the cheese blend on the un‑buttered side of two slices, spreading it evenly to the edges. This ensures every bite gets that cheesy stretch. Then, top with the remaining two slices, buttered side up, creating two perfect sandwiches. The cheese should be about a quarter‑inch thick; any more and it may ooze out during cooking.
Heat a large non‑stick skillet over medium‑high heat. When the pan is hot enough that a drop of water sizzles and evaporates instantly, add a tiny drizzle of olive oil—just enough to coat the surface. That sizzle when it hits the pan? Absolute perfection. Place the sandwiches in the pan, buttered side down, and let them cook undisturbed for 3‑4 minutes. You’ll hear a gentle crackle, the sound of the crust forming.
Flip the sandwiches carefully with a thin spatula. The first side should be a deep, golden brown, almost caramelized. Cook the second side for another 3‑4 minutes, pressing lightly with the spatula to ensure even contact.
Watch Out: If the heat is too high, the butter will burn before the cheese melts, leaving a bitter aftertaste.Once the cheese is molten and the bread is a gorgeous amber, remove the sandwiches from the pan and let them rest on a cutting board for about a minute. This rest period lets the cheese settle, preventing a cheesy spill when you slice.
Kitchen Hack: Slice the sandwich with a serrated knife at a slight diagonal; this creates more surface area for that perfect cheese pull.Cut each sandwich in half, forming two triangles. The cheese should stretch like a lazy cat waking from a nap, and the edges should be crisp enough to shatter under gentle pressure. Serve immediately while the steam still rises, because that’s when the flavor is at its peak. Picture yourself pulling this out of the pan, the whole kitchen smelling incredible… you’ve just created a culinary masterpiece.
If you’re feeling extra fancy, drizzle a whisper of extra‑virgin olive oil over the top, sprinkle a pinch of flaky sea salt, and garnish with a few fresh parsley leaves for color. This final flourish adds a subtle brightness that cuts through the richness. And now the fun part: dig in, savor every bite, and tell anyone who’ll listen that you just made the best grilled cheese of their lives.
That's it — you did it. But hold on, I've got a few more tricks that'll take this to another level...
Insider Tricks for Flawless Results
The Temperature Rule Nobody Follows
Most home cooks crank the heat up to “fast cook” and end up with burnt butter and under‑melted cheese. The secret is to keep the skillet at medium‑high, not scorching. This allows the butter to brown slowly, developing that nutty, caramelized flavor while giving the cheese time to melt uniformly. If you have an infrared thermometer, aim for a surface temperature of about 350°F (175°C). Trust me, this tiny adjustment turns a good sandwich into a great one.
Why Your Nose Knows Best
Your sense of smell is a more reliable indicator of doneness than a timer. When the butter‑garlic mixture starts to turn a rich amber and you catch that sweet, toasted aroma, you know the first side is ready. Flip only when you can hear a gentle sigh as the crust releases from the pan. This sensory checkpoint eliminates guesswork and guarantees that perfect golden crust every time.
The 5‑Minute Rest That Changes Everything
After the sandwich leaves the pan, let it sit for exactly five minutes before slicing. This short rest allows the cheese fibers to re‑align, preventing a gooey mess and giving the butter a chance to set. I once skipped this step in a rush and ended up with cheese spilling onto the plate like a dairy disaster. The lesson? Patience is a virtue, especially when cheese is involved.
Butter‑Garlic Freeze‑Ahead
If you love this recipe, make a batch of the garlic‑butter ahead of time and freeze it in ice‑cube trays. Each cube is just enough for one sandwich, and you can pop one out whenever the craving hits. The butter re‑melts quickly, and the flavor stays fresh. This hack turned my busy weekday mornings into a gourmet experience without any extra effort.
The Cheese Ratio Secret
A 2:1 mozzarella‑to‑cheddar ratio yields the perfect stretch and flavor balance. Too much cheddar makes the cheese firm; too much mozzarella can be bland. By keeping the ratio in check, you get that luxurious pull and a subtle sharp bite that keeps the palate interested. If you’re adventurous, swap half the cheddar for pepper jack for a spicy twist.
Creative Twists and Variations
This recipe is a playground. Here are some of my favorite ways to switch things up:
Spicy Jalapeño Kick
Add thinly sliced jalapeños to the cheese layer before cooking. The heat cuts through the buttery richness, creating a lively flavor contrast that will please anyone who loves a little fire. Pair with a cool glass of milk for the perfect balance.
Herb‑Infused Delight
Swap dried parsley for a mixture of dried oregano and thyme. This herb combo adds a Mediterranean flair, making the sandwich feel like a quick trip to a seaside café. It’s especially good with a side of tomato soup.
Umami Boost
Mix a tablespoon of grated Parmesan into the cheese blend. The umami depth from the Parmesan intensifies the overall flavor, giving the sandwich a richer, more complex profile. A dash of Worcestershire sauce on the butter can amplify this effect.
Sweet & Savory Fusion
Spread a thin layer of fig jam on the un‑buttered side before adding the cheese. The sweet fruit notes contrast beautifully with the garlic butter, creating a sophisticated sweet‑savory experience that’s perfect for brunch.
Vegan Version
Replace butter with a plant‑based margarine, use a dairy‑free mozzarella‑cheddar blend, and swap the garlic powder for fresh minced garlic sautéed in olive oil. The result is a cruelty‑free version that still delivers that coveted crunch and melt.
Storing and Bringing It Back to Life
Fridge Storage
Place cooled sandwiches in an airtight container or a zip‑top bag. They’ll stay fresh for up to 2 days. To reheat, preheat a skillet over medium heat, add a tiny splash of water to the pan, and cover with a lid for 2‑3 minutes. The steam revives the crust while melting the cheese gently.
Freezer Friendly
Wrap each sandwich tightly in parchment paper, then place them in a freezer‑safe bag. They’ll keep for up to 3 months. When you’re ready to eat, thaw in the refrigerator overnight, then reheat in a skillet with a light drizzle of butter, pressing gently for a crisp finish.
Best Reheating Method
The ultimate reheating trick: add a tiny splash (about a teaspoon) of water to the pan before warming the sandwich. The water creates steam that revives the interior cheese without making the crust soggy, while the butter in the pan restores that buttery crunch. This method works whether you’re using the fridge or freezer version.