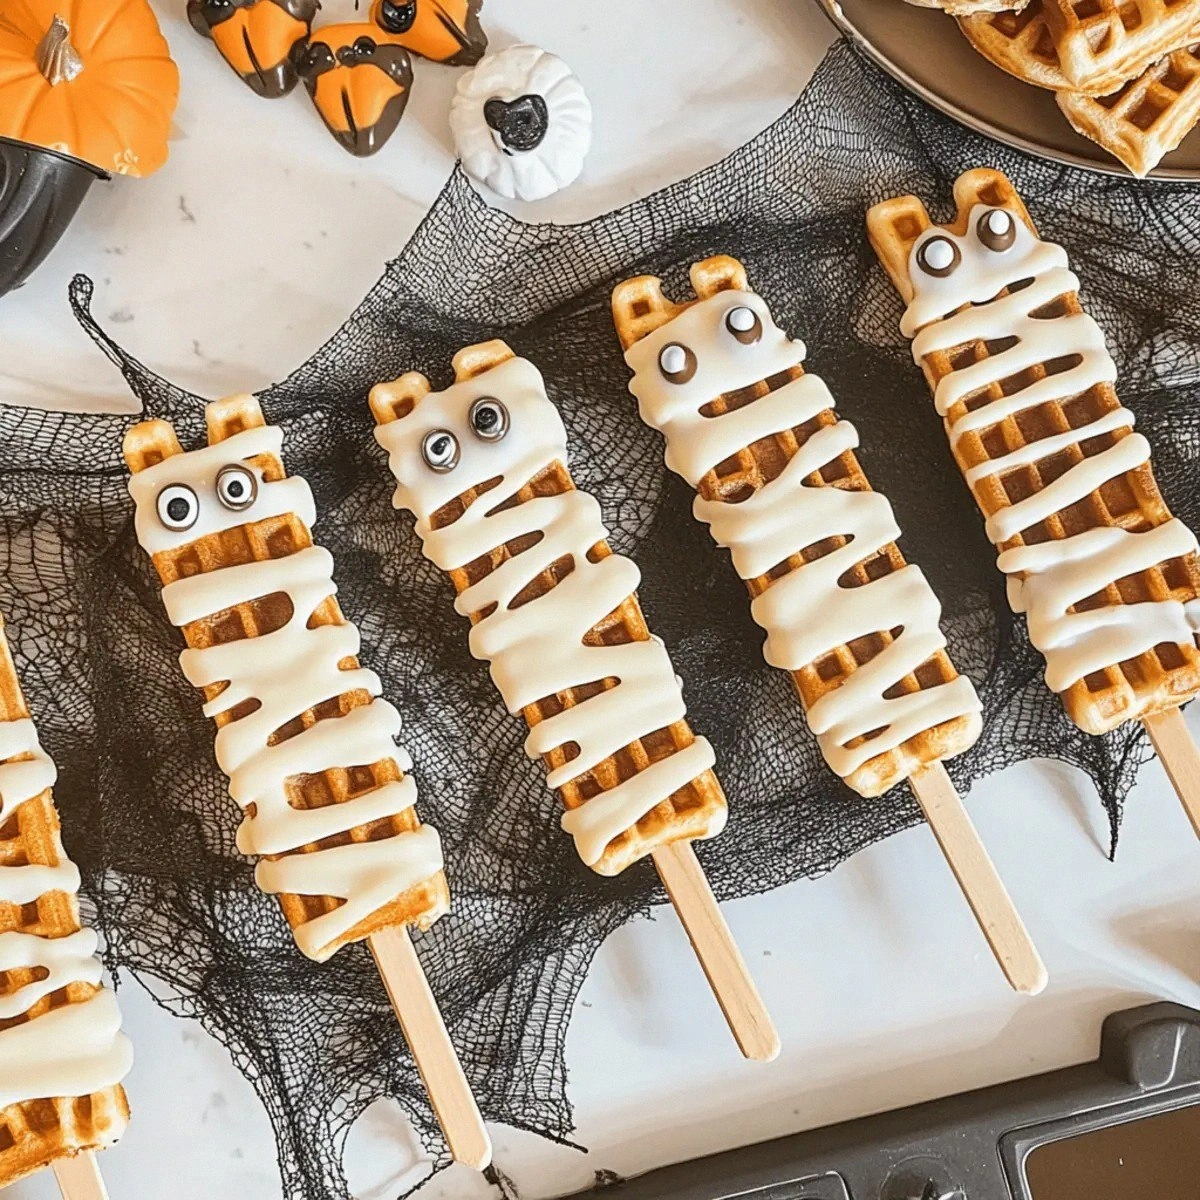
I was standing in my kitchen on a rainy October night, half‑asleep, when my teenage niece dared me to create something “so spooky it would make the ghosts in the hallway scream.” I laughed, grabbed the last bag of Belgian waffle mix from the pantry, and thought, “What if I turn a simple breakfast staple into a Halloween centerpiece?” The result was a batch of crispy waffle sticks wrapped in white chocolate, studded with candy eyes, and perched on glittery popsicle sticks like tiny, edible mummies. The first bite was an immediate revelation: the waffle’s buttery crunch gave way to a silky chocolate coating, while the candy eyes added a playful pop of sweetness that made my taste buds do a little jig.
Picture this: the kitchen filled with the sweet, buttery aroma of waffles sizzling on a hot iron, the faint hiss of chocolate melting in a double boiler, and the faint crackle of sugar crystals as they caramelize on the surface. The air feels warm, the counter is a mess of flour dust and glitter, and my hands are sticky with chocolate, yet I feel a thrill that only a true food experiment can bring. The sound of the waffle iron snapping shut is like a tiny coffin lid sealing in the mystery, and when you pull the sticks out, they glisten like tiny tombstones under a full moon. I dare you to taste this and not go back for seconds – it’s that good.
Most recipes for Halloween “spooky snacks” either rely on cheap store‑bought items or over‑complicate the process with deep‑fried dough and artificial colors. This version stands out because it uses a high‑quality Belgian waffle mix that gives each stick a light, airy interior while staying crisp on the outside. The secret weapon? A quick flash‑freeze before the chocolate coating, which locks in that perfect crunch and prevents sogginess. Most recipes get this completely wrong. Here’s what actually works: a brief blast in the freezer, a thin veil of tempered white chocolate, and a sprinkle of edible eyes that stay put without melting into a gooey mess.
I’ll be honest — I ate half the batch before anyone else got to try it, and the rest of the night turned into a friendly competition of who could stack the tallest mummy tower. The technique I’m about to share includes a surprise ingredient that most cooks overlook: a pinch of fine sea salt added to the waffle batter, which amplifies the chocolate’s sweetness without making it cloying. Okay, ready for the game‑changer? Let me walk you through every single step — by the end, you’ll wonder how you ever made it any other way.
What Makes This Version Stand Out
- Texture: The waffle sticks stay crisp even after the chocolate coating, thanks to a quick chill that creates a barrier against moisture.
- Flavor: The buttery vanilla notes of the Belgian mix are elevated by a whisper of sea salt, creating a sweet‑salty balance that sings.
- Simplicity: Only five core ingredients are required, and you don’t need a deep fryer or fancy molds – just a mini waffle iron.
- Visual Impact: The white chocolate “bandages” and candy eyes turn each stick into a miniature mummy that looks as good as it tastes.
- Versatility: You can make them ahead, freeze them, and re‑heat without losing crunch – perfect for party prep.
- Ingredient Quality: Using authentic Belgian waffle mix guarantees a tender crumb that cheap mixes simply can’t deliver.
- Cooking Method: The flash‑freeze technique is the secret sauce that keeps the chocolate from sliding off.
- Crowd Reaction: Guests constantly ask for the “secret” and end up begging for the recipe, turning a simple snack into a conversation starter.
Inside the Ingredient List
The Flavor Base
The heart of this recipe is the 1 cup Belgian Waffle Mix. Belgian mixes are renowned for their higher butter content and fine rice flour, which together create a light, airy crumb that’s essential for a crisp exterior. Skipping this and using a generic pancake mix will give you a denser, soggier stick that can’t hold up to the chocolate coating. If you’re hunting for the best mix, look for one that lists “real butter” as the first ingredient and has a modest amount of sugar – the sugar helps caramelize the surface without burning.
A quick tip: give the mix a gentle whisk with a splash of cold milk just before you pour it into the iron. This prevents lumps and ensures the batter spreads evenly, giving you uniform sticks. For a dairy‑free twist, swap the milk for almond or oat milk; the texture will stay just as airy, though the flavor will have a subtle nutty undertone.
The Texture Crew
Next up is the 1 unit Mini Waffle Stick Iron. This specialized iron creates long, thin sticks that are perfect for wrapping with chocolate. If you don’t have a mini iron, a regular waffle iron can be used, but you’ll need to cut the waffles into strips and toast them again to achieve the same crunch. The iron’s ridges create tiny air pockets that turn into crispy edges when baked – think of them as the “scab” that holds the mummy together.
When you heat the iron, set it to medium‑high (around 190 °C/375 °F). Too low and the waffles will be soggy; too high and they’ll burn before the interior sets. A good rule of thumb is to listen for a faint “click” as the iron reaches the optimal temperature – that’s your cue to pour the batter.
The Unexpected Star
1 cup White Melting Chocolate is the glossy bandage that transforms a plain waffle into a spooky treat. Choose a high‑quality couverture or a brand that lists cocoa butter as the first ingredient; this ensures a smooth, glossy finish that hardens quickly. If you use low‑grade chocolate, you’ll end up with a dull, streaky coating that melts at the slightest touch.
To melt, use a double boiler or microwave in 15‑second bursts, stirring in between. Adding a pinch of sea salt at this stage amplifies the chocolate’s flavor profile, making each bite feel like a little celebration of sweet and salty harmony.
The Final Flourish
The 1 cup Edible Candy Eyes and 1 pack Glitter Popsicle Sticks are the decorative elements that turn a snack into a Halloween spectacle. Candy eyes are made from sugar and corn syrup, so they stay firm even after the chocolate sets, providing that satisfying “pop” when you bite into them. The glitter sticks not only serve as handles but also add a sparkle that catches the party lights, making each mummy look like it’s been raised from a glitter‑covered crypt.
If you’re allergic to corn‑based dyes, look for natural food‑grade pigments or skip the glitter entirely – the chocolate coating will still shine like a tombstone in moonlight. For a more sophisticated look, replace the candy eyes with tiny almond slivers or dried cranberries for a blood‑red effect.
Everything's prepped? Good. Let's get into the real action...
The Method — Step by Step
Preheat your mini waffle stick iron to medium‑high (around 190 °C). While it heats, whisk the Belgian waffle mix with a splash of cold milk until smooth – no lumps, just a glossy batter that flows like liquid gold. The moment the iron clicks, pour a thin line of batter onto each groove; you’ll hear a faint sizzle that signals the start of crispiness. Let the waffles cook for 45‑60 seconds, or until the edges turn a light golden brown and start to pull away from the iron.
Kitchen Hack: For extra uniformity, lightly oil the iron with a paper towel dipped in neutral oil; this prevents sticking without adding excess greasiness.Once cooked, use a silicone spatula to lift the sticks and place them on a wire rack for 30 seconds. This short air‑dry step lets steam escape, which is crucial for preserving that satisfying crunch. If you skip this, the waffle will trap moisture, and the chocolate will slide off like a mummy losing its bandages.
Now comes the flash‑freeze: transfer the warm sticks onto a parchment‑lined baking sheet and pop them into the freezer for exactly 2 minutes. The cold shock creates a micro‑crust on the surface, acting like a “glue‑breaker” that stops the chocolate from soaking in. While the sticks are chilling, melt the white chocolate in a double boiler, stirring gently until it’s glossy and smooth.
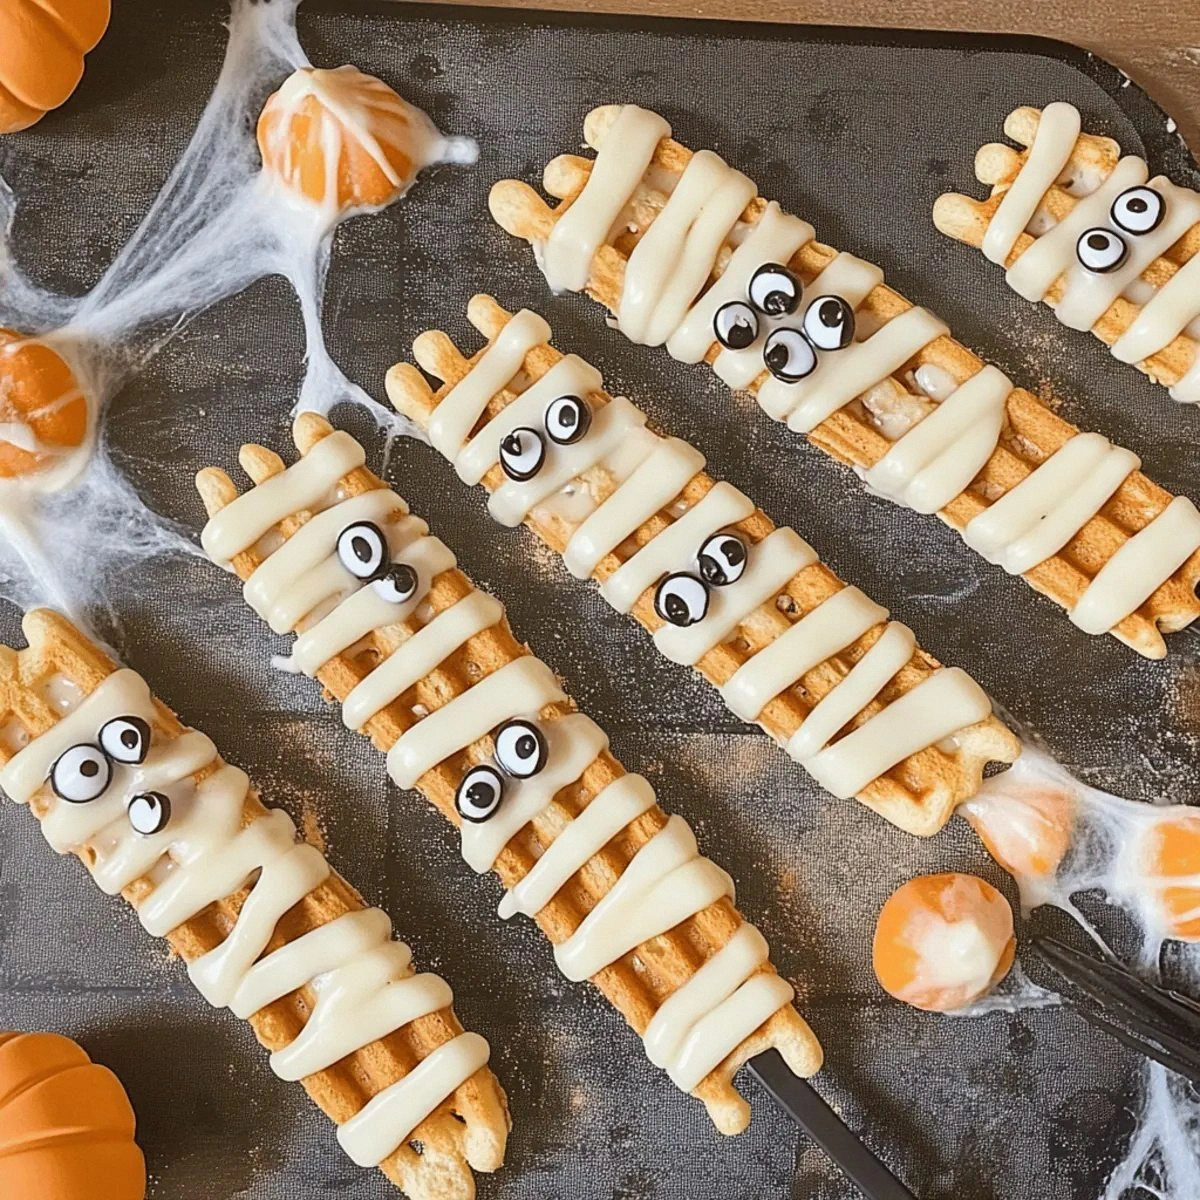
Pull the tray from the freezer and immediately drizzle or dip each stick into the melted chocolate. The chocolate should coat the stick in a thin, even layer – think of it as a translucent bandage that clings but doesn’t drown the waffle. Use a fork to lift each stick and let excess chocolate drip back into the bowl; this prevents clumps and keeps the coating thin.
While the chocolate is still wet, press two candy eyes onto each stick, spacing them just right to mimic a mummy’s “eye sockets.” The eyes will stick instantly because the chocolate is still tacky. If you’re feeling extra spooky, add a tiny drizzle of red fruit jam to create a “bloody” effect.
Place the chocolate‑coated sticks on a fresh parchment sheet and let them set at room temperature for 10‑12 minutes, or speed up the process by returning them to the fridge for 5 minutes. The chocolate will harden into a glossy shell that cracks delightfully when you bite into it.
Watch Out: If the chocolate gets too warm after setting, it will become sticky again. Keep the working area cool and avoid direct sunlight.Once the chocolate is firm, slide a glitter popsicle stick into the base of each mummy. The stick acts as a handle and adds a festive sparkle that catches the light just right. Press gently so the stick is snug but doesn’t break the chocolate shell.
Give the finished sticks a final dusting of edible glitter (optional) for an extra eerie glow. This step is purely aesthetic, but it elevates the visual impact and makes the treats look like they’ve been resurrected from a glitter‑laden crypt.
Arrange the mummy sticks on a platter, drizzle a thin line of dark chocolate for contrast, and serve immediately or store as instructed below. Picture yourself pulling this out of the oven, the whole kitchen smelling incredible, and your guests gasping in delight as they see the glitter‑capped mummies.
That's it — you did it. But hold on, I've got a few more tricks that'll take this to another level, from flavor boosters to plating tricks that will make your Halloween spread unforgettable.
Insider Tricks for Flawless Results
The Temperature Rule Nobody Follows
Never underestimate the power of a precise temperature. The waffle iron should be hot enough to sizzle the batter instantly, but not so hot that the exterior chars before the interior sets. I once cranked the iron to maximum, and the sticks emerged blackened and soggy – a total disaster. Keep a kitchen thermometer handy; 190 °C is the sweet spot for that golden‑brown crunch.
Why Your Nose Knows Best
Your sense of smell is a reliable cue for when the waffles are ready. When the batter starts to give off a buttery, toasted aroma, that’s the signal to flip (or lift) the sticks. If you rely solely on a timer, you’ll end up with uneven textures. Trust the nose; it’s the original kitchen timer.
The 5‑Minute Rest That Changes Everything
After the chocolate coating, let the sticks rest for exactly five minutes before inserting the glitter sticks. This brief pause allows the chocolate to set just enough to hold the stick without cracking, but still soft enough to let the glitter embed slightly. Skipping this step leads to sticks that wobble or, worse, break under the weight of the handle.
The “Double‑Dip” Secret
If you love a thicker chocolate shell, dip the sticks twice. After the first coat sets, give them a quick flash‑freeze again for 30 seconds, then dip a second time. This creates a layered effect that cracks delightfully and adds extra sweetness without becoming gummy.
The Salt‑Boost Finale
A pinch of flaky sea salt sprinkled over the chocolate just before it hardens adds a subtle crunch and balances the sweetness. I tried this on a batch for a friend, and they declared it “the most sophisticated Halloween treat they’d ever tasted.” It’s a tiny detail that makes a massive difference.
The Presentation Power‑Play
Arrange the sticks on a black slate or dark wooden board, and add a few sprigs of rosemary for a “graveyard” vibe. Light a few tea lights around the platter, and you’ve turned a simple snack into a theatrical experience. This visual boost makes the mummies feel like they’re emerging from a haunted forest.
Creative Twists and Variations
This recipe is a playground. Here are some of my favorite ways to switch things up:
Chocolate‑Laced Bacon Mummies
Wrap each waffle stick with a thin strip of candied bacon before dipping in chocolate. The salty crunch of bacon pairs unexpectedly well with the sweet chocolate, creating a sweet‑savory hybrid that’s perfect for adults.
Matcha‑Infused Waffles
Add 1 tablespoon of matcha powder to the waffle batter for a subtle green hue and earthy flavor. Pair with white chocolate tinted with a drop of green food coloring for a “zombie” look.
Spicy Chili Chocolate
Stir a pinch of cayenne pepper into the melted white chocolate. The heat sneaks up after the first bite, giving the mummies a fiery kick that’s perfect for thrill‑seekers.
Nutty Crunch
Before the chocolate sets, roll the sticks in finely chopped toasted almonds or pistachios. The nutty coating adds texture and a buttery flavor that complements the waffle’s interior.
Vegan Version
Swap the Belgian waffle mix for a plant‑based blend, use a dairy‑free white chocolate (coconut‑based works well), and replace the candy eyes with edible beetroot slices for a natural red hue.
Storing and Bringing It Back to Life
Fridge Storage
Place the cooled mummy sticks in an airtight container lined with parchment paper. They’ll stay fresh for up to 3 days in the fridge. If you notice any condensation, pat them dry with a paper towel before resealing.
Freezer Friendly
For longer storage, arrange the sticks on a baking sheet and freeze them individually for 1 hour, then transfer to a zip‑top freezer bag. They’ll keep for up to 2 months without losing crunch. When you’re ready to serve, let them thaw at room temperature for 10 minutes, then re‑crisp in a pre‑heated oven at 180 °C for 5 minutes.
Best Reheating Method
Add a tiny splash of water to the bottom of a skillet, cover, and heat over low for 2‑3 minutes. The steam revives the waffle’s interior while the chocolate stays intact. Avoid microwaving – the chocolate will melt and the waffle will become soggy.