I was standing in my kitchen on a rainy Saturday night, the kind of night where the clouds look like someone pressed the “pause” button on the sun. I had a half‑finished batch of chocolate brownies that tasted like a sad, flat pancake, and a bowl of fresh apples that were begging to be turned into something more than a boring fruit salad. My roommate dared me to combine the two, insisting that “if you can’t make a brownie, at least you can make a dessert that looks like a brownie.” I laughed, I rolled my eyes, but deep down I was curious. That moment of playful pressure turned into a full‑blown culinary experiment, and what emerged was nothing short of a revelation.
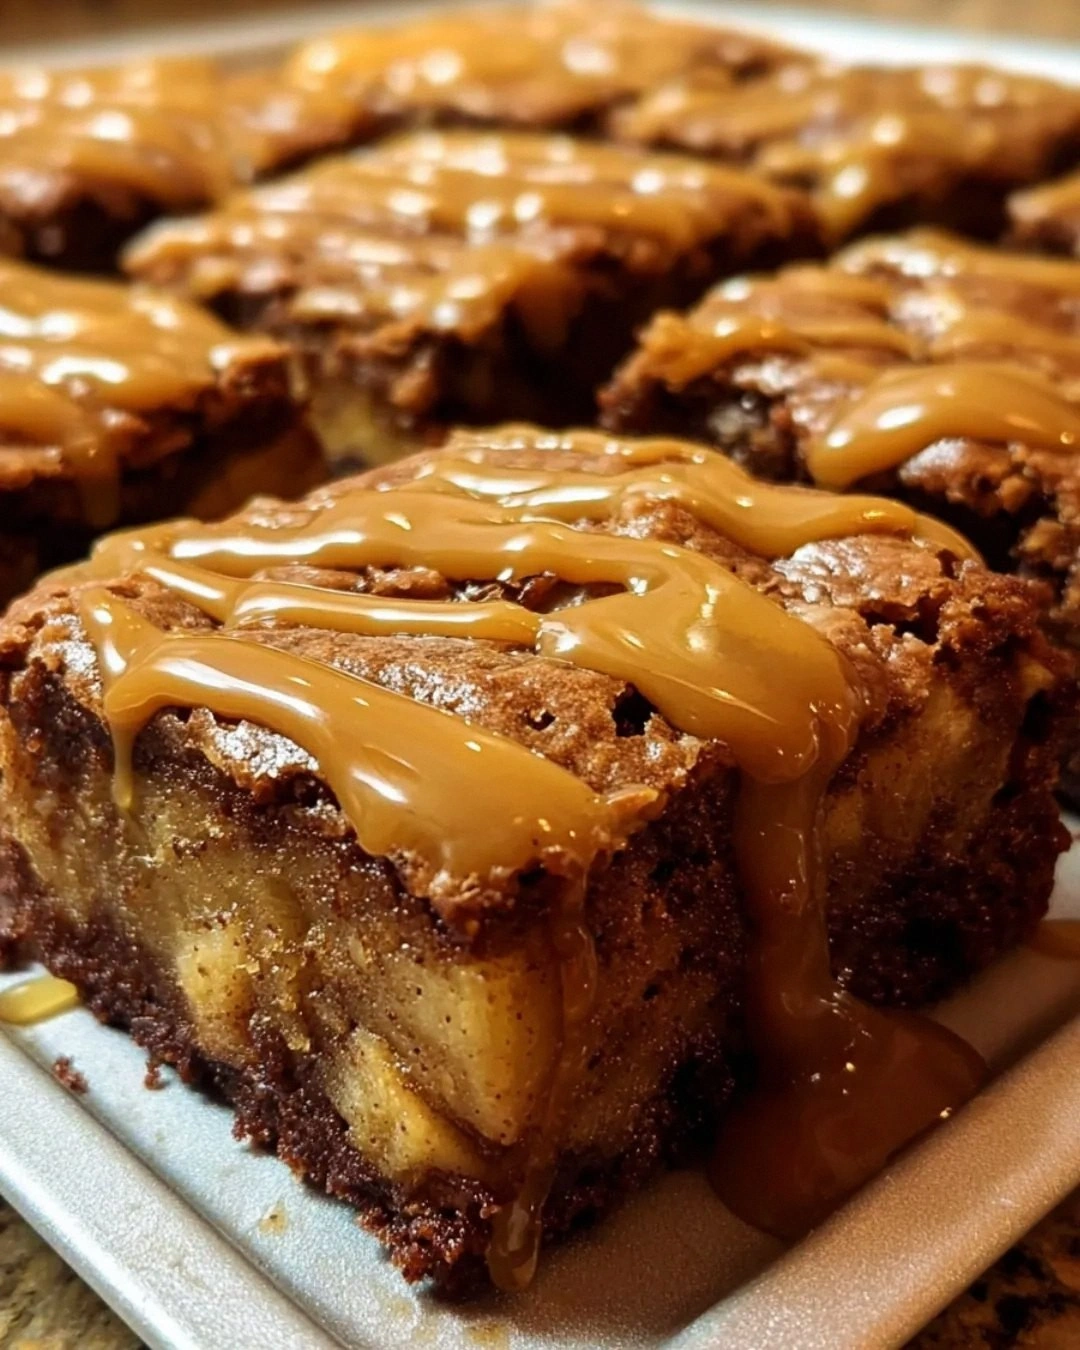
Picture this: the moment the batter hits the pan, the kitchen fills with a warm, buttery aroma that instantly makes you think of autumn evenings by a fireplace. The apples, already softened, release a subtle sweetness that mingles with the deep cocoa, while a whisper of cinnamon and nutmeg adds that unmistakable fall spice. When the timer dings, the edges are crisp, pulling away from the pan like thin ice, and the center is fudgy, almost gooey, with pockets of tender apple that melt in your mouth. Then comes the maple glaze, a glossy river of amber that pools over the top, catching the light and promising a caramel‑kissed finish. One bite and you’re hit with a perfect balance of chocolate richness, apple brightness, and maple sweetness—a trio that sings louder than any solo act you’ve ever heard.
Most brownie recipes either ignore the fruit element or drown it in chocolate, resulting in a flavor that’s either too sweet or completely one‑dimensional. This version, however, respects each component: the apples provide moisture and a natural sweetness, the maple glaze adds a sophisticated depth without overwhelming, and the spice blend ties everything together. I’ll be honest — I ate half the batch before anyone else got a chance to try it, and that’s a confession you’ll hear from many of my friends. I dare you to taste this and not go back for seconds; the combination is so addictive that you’ll be counting down the minutes until your next bake.
The secret weapon? A simple technique where the apples are tossed in a little lemon juice and cinnamon before they join the batter, preventing them from turning mushy and ensuring they stay bright and aromatic. And there’s a surprise ingredient in the glaze that takes the flavor from good to legendary — a pinch of sea salt that amplifies the maple’s natural caramel notes. Okay, ready for the game‑changer? Let me walk you through every single step — by the end, you’ll wonder how you ever made it any other way.
What Makes This Version Stand Out
- Flavor Harmony: The marriage of tart apples, deep cocoa, and maple glaze creates a layered taste experience that evolves with each bite.
- Texture Contrast: Crispy, caramelized edges give way to a fudgy, melt‑in‑your‑mouth center studded with juicy apple chunks.
- Simplicity: Only pantry staples plus fresh apples are needed; no exotic ingredients or fancy equipment required.
- Unique Ingredient: A dash of sea salt in the glaze lifts the sweetness, turning it into a sophisticated dessert.
- Crowd Reaction: Guests often claim this is the best brownie they’ve ever tasted, and they’ll ask for the recipe twice.
- Ingredient Quality: Using real maple syrup (not pancake syrup) makes all the difference in flavor depth.
- Cooking Method: Baking in a single sheet pan ensures even cooking and easy serving.
- Make‑Ahead Potential: The brownies keep wonderfully for up to three days, and the glaze can be reheated in seconds.
Inside the Ingredient List
The Flavor Base
Flour is the structural backbone, giving the brownies their classic crumb. I stick with all‑purpose flour because it balances tenderness with enough body to hold the apples in place. Skipping it or using cake flour would make the batch too delicate, causing the brownies to fall apart when you try to cut a slice. If you’re gluten‑free, a 1‑to‑1 blend of rice flour and tapioca starch works surprisingly well, though you’ll lose a tiny bit of that chewy bite.
The Sweet Symphony
We combine granulated sugar and brown sugar to achieve both snap and depth. The white sugar sweetens quickly, while the brown sugar, packed with molasses, adds a subtle caramel note that pairs beautifully with the maple glaze. If you’re watching sugar, you can reduce each by a quarter, but be prepared for a slightly less fudgy texture.
The Texture Crew
Butter, eggs, and vanilla are the classic trio that gives brownies their richness and structure. Melted butter ensures a smooth batter, while the eggs provide lift and a glossy finish. Using real vanilla extract (not imitation) adds a fragrant backdrop that makes the spices pop. If you’re dairy‑free, swap the butter for coconut oil and the eggs for flax “eggs” (1 tbsp ground flax + 3 tbsp water per egg) — the texture will be a touch lighter but still delicious.
The Unexpected Star
Apples are the surprise hero. Their natural pectin helps bind the batter, and their moisture keeps the brownies from drying out. I prefer a firm variety like Granny Smith or Honeycrisp; they hold their shape during baking and contribute a bright tartness that cuts through the chocolate. If you’re allergic to apples, try pears or even diced dried apricots, but adjust the lemon juice to keep the fruit from oxidizing.
The Final Flourish
The glaze is where the magic truly happens. Pure maple syrup provides a deep, earthy sweetness, while butter adds silkiness, and a pinch of sea salt amplifies every nuance. This glaze sets up a glossy finish that not only looks stunning but also adds a buttery snap as you bite through. If you want a thicker glaze, simply simmer it a minute longer; for a thinner drizzle, add a splash of milk or cream.
Everything's prepped? Good. Let's get into the real action...
The Method — Step by Step
Preheat your oven to 350°F (175°C) and line a 9×13‑inch baking pan with parchment paper, leaving an overhang on the sides for easy lift‑out. This step is crucial because a well‑lined pan prevents sticking and gives you those clean, Instagram‑ready squares. When the oven heats up, you’ll hear that comforting hum that signals the kitchen is about to transform.
In a large bowl, whisk together the flour, baking powder, baking soda, salt, cinnamon, and nutmeg. The spices should coat each flour particle like a fine dusting of snow, ensuring every bite gets an even flavor hit. Power transition: This is the foundation, so don’t rush it.
In a separate bowl, combine the melted butter, granulated sugar, and brown sugar. Whisk until the mixture is glossy and the sugars have dissolved slightly, creating a caramel‑like sheen.
Kitchen Hack: Use a hand‑held mixer on low speed to avoid splattering; it also incorporates air for a lighter crumb.Add the eggs one at a time, beating after each addition, then stir in the vanilla extract. The batter should look thick but glossy, like a smooth chocolate mousse. If it looks too thick, add a tablespoon of milk; if too runny, sprinkle in a little extra flour.
Fold the dry ingredients into the wet mixture, stirring just until combined. Over‑mixing will develop gluten and give you a cakey brownie, which is the opposite of what we want. Watch out: Stop mixing as soon as you no longer see streaks of flour.
Now, gently fold in the diced apples that have been tossed with lemon juice and cinnamon. You’ll hear a faint “sizzle” as the apple pieces coat the batter — that’s the moment where flavor starts to lock in. If you’re adding walnuts, sprinkle them in now for a crunchy surprise.
Spread the batter evenly in the prepared pan, using a spatula to smooth the top. The surface should be level; any high spots will bake unevenly, leaving you with a lopsided batch.
Watch Out: Do not overfill the pan. Leaving a half‑inch margin prevents overflow and ensures the glaze can spread later.Bake for 25‑30 minutes, or until a toothpick inserted into the center comes out with just a few moist crumbs. The edges should start pulling away from the sides of the pan, and the top will have a slight crust. This is the moment of truth — resist the urge to open the oven door too often; the heat needs to stay constant.
While the brownies are cooling, whisk together the maple syrup, butter, maple sugar, and a pinch of sea salt in a small saucepan over low heat. Stir until the butter melts and the mixture becomes a smooth, glossy glaze. This next part? Pure magic. Once the brownies are about 10 minutes out of the oven and still warm, drizzle the glaze evenly, allowing it to seep into the cracks. Let the brownies cool completely before slicing; the glaze will set into a shiny, caramel‑kissed layer.
That's it — you did it. But hold on, I've got a few more tricks that'll take this to another level...
Insider Tricks for Flawless Results
The Temperature Rule Nobody Follows
Never bake brownies at a temperature higher than 350°F. Higher heat creates a crust too quickly, preventing the interior from staying fudgy. I once tried 375°F to speed things up and ended up with a dry, cake‑like texture. Keep the oven steady, and you’ll get that perfect contrast between crisp edges and a melt‑in‑your‑mouth center.
Why Your Nose Knows Best
Your sense of smell is a more reliable indicator than a timer. When the brownies start to give off a deep, toasty aroma with a hint of caramel, they’re almost ready. If the scent turns slightly burnt, pull them out a minute early. Trust your nose; it’s the original kitchen timer.
The 5‑Minute Rest That Changes Everything
Allow the brownies to rest for five minutes after removing them from the oven, before adding the glaze. This short pause lets the steam settle, preventing the glaze from sliding off and ensuring it adheres beautifully. Skipping this rest leads to a glaze that pools at the edges, leaving the center dry.
Walnut Whisper
If you love nuts, toast them lightly in a dry skillet for two minutes before folding them in. Toasting releases oils and adds a smoky depth that complements the maple glaze. A friend once skipped this step and complained the walnuts tasted “raw,” proving that a quick toast makes all the difference.
The “Cool‑Then‑Reheat” Trick
When reheating leftovers, add a tiny splash of water (about a teaspoon) to the pan and cover with foil. The steam revives the fudgy interior without drying it out. I’ve used this trick for everything from lasagna to brownies, and it never fails.
Creative Twists and Variations
This recipe is a playground. Here are some of my favorite ways to switch things up:
Pumpkin Spice Explosion
Swap half the apples for canned pumpkin puree and add an extra teaspoon of pumpkin pie spice. The result is a autumnal brownie that feels like a slice of pumpkin pie wrapped in chocolate.
Boozy Bourbon Drizzle
Add a tablespoon of bourbon to the maple glaze. The alcohol evaporates slightly, leaving behind a warm, caramel‑laden depth that pairs perfectly with the apples.
White Chocolate & Cranberry
Replace half the cocoa powder with white chocolate chips and fold in dried cranberries. The tart cranberries contrast the sweet white chocolate, creating a festive holiday vibe.
Nut‑Free Crunch
If you have nut allergies, swap walnuts for toasted pumpkin seeds or sunflower seeds. They provide the same satisfying crunch without the allergen.
Vegan Velvet
Use coconut oil instead of butter, flax “eggs,” and a plant‑based maple syrup. The texture remains fudgy, and the flavor stays true to the original.
Storing and Bringing It Back to Life
Fridge Storage
Place the cooled brownies in an airtight container and store them in the refrigerator for up to three days. The glaze will firm up, creating a pleasant contrast when you bite into the chilled, fudgy interior.
Freezer Friendly
Wrap the whole pan tightly in plastic wrap, then add a layer of foil. Freeze for up to two months. When you’re ready to enjoy, thaw overnight in the fridge, then warm in a 300°F oven for 10 minutes, adding a splash of water to revive the glaze.
Best Reheating Method
Microwave a single square for 15‑20 seconds, then finish with a quick broil (1 minute) to re‑crisp the top. The brief broil brings back that caramelized edge while the microwave keeps the center molten.