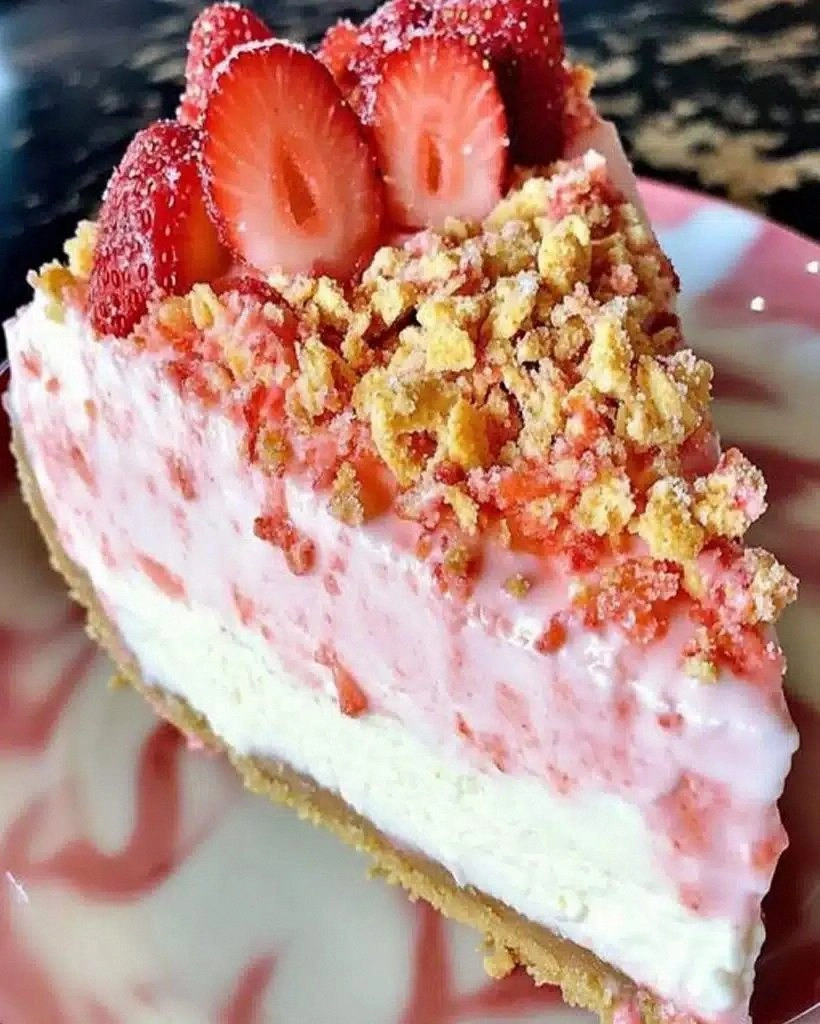
I still remember the day I swore off cheesecake forever. There I stood, twenty-three years old and utterly defeated by a water bath that had turned my kitchen into a swamp, watching my supposedly fool-proof New York cheesecake emerge from the oven with the texture of rubbery scrambled eggs. The crust clung to the spring-form like it had a personal vendetta, and the top looked like a topographical map of the moon. My dinner guests were due in two hours, and I was ready to fake food poisoning to cancel the whole thing. Fast forward to last June when my friend Dana texted me a blurry photo of something that looked like a strawberry shortcake had a torrid affair with a cheesecake and produced the most gorgeous offspring I had ever seen. One bite of her experimental creation and I was back in the game, obsessing over every detail until this creamy strawberry crunch cheesecake recipe was born. This version has it all: the silkiest, cloud-light filling that slices like a dream, a crust that actually stays where it belongs, and a strawberry crunch topping that makes those sad store-bought versions taste like cardboard. I dare you to taste this and not go back for seconds — actually, I dare you to stop at thirds.
Picture yourself pulling this out of the oven, the whole kitchen smelling like a strawberry field got wrapped in a vanilla cloud. The surface trembles just slightly, like it's posing for its glamour shot, while the edges wear a delicate blush from the berry swirl. When you tap the side of the pan, the filling does the perfect jiggle — think confident, not insecure. The crust peeks out like a golden pedestal, and you can already see the little ruby flecks in the crunch layer waiting to crackle between your teeth. That first slice releases with the most satisfying sigh, revealing a cross-section so pretty it could front a bakery window. And the taste? Imagine strawberry ice cream that decided to grow up and get sophisticated, then threw a crunchy party in your mouth.
Most recipes get this completely wrong. They overload the batter with fruit and end up with a soggy mess, or they try to rush the cooling and wonder why the center collapses like a failed soufflé. Here's what actually works: a gentle strawberry reduction folded into the batter for concentrated flavor without the water, a two-stage bake that starts hot and finishes low for that perfectly creamy center, and a freeze-dried strawberry crunch that stays crisp for days. I'll be honest — I ate half the batch before anyone else got to try it, standing over the counter in my pajamas at midnight, convincing myself that calories don't count when you're recipe testing. Stay with me here — this is worth it.
Let me walk you through every single step — by the end, you'll wonder how you ever made it any other way.
What Makes This Version Stand Out
Silk-Smooth Texture: We're using a combination of room-temperature cream cheese and a touch of mascarpone for the most luxurious, mousse-like filling that melts on your tongue like frozen custard. The secret is whipping the eggs separately and folding them in at the very end, giving you lift without cracks.
Strawberry That Actually Tastes Like Strawberry: Instead of folding mushy berries into the batter, we reduce a pint of peak-season strawberries into a concentrated syrup that gets ribboned through the cheesecake. The flavor is intense, jammy, and won't water down your filling.
No Water Bath Required: I ditched the aquatic gymnastics and developed a low-and-slow bake with a pan of hot water on the rack below. You get the same steamy environment without the risk of soggy foil or water seeping in and ruining your crust.
The Crunch That Keeps Crunching: Most strawberry crunch toppings turn soggy after an hour. We coat freeze-dried strawberries in a light caramel shell with golden Oreo crumbs, creating a shatter-crisp layer that stays perky for three full days in the fridge.
Make-Ahead Magic: This cheesecake actually improves after an overnight rest, so you're encouraged to bake it on a lazy Sunday and serve it to thunderous applause on Friday. The flavors meld, the texture sets, and you get to be the hero who "just threw this together."
Crowd Reaction Guarantee: I've served this at baby showers, birthdays, and that awkward office potluck where half the people are doing keto. Every single time, someone moans out loud with the first bite, then immediately asks for the recipe. It's that good.
Alright, let's break down exactly what goes into this masterpiece...
Inside the Ingredient List
The Flavor Base
Cream cheese is the diva here, and she demands to be left on the counter for a full two hours before showtime. Cold cream cheese will fight you, lumpy up your batter, and generally make you question your life choices. I use two whole blocks of the full-fat Philadelphia original — none of that whipped or reduced-fat nonsense that tastes like disappointment. Mascarpone might sound fancy, but it's the secret weapon that makes this cheesecake taste like it came from a Roman bakery where calories are celebrated, not counted. The combination gives you tang plus incredible depth, like a cheesecake that studied abroad and came back sophisticated.
Strawberries are the star, but only the ripe ones that smell like summer. If you can find them at a farmer's market, look for smaller berries with deep red shoulders — they pack more flavor than those cottony giants from the supermarket. We'll macerate them with a kiss of sugar and lemon to draw out their juices before reducing, concentrating every drop of berry essence into a syrup so intense you'll want to drizzle it over everything from yogurt to your morning oatmeal.
The Texture Crew
Eggs do double duty: yolks for richness, whites for lift. Separate them while they're cold (way easier), then let everything come to room temperature before mixing. Room-temp eggs incorporate smoothly without the grainy texture that gives away a rookie baker. The whites get whipped to soft peaks and folded in last, creating a cheesecake that puffs slightly in the oven and settles into a perfect flat top as it cools — no cracks, no sinkhole, no tears.
Heavy cream gets whipped to soft peaks and folded into the cooled strawberry reduction, creating a mousse-like swirl that stays distinct from the vanilla batter. It's like two desserts in one slice, each bite a perfect balance of creamy and fruity. Don't reach for the half-and-half here; we need the fat to keep the swirl from turning icy in the fridge.
The Unexpected Star
Golden Oreos might seem like an odd choice, but they bring a vanilla-bean note that plays beautifully with strawberries. We blitz them into fine crumbs, then toss with melted butter and a pinch of salt. The salt sounds weird, but it amplifies the sweetness and keeps the crust from tasting one-note. If you're an Oreo purist, regular chocolate ones work, but the golden version keeps the color palette bright and summery.
Cornstarch is my insurance policy against a weepy cheesecake. Just a teaspoon stabilizes the filling so it cuts cleanly and doesn't weep that weird liquid puddle that makes people think you messed up. It's the same trick pastry chefs use in custard tarts, and nobody will know it's there except you and your smug knowledge.
The Final Flourish
Freeze-dried strawberries are the crunch layer's secret weapon. They shatter into bright red shards that taste like strawberry essence in solid form. Regular dried berries are chewy and sad; freeze-dried gives you that satisfying crackle that makes people close their eyes involuntarily. Pulse them in a food processor until they're dust, then fold with crushed cookies and a touch of melted white chocolate to create clusters that taste like the best parts of strawberry shortcake and cookies-and-cream had a delicious baby.
Everything's prepped? Good. Let's get into the real action...
The Method — Step by Step
- Start with the crust because it needs time to cool while you make the filling. Blitz your golden Oreos into fine crumbs — you want the texture of damp sand, not powder. Pour in the melted butter and pulse until everything looks like wet beach sand that holds together when you squeeze it. Press this mixture into the bottom of a 9-inch spring-form pan, using the flat bottom of a measuring cup to compact it evenly. Don't go up the sides; we want a neat, flat base that'll contrast with the tall filling. Slide this into a 325°F oven for exactly 12 minutes — set a timer because golden cookies turn from perfect to burnt faster than you can say "cheesecake emergency."
- While the crust bakes, start your strawberry reduction. Hull and quarter your berries, then toss with sugar and lemon juice in a small saucepan. The sugar will start drawing out juice immediately — that's good. Cook over medium heat, stirring occasionally, until the berries break down and the mixture looks like loose jam. This takes about 15 minutes, and your kitchen will smell like a strawberry festival. Reduce the heat and simmer for another 5 minutes until it coats the back of a spoon like warm honey. Cool this completely — warm syrup will melt your whipped cream later and create a pink swirl disaster.
- Okay, ready for the game-changer? In a stand mixer with the paddle attachment, beat the cream cheese and mascarpone on medium speed for a full 3 minutes. I know it feels like forever, but this is where we banish lumps forever. Scrape down the bowl twice — those stubborn cream cheese bricks love to hide under the paddle. The mixture should look like thick whipped cream and be completely smooth. Add the sugar in a slow stream, then the cornstarch and salt. Beat another minute until everything is glossy and combined. This is the foundation of your dreams; don't rush it.
That's it — you did it. But hold on, I've got a few more tricks that'll take this to another level...
Insider Tricks for Flawless Results
The Temperature Rule Nobody Follows
Room temperature isn't just a suggestion — it's the difference between a silky cheesecake and a lumpy disaster. I set everything out on the counter two hours before I start, even the eggs. If you're impatient (and I usually am), submerge cold eggs in warm tap water for 10 minutes. Cold cream cheese will fight you every step, leaving tiny stubborn lumps that no amount of beating will smooth out. A friend tried skipping this step once — let's just say it didn't end well, and her cheesecake had the texture of cottage cheese with trust issues.
Why Your Nose Knows Best
Don't rely on timers alone — your nose is the best cheesecake detector. When it's perfectly baked, your kitchen will smell like vanilla and strawberries had a beautiful baby. If you smell something eggy or sulfurous, you've over-baked it and the texture will be rubbery. The scent should be warm, inviting, and make you want to face-plant into the oven. That's when you know it's ready to come out, even if your timer says you have five minutes left.
The 5-Minute Rest That Changes Everything
After baking, let the cheesecake rest in the turned-off oven for exactly 5 minutes with the door closed. This allows the center to finish setting without over-baking the edges. Open the door slightly and let it rest another 5 minutes. This gradual cooling prevents the dramatic collapse that makes your beautiful cheesecake look like a sinkhole. Patience here is everything — I know it's hard when the smell is driving you crazy, but trust the process.
The Release Technique
Don't try to remove the spring-form sides while the cheesecake is warm — it will tear and stick like a bad breakup. Run a thin knife around the edge while it's cooling, then chill completely. When you're ready to serve, wrap a hot towel around the pan for 30 seconds. The gentle heat will release the sides without melting your filling. If any bits stick, use an offset spatula to gently nudge them free instead of yanking and risking a cracked edge.
The Slice That Impresses
Here's the pro secret: use dental floss. Unflavored, unwaxed dental floss slides through a chilled cheesecake like a hot knife through butter, giving you perfect edges every time. Measure your floss longer than the diameter, loop it under the cheesecake, cross the ends over the top, and pull through. Wipe the floss between cuts for pristine slices that look like they came from a boutique bakery. Your guests will think you're a wizard, and you'll never go back to a knife again.
Creative Twists and Variations
This recipe is a playground. Here are some of my favorite ways to switch things up:
Raspberry Lemon Zing
Swap the strawberries for raspberries and add the zest of two lemons to the batter. The tartness cuts through the richness like a citrus knife. Use lemon Oreos for the crust and add poppy seeds to the crunch topping for texture that pops between your teeth. The result tastes like summer sunshine in dessert form, bright and addictive.
Chocolate Covered Strawberry
Add 1/4 cup cocoa powder to the crust mixture and replace the golden Oreos with chocolate ones. Swirl in melted dark chocolate with the strawberry reduction for a marbled effect that looks like expensive art. The crunch topping gets a drizzle of white chocolate and cocoa nibs for a sophisticated finish that tastes like the best chocolate-covered strawberry you've ever had.
Tropical Escape
Replace half the strawberries with diced mango and add a splash of coconut extract to the batter. Use coconut cookies for the crust and toast some coconut flakes for the topping. The result tastes like a Caribbean vacation in dessert form — sunny, fruity, and impossible to stop eating. Add a tiny pinch of cardamom to the batter for an exotic whisper that makes people ask "what is that amazing flavor?"
Salted Caramel Dream
Swirl in 1/2 cup of cooled salted caramel instead of the strawberry reduction. The sweet-salty combination is addictive, especially when you add a sprinkle of flaky salt to the crunch topping. Use brown sugar in the crust for a deeper flavor that complements the caramel like they were made for each other. This version disappears faster than anything else I've ever brought to a potluck.
Berry Medley Magic
Use a mix of strawberries, blueberries, and blackberries for the reduction. Each berry brings its own personality — strawberries for brightness, blueberries for depth, blackberries for a wine-like complexity. The color turns a deep purple that's absolutely stunning, and the flavor is like the best berry jam you've ever tasted, but lighter and more sophisticated.
Mocha Madness
Add 2 tablespoons of instant espresso powder to the batter and replace the strawberry swirl with Kahlua-spiked coffee syrup. Use chocolate-covered espresso beans in the crunch topping for a caffeinated kick that makes this perfect for dinner parties. The coffee flavor intensifies the chocolate notes and keeps the whole thing from being too sweet.
Storing and Bringing It Back to Life
Fridge Storage
Cover the cheesecake loosely with plastic wrap, making sure it doesn't touch the surface or it'll stick and pull off your beautiful top. If you've already added the crunch topping, store it in a cake carrier or loosely tented with foil. It will keep for up to 5 days, though the crunch will start to soften after day 3. For best texture, add the topping just before serving if you're making it ahead. The cheesecake itself actually improves after a day as the flavors meld and mature like a fine wine.
Freezer Friendly
This cheesecake freezes beautifully — I've done it for up to 2 months with perfect results. Wrap individual slices in plastic wrap, then foil, and store in a freezer bag. Thaw overnight in the fridge for best texture, or at room temperature for 30 minutes if you're impatient. The crunch topping won't survive freezing, so add it fresh after thawing. Frozen cheesecake has a slightly denser texture that's actually delightful, like frozen custard.
Best Reheating Method
Cheesecake should never be microwaved — it turns rubbery and sad. For the best texture, let slices sit at room temperature for 20-30 minutes before serving. If it's been in the freezer, thaw overnight in the fridge first. For a slightly warmed slice that tastes like it just came from the bakery, place a piece in a 200°F oven for 5 minutes. Add the crunch topping after warming so it stays crisp and doesn't get soggy from the temperature change.