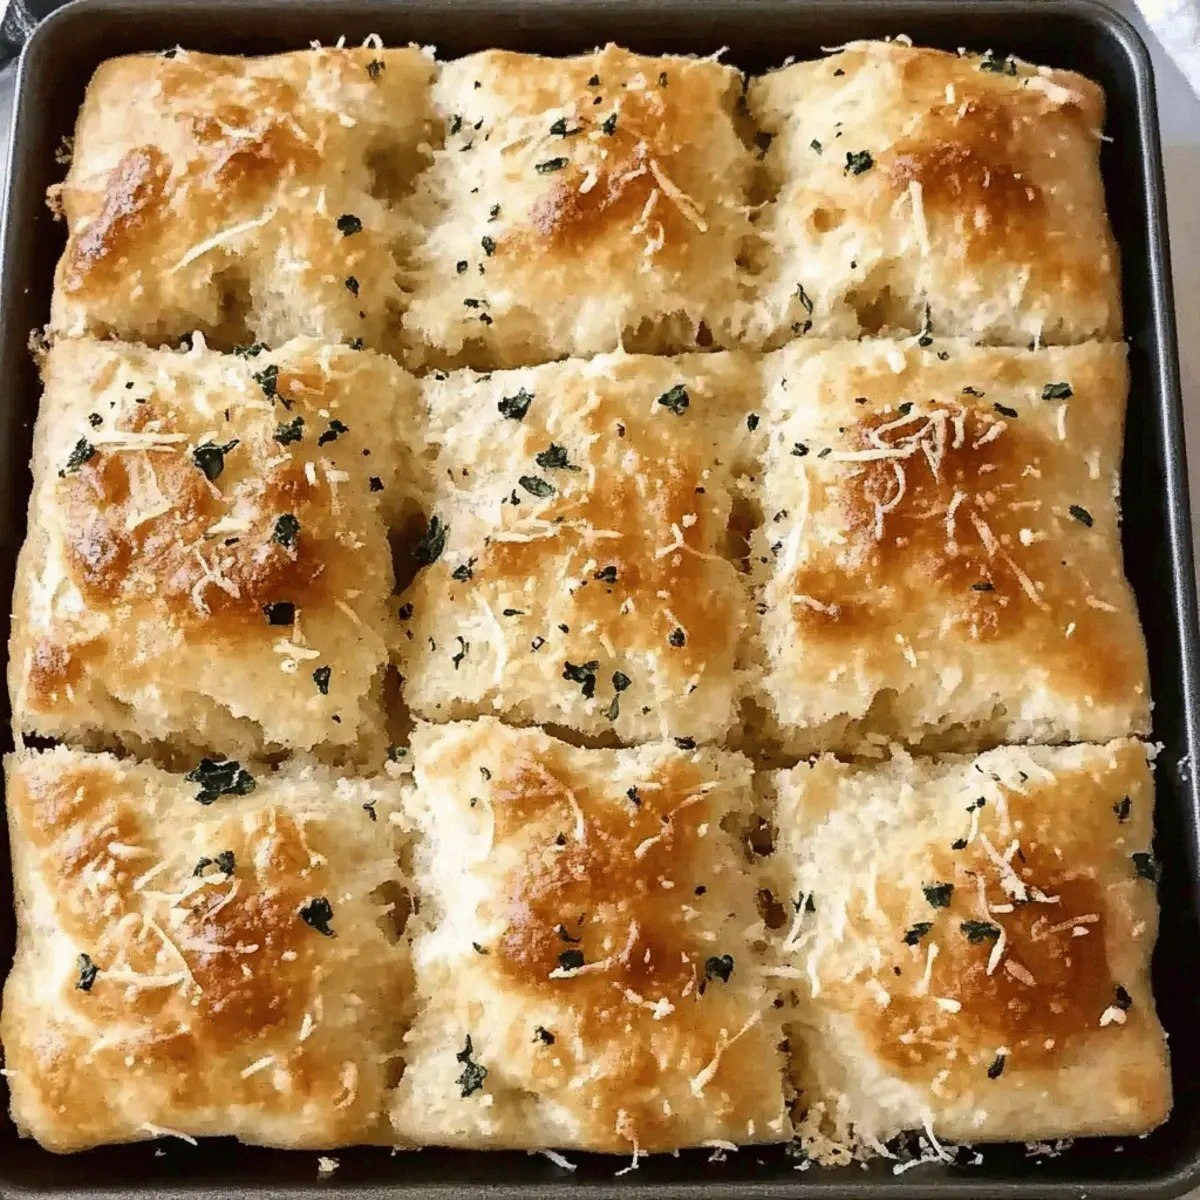
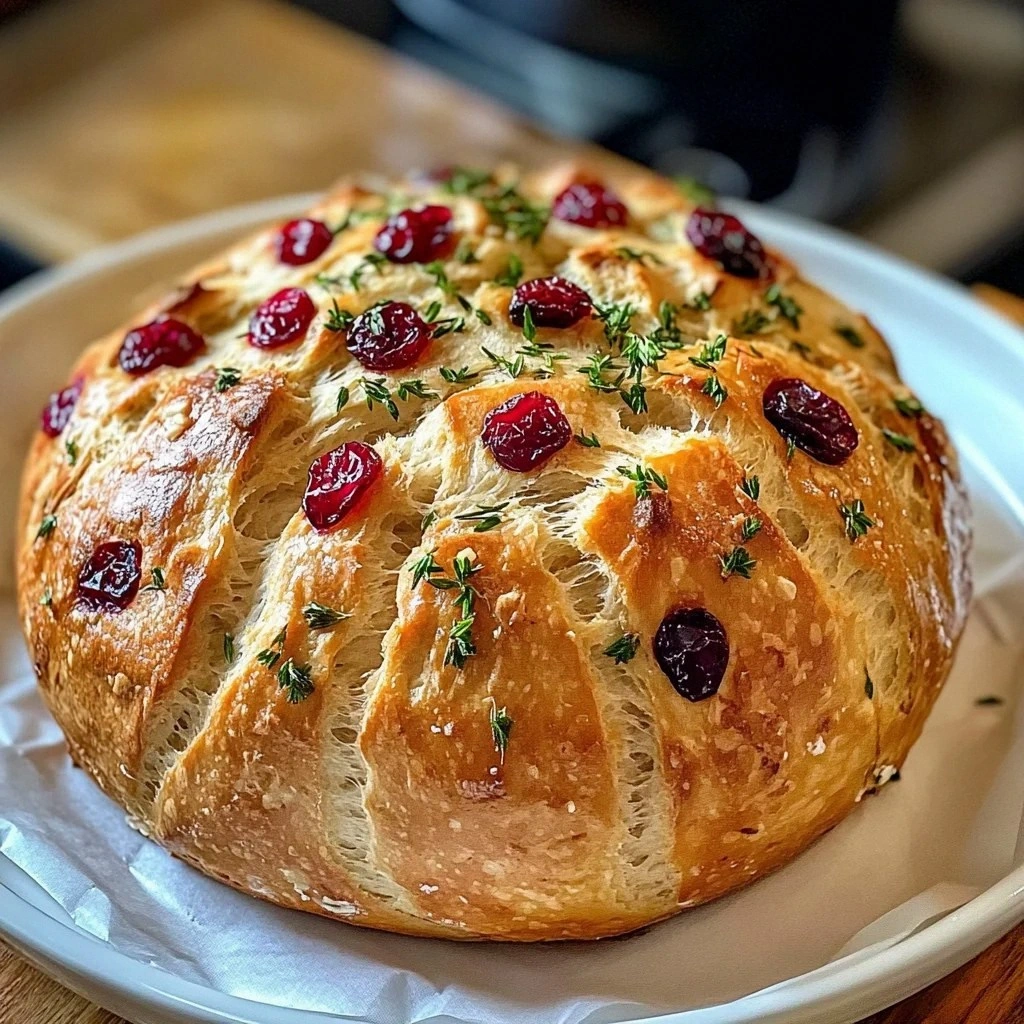
I still remember the first time I attempted to make artisan bread at home. It was a disaster of epic proportions — flour everywhere, a sticky mess that refused to cooperate, and a final product that could have doubled as a doorstop. Fast forward through countless failures, and I discovered this no-knead method that completely transformed my relationship with homemade bread. The combination of sweet-tart cranberries, aromatic herbs, and that glorious garlic butter creates something so magical, you'll find yourself making excuses to bake it every weekend.
There's something almost meditative about mixing flour, water, and yeast, then watching time work its magic while you go about your day. The anticipation builds as the dough slowly bubbles and expands on your counter, filling your kitchen with that unmistakable aroma of possibility. When you finally pull this golden-crusted beauty from the oven, slather it with that herb-packed garlic butter, and take that first bite — well, let's just say it's a moment that makes all those previous baking disasters worth it.
What makes this recipe absolutely foolproof is the no-knead technique that professional bakers have been using for decades, but somehow never made it into most home kitchens. Instead of wrestling with sticky dough and exhausting your arms with endless kneading, you'll simply mix everything together and let time do all the heavy lifting. The result is a bread with an impossibly crisp crust, a tender crumb studded with jewel-like cranberries, and flavors that taste like they came from a French bakery rather than your own kitchen.
Picture yourself pulling this out of the oven, the whole kitchen smelling incredible, your family gathering around like moths to a flame. That first slice, still warm, slathered with garlic butter that melts into every nook and cranny — it's the kind of moment that makes you understand why humans have been baking bread for thousands of years. Let me walk you through every single step — by the end, you'll wonder how you ever made it any other way.
What Makes This Version Stand Out
Revolutionary Simplicity: Most bread recipes require precise kneading, multiple rises, and constant attention. This version throws all that complexity out the window. You literally stir everything together with a wooden spoon, cover it, and walk away. The long fermentation develops flavors that rival any artisan bakery, while the high hydration creates those gorgeous air pockets that make artisan bread so special.
Flavor Explosion: The combination of tangy cranberries, earthy herbs, and savory garlic butter creates a bread that's impossible to categorize — it's simultaneously sweet, savory, herbal, and utterly addictive. Each bite delivers a different combination of flavors, keeping your taste buds constantly engaged and preventing the dreaded "bread boredom" that happens with plain loaves.
Texture Perfection: The no-knead method creates a bread with a crust so crisp it practically shatters when you cut into it, while the interior stays moist and tender with those gorgeous irregular holes that indicate proper fermentation. The cranberries provide delightful bursts of sweetness, while the herbs distribute their aromatic oils throughout every slice.
Make-Ahead Magic: This dough actually improves with age — you can mix it up to three days ahead and keep it in the fridge, developing even more complex flavors. When you're ready to bake, just shape and pop it in the oven. It's like having a French bakery in your fridge, ready whenever the craving strikes.
Fail-Safe Results: I've tested this recipe in everything from professional ovens to tiny apartment kitchens, and it works every single time. The high hydration prevents the dense, brick-like results that scare people away from bread baking. Even if you've never baked bread before, you'll achieve professional-looking results on your very first try.
Incredible Aroma Therapy: Let's be honest — half the joy of baking bread is that incredible smell that fills your home. This recipe takes it to another level with the herbs and garlic butter creating an aroma so intoxicating, you'll have neighbors knocking on your door asking what you're making. It's like a warm hug for your entire house.
Alright, let's break down exactly what goes into this masterpiece...
Inside the Ingredient List
The Foundation Builders
Bread flour forms the backbone of this recipe, providing the high protein content needed for proper gluten development. The protein creates those long, stretchy strands that trap carbon dioxide during fermentation, giving your bread its structure and those beautiful air pockets. Don't substitute all-purpose flour here — the lower protein content will give you a denser, less impressive result that doesn't achieve that artisan bakery texture we're after.
Instant yeast is your best friend in this recipe because it doesn't need to be proofed first — you can mix it directly with the dry ingredients. The long fermentation time allows even this fast-acting yeast to develop complex flavors usually associated with sourdough starters. Make sure your yeast is fresh (check the expiration date) because old yeast is the number one reason bread fails to rise properly.
Kosher salt does more than just season the bread — it strengthens the gluten structure and controls yeast activity. I prefer kosher salt because its larger crystals distribute more evenly throughout the dough, preventing those unpleasant salty pockets you sometimes get with table salt. The salt also brings out the natural sweetness in the cranberries and helps balance the herbs.
The Flavor Enhancers
Dried cranberries are the star players here, providing bursts of sweet-tart flavor that prevent the bread from becoming one-note. They rehydrate during the long fermentation, becoming plump and juicy without making the surrounding dough soggy. Chop them roughly if they're large — you want pieces big enough to provide textural interest but not so large they create weak spots in the bread structure.
Rosemary and thyme create an aromatic base that makes this bread smell like you've been transported to the Mediterranean. Fresh herbs are non-negotiable here — dried herbs will give you a musty, dusty flavor that completely misses the mark. The oils in fresh herbs distribute throughout the dough during fermentation, creating layers of flavor that develop and meld over time.
Extra-virgin olive oil adds richness and helps create that tender crumb we're after. It also helps the herbs distribute evenly throughout the dough and prevents the cranberries from clumping together. Use a good quality oil here — you don't need to break the bank, but avoid the really cheap stuff that tastes like old olives.
The Unexpected Game-Changers
Honey might seem out of place, but it serves multiple crucial functions. It feeds the yeast, helping it develop those complex flavors during the long fermentation. It also helps the crust achieve that gorgeous golden-brown color, and adds just enough sweetness to balance the tart cranberries without making the bread taste like dessert.
Garlic powder in the dough itself adds depth without being overwhelming — it blooms during baking and creates this incredible aroma that makes people weak in the knees. Don't substitute fresh garlic here — it can interfere with yeast activity and create bitter spots in your bread.
The Garlic Butter Magic
Unsalted butter forms the base of our finishing touch, and using unsalted is crucial because it lets you control the salt level precisely. European-style butter with higher fat content creates the most luxurious, spreadable texture, but regular butter works beautifully too. Let it soften properly — trying to work with cold butter is an exercise in frustration that nobody needs.
Fresh garlic, minced to a paste, distributes more evenly through the butter than chopped garlic. The paste releases its oils throughout the butter, creating that incredible aroma that makes people follow their noses to your kitchen. Fresh garlic is essential here — the pre-minced stuff in jars has a harsh, acrid flavor that will ruin your beautiful bread.
Parsley adds freshness and color to the garlic butter, preventing it from looking like something you'd spread on vampires. Flat-leaf parsley has better flavor than curly, and it holds up better when mixed into the butter. Chop it just before using — parsley loses its vibrant color and flavor quickly once cut.
Everything's prepped? Good. Let's get into the real action...
The Method — Step by Step
- Start with a large bowl — and I mean large. This dough will expand dramatically, and there's nothing worse than coming back to find your counter covered in escaped dough. Whisk together your bread flour, salt, and instant yeast until they're evenly distributed. This ensures the yeast and salt are properly mixed, preventing dead spots where the yeast might be inhibited by too much direct contact with salt.
- Add your water, olive oil, and honey to the dry ingredients. Here's where most people panic — the dough will look like a shaggy, wet mess that couldn't possibly become bread. That's exactly what you want! The high hydration is what creates those gorgeous air pockets. Use a wooden spoon to mix everything together until there are no dry patches of flour remaining. Don't overthink this — just stir until combined.
- Now comes the fun part — fold in your cranberries, rosemary, and thyme. The dough will be quite loose, so use a gentle folding motion rather than stirring vigorously. You want to distribute everything evenly without deflating the dough too much. Those cranberries will want to clump together, so take your time here. The herbs should be evenly distributed throughout, creating little green flecks that promise incredible flavor.
- Cover the bowl with plastic wrap — press it directly onto the surface of the dough to prevent a skin from forming. Now walk away. Let it sit at room temperature for 12 to 18 hours. I know, I know, that's a long time. But this is where the magic happens. The yeast will work slowly, developing complex flavors and creating those beautiful air bubbles that make artisan bread so special.
- When you're ready to bake, place your Dutch oven (with the lid on) in your oven and preheat to 450°F. This step is crucial — that screaming-hot Dutch oven creates the steam that gives you that incredible crust. Let it heat for at least 30 minutes after your oven reaches temperature. While it's heating, gently turn your dough out onto a well-floured surface. It will be sticky and loose — that's perfect!
- With well-floured hands, fold the dough over itself a few times to form a rough ball. Don't worry about making it perfect — rustic is what we're after here. The key is handling it as little as possible to preserve those air bubbles. Place it on a piece of parchment paper and cover with plastic wrap while your Dutch oven continues to heat. This short rest helps the gluten relax, making it easier to score later.
- Now comes the moment of truth. Carefully remove your preheated Dutch oven — remember, it's screaming hot! Remove the plastic wrap from your dough and use a sharp knife or razor blade to make a shallow slash across the top. This isn't just for looks — it controls where the bread will expand during baking. Quickly lift the parchment paper and dough into the Dutch oven, cover with the lid, and get it back in the oven fast to preserve the heat.
- Bake covered for 30 minutes, then remove the lid and bake another 15-20 minutes until the bread is deep golden brown. The internal temperature should reach about 210°F if you want to be precise. But honestly, you'll know it's done when it sounds hollow when you tap the bottom. Let it cool on a wire rack for at least an hour before slicing — I know it's torture, but cutting into hot bread will give you gummy results.
- While the bread cools, make your garlic butter by mixing softened butter with minced garlic, chopped parsley, and a pinch of salt. Let it sit while the bread cools — this gives the garlic time to infuse throughout the butter. When the bread is finally cool enough to slice, spread a generous amount of this liquid gold on each slice. That sizzle when it hits the warm bread? Absolute perfection.
- That's it — you did it. But hold on, I've got a few more tricks that'll take this to another level...
Insider Tricks for Flawless Results
The Temperature Rule Nobody Follows
Here's something that'll change your bread-baking game forever — use lukewarm water, not hot water. I know it seems counterintuitive, but water that's too warm will make your yeast work too fast, resulting in bland bread. Aim for water that feels just slightly warm on your wrist, about 70-75°F. This slower fermentation allows the development of complex flavors that make artisan bread so special. A friend tried using hot water once — let's just say it didn't end well, with bread that tasted like it came from a factory rather than a bakery.
Why Your Nose Knows Best
Trust your sense of smell throughout this process — it's your most reliable indicator of what's happening in your dough. During fermentation, you should notice a pleasant, slightly tangy, yeasty aroma developing. If it smells aggressively sour or like alcohol, your dough has over-fermented. If it smells flat and floury, it needs more time. This intuitive approach takes practice, but once you learn to trust your nose, you'll never need to second-guess your timing again.
The 5-Minute Rest That Changes Everything
After mixing your dough, let it rest for just five minutes before you start the fermentation. This brief pause, called autolyse, allows the flour to fully hydrate and starts gluten development without any effort on your part. The difference is remarkable — the dough becomes smoother, more extensible, and easier to shape later. It's one of those tiny steps that separates good bread from extraordinary bread, and it requires zero additional effort.
Steam Secrets for the Perfect Crust
While the Dutch oven method creates its own steam, you can take it further. Just before putting the lid on, spray the surface of your dough with water. This extra moisture creates even more steam, resulting in a crust that's so crisp and blistered, you'll think it came from a professional bakery. Don't overdo it — a light misting is all you need. Too much water will make your crust tough rather than crisp.
The Overnight Advantage
While you can bake this bread after 12 hours of fermentation, letting it go the full 18 hours develops significantly more flavor. The extended fermentation allows enzymes to break down complex starches into simple sugars, creating deeper, more nuanced flavors. If you can plan ahead, mix your dough before bed and bake it the next evening. The difference is remarkable — we're talking restaurant-quality versus merely good homemade bread.
Creative Twists and Variations
This recipe is a playground. Here are some of my favorite ways to switch things up:
The Mediterranean Makeover
Swap the cranberries for chopped sun-dried tomatoes and replace the herbs with oregano and basil. Add some crumbled feta to the garlic butter for a Greek-inspired version that pairs perfectly with grilled vegetables. The sun-dried tomatoes provide that same sweet-tart contrast as cranberries, but with a savory twist that makes this version perfect for serving alongside Mediterranean meals.
Autumn Harvest Edition
Replace the cranberries with dried cherries and add some toasted pecans to the dough. Use sage and rosemary for the herbs, and mix some maple syrup into your garlic butter instead of honey. This version screams fall and makes your house smell like Thanksgiving. The pecans add incredible texture and richness that takes this bread into special occasion territory.
The Everything Bagel Bread
Keep the cranberries but swap the herbs for everything bagel seasoning mixed right into the dough. Top the bread with more everything seasoning before baking for an extra-crunchy crust. The garlic butter gets upgraded with cream cheese mixed in, creating the most incredible spread that tastes like your favorite bagel but in artisan bread form. I dare you to taste this and not go back for seconds.
Spicy Southwest Version
Replace the cranberries with dried mango or pineapple, use cilantro and a touch of jalapeño for the herbs, and add some lime zest to both the dough and the garlic butter. The sweet-spicy combination is absolutely addictive, especially when served alongside chili or soup. The tropical fruit provides that necessary sweetness to balance the heat from the jalapeño.
Breakfast Bread Transformation
Swap the cranberries for golden raisins, use cinnamon and a touch of cardamom for the spices, and add some orange zest to both the dough and the garlic butter. Serve this toasted with cream cheese for what might be the most decadent breakfast ever. The warm spices make your kitchen smell like Christmas morning, regardless of the season.
Cheese Lover's Dream
Keep everything the same but fold in some sharp white cheddar chunks along with the cranberries. The cheese creates these incredible pockets of melty goodness throughout the bread, while the cranberries provide the perfect sweet contrast. This version is absolutely incredible when served warm with the garlic butter melting into all those cheesy crevices.
Storing and Bringing It Back to Life
Fridge Storage
Store your completely cooled bread in a paper bag at room temperature for up to 3 days. The paper allows the crust to breathe while preventing it from becoming rock hard. After day 3, transfer to a plastic bag — the crust will soften but the bread stays fresh for up to 5 days total. Never store warm bread in plastic — the trapped steam will make your beautiful crust soggy and sad.
Freezer Friendly
This bread freezes beautifully — slice it first, then freeze the slices in a single layer on a baking sheet. Once frozen, transfer to a freezer bag. This way you can grab individual slices as needed. Frozen bread stays good for up to 3 months, though honestly, mine never lasts that long. To thaw, either let it sit at room temperature for 30 minutes or pop it directly into the toaster.
Best Reheating Method
The absolute best way to revive day-old bread is to mist it lightly with water and warm it in a 350°F oven for 5-7 minutes. The water creates steam that refreshes the crust, bringing back that just-baked texture. For individual slices, the toaster works perfectly. Add a tiny splash of water before reheating — it steams back to perfection, restoring that crisp crust and tender interior.