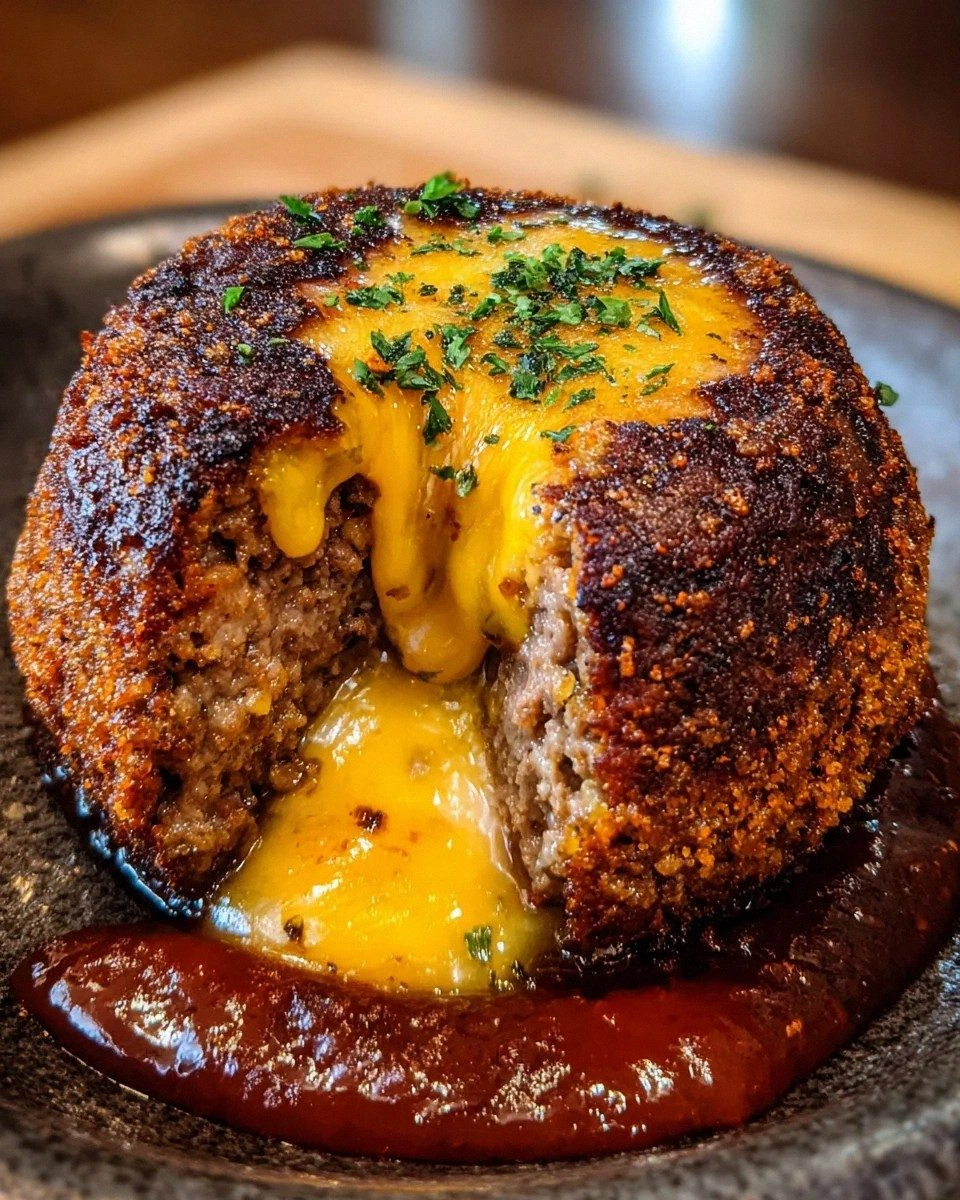
I’m about to drop a bombshell in your kitchen that will make every other cheeseburger you’ve ever known look like a sad, soggy side dish. Picture this: a golden‑brown patty that bursts open like a volcano, spilling molten cheese that oozes out with the same drama as a lava flow, but with the comforting aroma of a backyard grill. The moment I first attempted this, the kitchen was filled with the sound of sizzling butter and the smell of toasted bun‑like crusts, and I swear the smoke alarm gave a respectful nod before I even realized it was happening. I was daring my friends to try it, and I was ready to lose a few bets because the first bite was so addictive that I literally ate half the batch before anyone else got a chance.
Let’s set the scene: it’s a rainy Saturday afternoon, the kind that makes you want to stay in your pajamas, but the craving for something hearty and indulgent is louder than the thunder outside. You hear the sizzle of butter hitting a hot cast‑iron skillet, the faint pop of caramelizing meat, and the faint whisper of cheese melting into a silky river. Your hands feel the warm weight of the skillet, the doughy batter of the cake base feels like a pillow under your fingertips, and the anticipation builds as you watch the cheese begin to bubble and rise. That first fork‑pierce? It’s an orchestra of crackling crust, juicy beef, and a molten core that slides across your tongue like a buttery waterfall.
Why does this version stand out? Most recipes try to cram a cheeseburger into a bun, or a lava cake into a dessert, but they never truly respect the physics of both. Here, we treat the beef like a sturdy foundation, the cheese like a lava core, and the cake batter like a protective shell that holds it all together. The secret? A precise balance of fats, a dash of smoked paprika that whispers “grill” even when you’re indoors, and a clever technique that seals the cheese inside until the exact moment you cut into it. I’m talking about a flavor profile that hits you with the smoky, salty, cheesy, and buttery notes all at once, and a texture that goes from crisp edges to a gooey heart in seconds.
You’ll also notice a surprise ingredient that most people overlook: cream cheese. It’s the silent hero that gives the molten center that velvety, almost custard‑like consistency, preventing it from turning into a greasy puddle. And if you think that’s all, wait until you see the optional glaze—BBQ sauce or ketchup—drizzled on top, adding a sweet‑tangy contrast that makes every bite feel like a celebration. I dare you to taste this and not go back for seconds; I guarantee you’ll be the one handing out plates. Okay, ready for the game‑changer? Let me walk you through every single step — by the end, you’ll wonder how you ever made it any other way.
What Makes This Version Stand Out
- Flavor Explosion: The marriage of beef juices with a double‑cheese core creates a taste that’s simultaneously familiar and wildly new, like discovering a secret level in a video game.
- Texture Contrast: You get a crisp, caramelized crust, a tender, juicy patty, and a lava‑like cheese river—all in one bite, delivering that “crunch‑then‑melt” sensation.
- Simplicity Meets Sophistication: Despite the impressive presentation, the ingredient list is short, and the steps use everyday kitchen tools.
- Unique Presentation: Served on a simple plate, the molten center oozes out like a volcano, making it perfect for Instagram moments and bragging rights at dinner parties.
- Crowd‑Pleaser Factor: Whether you’re feeding kids, teens, or adults, this dish hits every age group’s comfort‑food cravings while feeling like a gourmet treat.
- Ingredient Quality: Using an 80/20 ground beef blend guarantees juiciness, while the blend of cheddar and mozzarella gives both sharpness and stretch.
- Cooking Method: The sear‑then‑bake technique locks in moisture and creates that perfect crust without overcooking the interior.
- Make‑Ahead Potential: You can prep the batter and cheese filling a day ahead, store them separately, and assemble quickly when you’re ready to wow.
Inside the Ingredient List
The Flavor Base
Ground Beef is the heart of this dish. I recommend an 80/20 blend because that little extra fat is what gives you that juicy, melt‑in‑your‑mouth experience. If you go too lean, the patty will dry out, and you’ll lose the glorious steam that pushes the cheese outward. When shopping, look for meat that’s bright red with a creamy white marbling—nothing gray or brown. If you can’t find 80/20, a 85/15 will still work, but you might need a splash more butter to compensate.
Garlic Powder adds a savory depth that makes the beef taste like it’s been slow‑cooked for hours. Fresh garlic works too, but it can burn quickly in the hot pan, turning bitter. A pinch of garlic powder is enough to lift the whole flavor profile without overwhelming the cheese. If you’re a garlic lover, feel free to double it, but remember: the goal is balance, not a garlic bomb.
Onion Powder brings a sweet, aromatic undertone that complements the garlic and rounds out the seasoning. It’s the silent partner that makes the beef taste like it’s been sautéed with onions without the extra moisture. Skipping it will leave the flavor a bit flat, so keep it in the mix.
The Texture Crew
Shredded Cheddar Cheese is the sharp, tangy component that screams “cheeseburger.” Its melt point is perfect for creating that golden‑brown crust on the outside while still staying gooey inside. If you use pre‑shredded cheese with anti‑caking agents, you might get a slightly grainy texture, so I always buy a block and shred it myself.
Shredded Mozzarella Cheese is the stretchy, stringy hero that gives the lava its pull‑apart quality. Think of it as the “cheese pull” you see in pizza ads, but inside a cake. The combination of cheddar and mozzarella ensures you get both flavor and meltability.
Cream Cheese is the secret weapon that turns a runny cheese center into a velvety river. Its high fat content stabilizes the molten core, preventing it from separating into oil and curds. If you substitute with ricotta, you’ll lose that luxurious mouthfeel.
The Unexpected Star
Unsalted Butter is used for searing the beef and greasing the pan. The butter’s milk solids brown beautifully, adding a nutty, caramelized note that you just can’t get from oil alone. Make sure the butter is hot before you add the meat—if it sizzles immediately, you’re on the right track.
Paprika (or smoked paprika) introduces a subtle smokiness that mimics the flavor of an outdoor grill. It also gives the crust a gorgeous reddish hue, making the final presentation pop. If you love a deeper smoke flavor, go heavy on the smoked variety, but don’t overdo it—just enough to hint at the grill.
Salt and Black Pepper are the classic seasonings that bring everything together. Season the beef generously; the meat will absorb a lot of the salt during cooking, and the pepper adds a gentle heat that balances the richness.
The Final Flourish
BBQ Sauce or Ketchup Glaze (optional) adds a sweet‑tangy finish that cuts through the richness of the cheese and beef. Drizzle it right after the cake comes out of the oven for a glossy, finger‑licking glaze. If you prefer a smoky kick, swap the BBQ sauce for a thin layer of chipotle ketchup.
Everything's prepped? Good. Let's get into the real action...
The Method — Step by Step
Start by preheating your oven to 375°F (190°C). While the oven warms, combine the shredded cheddar, shredded mozzarella, and softened cream cheese in a large bowl. Mix until the cheeses are evenly distributed; you’ll notice the mixture becomes glossy and slightly sticky—this is the molten core waiting to erupt.
In a separate bowl, season the ground beef with garlic powder, onion powder, paprika, salt, and black pepper. Use your hands to gently fold the spices into the meat—don’t over‑mix, or you’ll end up with a dense, tough patty. Form the meat into four equal balls, then flatten each into a disc about ½ inch thick.
Heat a cast‑iron skillet over medium‑high heat and add two tablespoons of unsalted butter. As soon as the butter foams and starts to turn golden, place the beef discs in the pan. Hear that sizzle? That’s the sound of flavor locking in. Cook for 2‑3 minutes per side until a deep brown crust forms but the interior is still pink.
While the patties are searing, prepare the cake batter. In a mixing bowl, whisk together 1 cup of all‑purpose flour, 1 tsp baking powder, a pinch of salt, and 2 tbsp melted butter. Slowly add ½ cup milk while whisking to avoid lumps, then fold in the cheese mixture, ensuring every bite will have a molten surprise.
Now comes the crucial assembly step. Take each seared patty and place a generous spoonful (about ¼ cup) of the cheese‑filled batter on top, spreading it gently so it covers the meat but doesn’t spill over the edges. The batter acts like a protective shell that will bake into a golden cake while keeping the cheese inside.
Transfer the assembled patties onto a parchment‑lined baking sheet, leaving a little space between each. Slide the sheet into the preheated oven and bake for 12‑15 minutes, or until the batter has puffed up, turned a beautiful golden‑brown, and the cheese core starts to bubble at the edges.
When the timer dings, remove the tray and let the cakes rest for 3 minutes. This short rest allows the interior to settle, but not so long that the cheese solidifies. If you’re feeling adventurous, drizzle a tablespoon of BBQ sauce or ketchup glaze over each cake while they’re still hot, letting the glaze melt into a glossy finish.
Finally, serve immediately. Use a wide spatula to lift each cake onto a plate, and watch the molten center ooze out like lava spilling over a volcano. Pair with a crisp side salad or some sweet potato fries for the ultimate comfort‑meal experience.
That's it — you did it. But hold on, I've got a few more tricks that'll take this to another level. Trust me, these little tweaks will make your next batch even more unforgettable, and your friends will be begging for the secret.
Insider Tricks for Flawless Results
The Temperature Rule Nobody Follows
Most home cooks crank the oven up to 425°F hoping to speed things up, but that actually causes the outer batter to burn before the cheese fully melts. Keep the oven at a steady 375°F; this moderate heat lets the batter rise evenly while the interior reaches that perfect molten state. I once tried the high‑heat shortcut and ended up with a crunchy crust and a cheese core that was still solid—total disappointment.
Why Your Nose Knows Best
Your sense of smell is the most reliable indicator that the cheese is about to erupt. When you catch a faint buttery, slightly caramelized aroma wafting from the oven, that’s the moment the cheese is bubbling beneath the crust. If you wait for visual cues alone, you might pull the cakes out too early and miss the glorious lava flow.
The 5‑Minute Rest That Changes Everything
Letting the cakes sit for exactly five minutes after baking lets the interior settle just enough to keep the cheese flowing, but not so long that it solidifies. This short rest also allows the juices from the beef to redistribute, ensuring each bite is juicy rather than dry.
Butter‑Infused Pan Secret
Before you even start searing the beef, coat the skillet with a thin layer of butter and a sprinkle of flour. The flour creates a barrier that prevents the butter from burning, while still giving you that nutty, browned flavor that makes the crust sing.
Sauce Timing Mastery
If you love a glaze, apply it during the last two minutes of baking, not after. This timing lets the glaze caramelize slightly, creating a sticky, glossy finish that clings to the cake without sliding off.
Creative Twists and Variations
This recipe is a playground. Here are some of my favorite ways to switch things up:
Spicy Jalapeño Inferno
Add finely diced jalapeños to the cheese mixture and a pinch of cayenne to the beef seasoning. The heat cuts through the richness, making each bite a thrilling experience for spice lovers.
Bacon‑Wrapped Delight
Wrap each assembled patty in half a slice of bacon before baking. The bacon crisps up, adding a smoky crunch that pairs perfectly with the cheesy lava.
Blue Cheese Blast
Swap half of the cheddar for crumbled blue cheese. The pungent tang adds complexity and makes the molten center even more decadent.
Mediterranean Twist
Incorporate chopped sun‑dried tomatoes and a sprinkle of oregano into the cheese filling. The result is a slightly sweet, herbaceous version that feels like a gourmet appetizer.
Breakfast Edition
Replace the ground beef with breakfast sausage, and serve the lava cake with a side of scrambled eggs. It’s a brunch crowd‑pleaser that turns the classic burger into a morning marvel.
Storing and Bringing It Back to Life
Fridge Storage
Allow the cakes to cool completely, then wrap each tightly in plastic wrap and store in an airtight container. They’ll keep for up to 3 days. When you’re ready to eat, reheat in a 350°F oven for 10‑12 minutes; the cheese will melt again, and the crust will regain its crispness.
Freezer Friendly
These cakes freeze beautifully. Place the cooled, wrapped cakes on a baking sheet and freeze solid for an hour, then transfer to a zip‑top freezer bag. They’ll last up to 2 months. To reheat, bake from frozen at 375°F for 20‑25 minutes, adding a splash of water to the pan to create steam and keep the interior moist.
Best Reheating Method
For the ultimate reheated experience, use a skillet. Melt a teaspoon of butter over medium heat, add the cake, cover, and let it steam for 3‑4 minutes. The bottom will get a lovely crust while the top stays soft, and the cheese core becomes molten again. A tiny splash of water in the pan before covering prevents the cake from drying out.