I still remember the first time I attempted to make pull-apart pizza bread for a game night. I was so confident, so smug about my culinary skills, that I didn't even bother to read the recipe all the way through. Thirty minutes later, I had a sticky, doughy mess that looked like something you'd find under a couch cushion rather than something you'd serve to friends. The humiliation was real, folks. But here's the thing about epic kitchen failures — they either break you or they forge you into a better cook. I chose the latter, and after months of obsessive testing, tweaking, and taste-testing (my neighbors still talk about the "pizza bread summer"), I've emerged with what I genuinely believe is the most irresistible version of this crowd-pleasing classic.
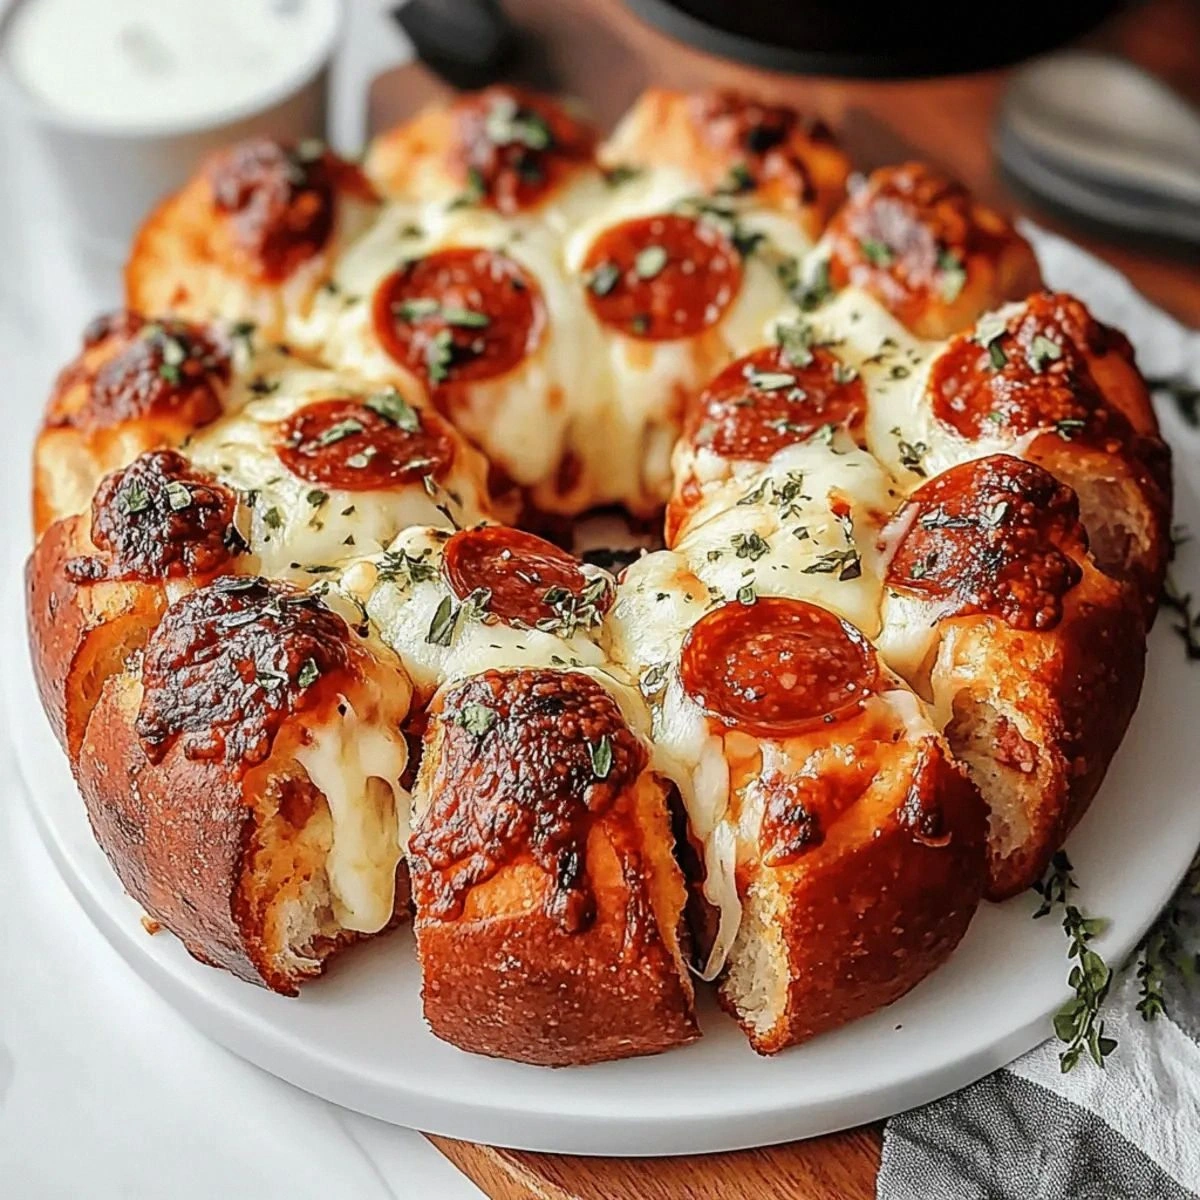
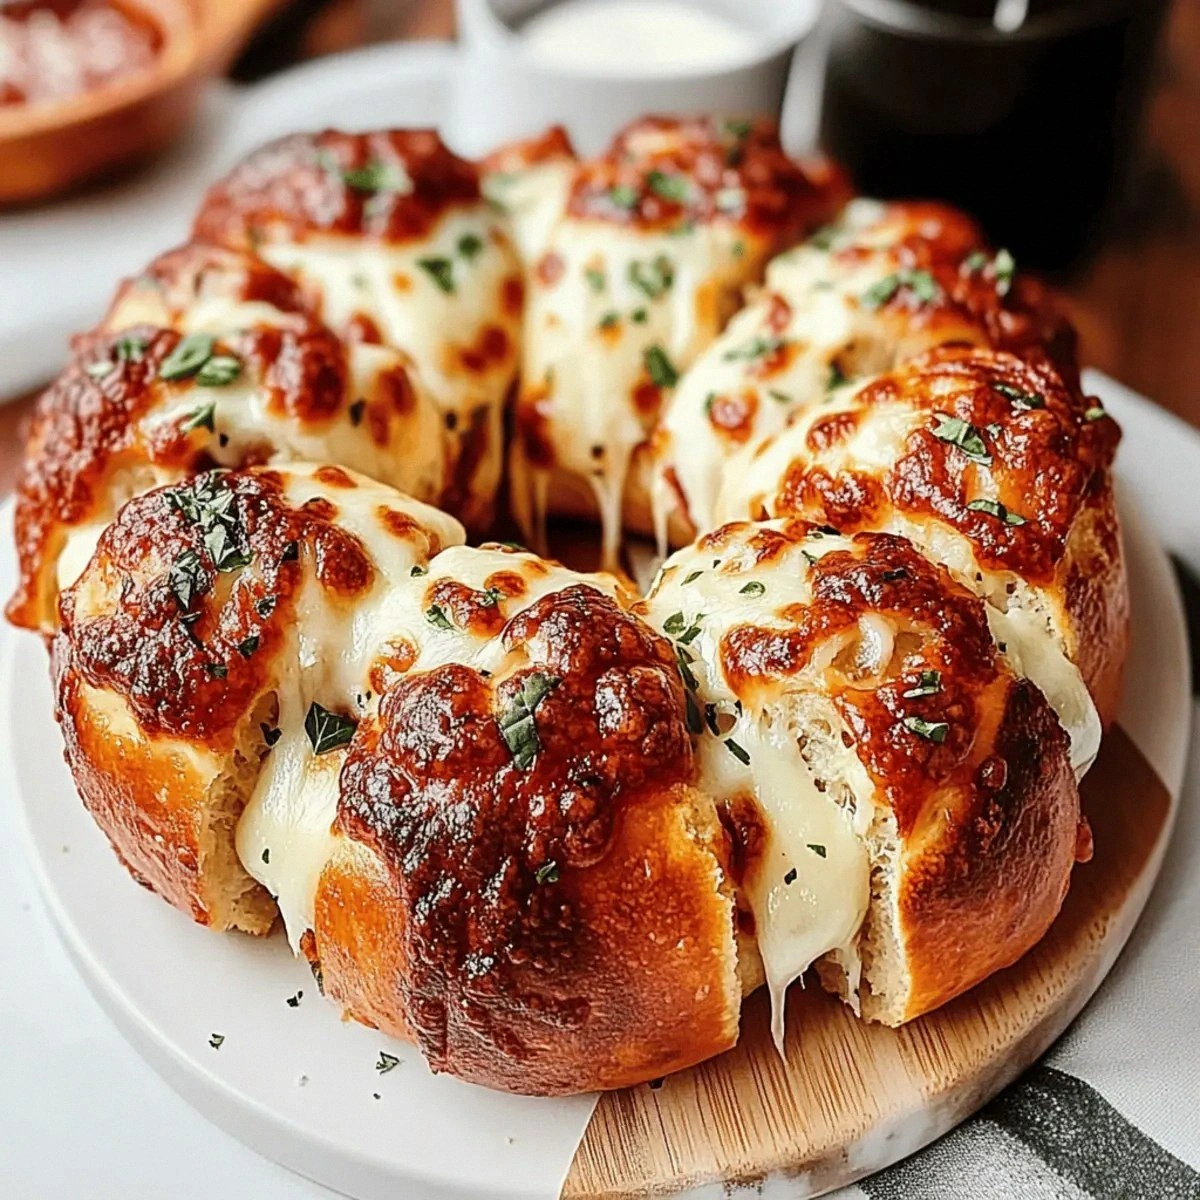
Picture this: golden-brown dough pieces, each one a perfect pocket of bubbling mozzarella and savory herbs, all nestled together in a pan like they're sharing secrets. When you pull one piece, it stretches into those Instagram-worthy cheese strings that make everyone at the party simultaneously reach for their phones. The aroma hits you first — that intoxicating blend of garlic, oregano, and yeasty dough that's somehow both nostalgic and exciting. That first bite? Pure magic. The outside has that satisfying crunch that gives way to a soft, pillowy interior that's been infused with all those Italian herbs and spices we've come to associate with our favorite pizzeria.
What makes this version different from the hundreds of pull-apart bread recipes floating around the internet? I'm glad you asked. Most recipes get the fundamentals completely wrong — they either overload the dough with toppings (resulting in soggy, sad bread) or they don't season aggressively enough (hello, bland city). My version uses a technique I call "flavor layering" where we season at every single step, building complexity like we're creating the world's most delicious edible Russian nesting doll. Plus, I've discovered the exact ratio of cheese to dough that ensures every piece is perfectly balanced, not just the lucky few on top.
Okay, ready for the game-changer? Instead of using plain olive oil like every other recipe insists, we create a garlic-herb infused oil that transforms ordinary pizza dough into something that tastes like it came straight from a Roman trattoria. This isn't just about adding flavor — it's about creating an experience that starts the moment your guests smell it baking and doesn't end until they're fighting over the last piece. Let me walk you through every single step — by the end, you'll wonder how you ever made it any other way.
What Makes This Version Stand Out
Cheese Distribution: Unlike other recipes where the cheese pools at the bottom or only tops a few pieces, our cutting technique ensures every single dough ball gets its fair share of melty mozzarella love. Each piece is individually seasoned and stuffed, creating a democratic pizza experience where no bite is left behind.
Texture Contrast: Most pull-apart breads are either too soft (mushy bread, anyone?) or too crusty (hello, broken teeth). Our method creates the perfect contrast — crispy, golden edges that shatter like thin ice, revealing a tender, chewy interior that pulls apart in the most satisfying way imaginable.
Speed Factor: While traditional recipes make you wait for hours of rising time, this version uses store-bought pizza dough that tastes completely homemade after our special treatment. You can go from zero to hero in under 45 minutes, which means spontaneous pizza cravings never have to go unsatisfied again.
Flavor Bomb Oil: That garlic-herb oil we make isn't just brushed on top — it's massaged into every crevice, creating layers of flavor that make each bite more addictive than the last. I dare you to taste this and not go back for seconds, thirds, and probably fourths.
Visual Drama: This isn't just food — it's a centerpiece. When you place this golden dome of cheesy goodness in the middle of your table, conversations stop, phones come out, and suddenly everyone's Instagram story features your culinary masterpiece. The pull-apart reveal never gets old.
Make-Ahead Magic: Here's what most recipes won't tell you — you can prep this entire thing up to the baking step, wrap it tightly, and freeze it for up to a month. When unexpected guests arrive or you need emergency comfort food, just pop it in the oven and let the magic happen.
Ingredient Flexibility: While I'll share my favorite combination, this recipe is like a Choose Your Own Adventure book for adults. Want to add pepperoni? Go for it. Prefer a white pizza version? I've got you covered. The base technique works with whatever pizza toppings make your heart sing.
Alright, let's break down exactly what goes into this masterpiece...
Inside the Ingredient List
The Flavor Base
Let's start with the foundation of any great pizza creation — the dough. Now, I know what you're thinking: "But homemade dough is so much better!" And you're right, it absolutely is. But here's my confession — I'll be honest, I ate half the batch before anyone else got to try it, and that was after making homemade dough from scratch. The store-bought stuff, when treated right, gives you 90% of the flavor with 10% of the effort. Look for pizza dough in the refrigerated section of your grocery store, usually near the biscuits and crescent rolls. The fresher, the better — check the expiration date and give it a gentle squeeze through the package. It should feel soft and pliable, not stiff or crackly.
Olive oil is our next superstar, and please, for the love of all that is holy, use the good stuff here. This isn't the time for that giant bottle of "light tasting" oil you bought for sautéing vegetables. We're looking for extra virgin olive oil with character — something that tastes like olives, not cardboard. The oil carries all our herbs and spices, so if you start with bland oil, you're building a flavor house on a foundation of disappointment. I keep a special bottle just for recipes like this, where the oil's flavor really shines through.
The Aroma Alchemists
Garlic is where most recipes go wrong — they either use too little and you can't taste it, or they use raw garlic that stays sharp and aggressive even after baking. Our solution? We infuse the garlic in warm oil first, which mellows its bite while amplifying its sweet, nutty qualities. Three cloves might seem like overkill, but trust me on this one. As the bread bakes, that garlic perfume wafts through your kitchen like a seductive Italian grandmother is cooking in your house.
Dried oregano and basil are the dynamic duo of Italian-American cuisine, but here's what most people don't know — they need to be "woken up" before use. If you've ever wondered why your Italian food tastes flat even when you use plenty of herbs, it's probably because you're adding them straight from the jar. We'll bloom them in hot oil, which releases their essential oils and transforms them from dusty afterthoughts to flavor powerhouses. The difference is so dramatic that you'll never go back to sprinkling dried herbs directly on your food again.
The Heat Brigade
Red pepper flakes are the unsung hero of this recipe, adding just enough heat to make things interesting without overwhelming the other flavors. A pinch might seem insignificant, but it's the difference between flat, one-dimensional bread and something that makes your taste buds sit up and pay attention. The heat should build slowly, hitting you in the back of the throat after you've already fallen in love with the garlic and herbs. If you're cooking for people who think black pepper is too spicy, you can reduce it slightly, but please don't eliminate it entirely — that tiny bit of heat is what makes the cheese taste cheesier and the garlic taste garlickier.
The Cheese Dream Team
Parmesan cheese is our flavor foundation — salty, nutty, and packed with umami that makes everything taste more like itself. The grated stuff in the green can will work in a pinch, but if you can swing it, buy a wedge of real Parmigiano-Reggiano and grate it yourself. The pre-grated stuff is often mixed with cellulose to prevent clumping, which can make it taste slightly chalky. Fresh-grated Parmesan melts into the oil, creating a savory paste that seasons every piece of dough from the inside out.
Mozzarella is where we get that Instagram-worthy cheese pull, but not all mozzarella is created equal. Skip the pre-shredded bags — they're coated with anti-caking agents that prevent proper melting. Instead, look for a low-moisture block that you can cube yourself. The cubes should be about half-inch pieces — large enough to create those dramatic cheese strings, but small enough to stuff into the dough without tearing it. And please, for all that is holy, don't use fresh mozzarella here. The water content is too high and will turn your beautiful bread into a soggy, disappointing mess.
The Fresh Finish
Fresh parsley might seem like an optional garnish, but it's actually crucial for cutting through all that richness. The bright, slightly peppery notes provide the perfect counterpoint to all that cheese and garlic, keeping the whole thing from becoming a one-note experience. Chop it just before serving — the fresher, the better. Those little flecks of green also make the whole thing look more appetizing, like you actually know what you're doing in the kitchen even if you're usually the person who burns water.
Pizza sauce for dipping is non-negotiable. Sure, you could serve this bread naked, but why would you when you could have that perfect marriage of saucy and cheesy? Warm the sauce slightly before serving — cold pizza sauce straight from the fridge is a crime against humanity that I simply cannot condone. If you're feeling fancy, you can doctor up a jarred sauce with a pinch of sugar, a splash of red wine, and some extra herbs, but honestly? A good quality jarred sauce heated until just bubbling is all you need.
Everything's prepped? Good. Let's get into the real action...
The Method — Step by Step
- Let's start by creating our flavor base, and this is where the magic really begins. Pour your olive oil into a small saucepan and set it over medium-low heat. While it's warming, mince your garlic — and I mean really mince it, not those chunky pieces that taste like you're eating raw garlic cloves. When the oil shimmers but isn't smoking, add the garlic and watch it like a hawk. This next part? Pure magic. Stir it gently for about 90 seconds, just until the edges start to turn the palest gold. Your kitchen should smell like you're living inside a garlic knot at this point, and if it doesn't, your heat is too low. The goal is to infuse the oil with garlic flavor while taming its sharp bite — think sweet and nutty, not aggressive and raw.
- Now we bloom our herbs, which sounds fancy but is actually just toasting them in hot oil to wake up their flavors. Add your oregano, basil, and red pepper flakes to the garlic oil, stirring constantly for about 30 seconds. You should see the herbs darken slightly and become incredibly fragrant — it's like someone opened a pizzeria in your kitchen. Watch out here because this mixture can go from perfectly toasted to burnt and bitter in seconds, so don't walk away from the stove here. Remove it from heat immediately and let it cool while you prep the dough. That sizzle when it hits the pan? Absolute perfection.
- Time to tackle the dough, and this is where most people mess up by overthinking it. Remove your pizza dough from the package and let it rest on the counter for 10 minutes — cold dough is stubborn dough, and we want it to cooperate. Cut it into 24-30 roughly equal pieces, but don't stress if they're not perfect. Actually, having slightly different sizes creates more nooks and crannies for the cheese to hide in, which is exactly what we want. Roll each piece into a rough ball between your palms, but don't obsess over perfection here — rustic is our friend.
- Now comes the fun part — stuffing these babies with cheese. Take each dough ball and flatten it slightly in your palm, creating a little nest for our mozzarella cubes. Place a cheese cube in the center, then pinch the dough around it like you're making tiny dumplings. Roll it gently to seal, making sure there are no gaps where the cheese can escape during baking. Think of it as edible origami, except when you're done, you get to eat your art. If you've ever struggled with this part, you're not alone — and I've got the fix. Don't overstuff them, or they'll burst like delicious little cheese bombs in your oven.
- Preheat your oven to 375°F now, even though we're not ready to bake yet. This ensures it reaches the perfect temperature by the time we're done assembling. While it's heating, grab a bundt pan or a 9-inch cake pan and grease it thoroughly with butter or cooking spray. I prefer a bundt pan because it creates that gorgeous crown shape that makes everyone think you're some kind of baking wizard, but a regular cake pan works perfectly fine. The key is making sure every surface is well-greased — there's nothing sadder than beautiful bread that won't release from the pan.
- This is the moment of truth where we bring everything together. Brush each stuffed dough ball with our garlic-herb oil — really get in there and make sure every surface is coated. As you oil them, start arranging them in your prepared pan, overlapping slightly like a delicious game of Tetris. The oil should pool slightly at the bottom, which is exactly what we want — it'll create a crispy, flavorful base that'll have everyone fighting over the bottom pieces. Save about 2 tablespoons of the oil for later; we'll use it to brush the top.
- Sprinkle the Parmesan cheese over the top of your arranged dough, making sure to get some in all the crevices. This is going to create that golden, crispy top that contrasts beautifully with the soft interior. Drizzle the remaining garlic-herb oil over everything, then cover the pan loosely with plastic wrap and let it rise in a warm spot for about 20 minutes. The dough should puff up slightly and look more relaxed — this step ensures your bread will be light and airy, not dense like a doorstop.
- Into the oven it goes, and now we wait. Bake for 25-30 minutes, but start checking at 20 minutes. You're looking for a deep golden-brown top and edges that have pulled away slightly from the sides of the pan. The cheese should be bubbling up through the cracks, creating those gorgeous caramelized bits that everyone fights over. If the top is browning too quickly, tent it loosely with foil for the last 10 minutes. Your kitchen should smell like a pizzeria had a baby with a bakery, and resisting the urge to open the oven door every five minutes will be your greatest challenge.
- When it's done, remove it from the oven and let it rest for exactly 5 minutes — no more, no less. This brief rest allows the cheese to set slightly so it doesn't all come gushing out when you flip it, but it's still short enough that you get that dramatic cheese pull. Run a knife around the edges to loosen it, then place a large plate over the top and invert it with confidence (and maybe a kitchen towel for protection). If you've greased your pan properly, it should slide out like a dream, leaving behind only a few crispy cheese bits that you'll definitely want to scrape out and eat immediately.
- Scatter the fresh parsley over the top while it's still hot — the heat will wilt it just enough to release its bright flavor without turning it into sad, gray flecks. Serve it immediately with the warmed pizza sauce on the side, and watch as your guests transform into ravenous wolves. Picture yourself pulling this out of the oven, the whole kitchen smelling incredible, and suddenly you're not just a person who made bread — you're a legend who created an experience. The first pull is always the most dramatic, so make sure everyone's watching for maximum impact.
That's it — you did it. But hold on, I've got a few more tricks that'll take this to another level...
Insider Tricks for Flawless Results
The Temperature Rule Nobody Follows
Here's what separates the amateurs from the pros: ingredient temperature matters more than you think. Cold dough resists shaping and can tear around your cheese cubes, while room-temperature dough stretches and cooperates like a dream. Your mozzarella should be cool but not cold — if it's straight from the fridge, it'll take longer to melt and might not create those Instagram-worthy cheese pulls we all crave. I leave my cheese on the counter for 15 minutes before cubing it, and the results are dramatically better. A friend tried skipping this step once — let's just say it didn't end well, and she ended up with cheese that stayed stubbornly solid while the bread over-browned.
Why Your Nose Knows Best
Your sense of smell is your most underutilized kitchen tool when making this bread. When the garlic is perfectly infused in the oil, your kitchen should smell like the world's best pizzeria, not like raw garlic. If you catch yourself thinking "wow, that's a lot of garlic," you've probably gone too far. The same goes for the bread itself — when it's perfectly baked, you'll smell toasted cheese and herbs before you even open the oven. If you find yourself checking the clock more than using your nose, you're doing it wrong. Most recipes get this completely wrong. Here's what actually works: trust your senses over the timer every single time.
The 5-Minute Rest That Changes Everything
I know you're going to want to dig in immediately — the smell is torture, the anticipation is killing you, and your guests are circling like sharks. But here's the thing: those five minutes of resting time aren't just suggested, they're essential. During this brief pause, the cheese sets slightly so you get clean pulls instead of a molten cheese explosion. The bread's structure firms up just enough to hold together when you invert it, but stays soft enough for that perfect tear-apart texture. Use this time to warm your pizza sauce, garnish with parsley, and build the anticipation. Trust me, good things come to those who wait, and this bread is no exception.
The Pan Size Secret
Most recipes are annoyingly vague about pan size, which drives me absolutely bonkers. Too small, and your bread becomes dense and undercooked in the middle. Too large, and you lose that dramatic height that makes it a showstopper. After testing this recipe in every pan I own, I found that a standard 10-12 cup bundt pan or a 9-inch round cake pan works perfectly for one package of dough. If you're doubling the recipe (and honestly, why wouldn't you?), use a 9x13-inch pan and add 5-10 minutes to the baking time. The bread should dome up dramatically and look almost too big for the pan — that's when you know you've got it right.
The Cheese Cube Cutting Technique
The way you cut your mozzarella directly impacts your cheese pull success. Too large, and the cheese won't melt properly, leaving you with rubbery chunks. Too small, and they disappear into the dough, leaving you wondering where all the cheese went. I cut mine into roughly half-inch cubes — about the size of large dice. They should be substantial enough to create dramatic cheese strings but small enough to stuff easily into the dough. Pro tip: if you're using fresh mozzarella (which I already told you not to do, but I know some of you rebels will anyway), pat it dry with paper towels first or you'll end up with a swimming pool at the bottom of your pan.
Creative Twists and Variations
This recipe is a playground. Here are some of my favorite ways to switch things up:
The Supreme Pizza Version
Transform this into supreme pizza bread by adding mini pepperoni slices and diced bell peppers to each dough ball along with the cheese. Use about 1/2 cup of each, diced very small so they don't tear the dough. The pepperoni releases its spicy oils as it bakes, creating little pockets of pizza-shop flavor throughout. I've found that turkey pepperoni works better than regular because it doesn't release as much grease, which can make the bread soggy. If you use regular pepperoni, blot the pieces with paper towels before stuffing them.
The White Pizza Wonder
For a sophisticated twist, skip the pizza sauce entirely and create a white pizza version. Replace the dried basil and oregano with 1 teaspoon each of dried thyme and rosemary, and add 1/4 cup of ricotta cheese to the stuffing mixture. The ricotta creates these creamy pockets that pair beautifully with the mozzarella, and the woodsy herbs make it taste like something you'd find at a fancy wine bar. Serve it with a side of garlic butter for dipping instead of marinara — it's absolutely divine and perfect for when you want to impress people who think they know what pizza bread should taste like.
The Buffalo Wing Adventure
Here's where things get wild — buffalo chicken pull-apart bread that's perfect for game day. Replace the Italian herbs with 1 teaspoon each of garlic powder and onion powder, then add 1/2 cup of shredded cooked chicken and 2 tablespoons of buffalo sauce to the stuffing mixture. Use blue cheese dressing for dipping instead of pizza sauce. The key is using mild buffalo sauce — too hot and it overpowers everything, too mild and you lose that signature buffalo flavor. I like to drizzle a little extra buffalo sauce over the top before serving for that authentic wing-shop vibe.
The Breakfast-for-Dinner Remix
Who says this has to be an appetizer? Create a breakfast version by replacing the herbs with 1 teaspoon of everything bagel seasoning and adding small cubes of cooked breakfast sausage and scrambled eggs to the stuffing. Use cheddar cheese instead of mozzarella for that classic breakfast flavor. Serve it with warm maple syrup for dipping — trust me on this one. The sweet-savory combination is absolutely addictive, and it's become my go-to for brunch gatherings where people expect the usual muffins and fruit.
The Mediterranean Escape
Give it a Mediterranean twist by adding chopped Kalamata olives, sun-dried tomatoes, and crumbled feta to the stuffing mixture. Replace the Italian herbs with dried oregano and a pinch of cinnamon (my Greek grandmother's secret weapon). Use olive tapenade for dipping instead of pizza sauce. The briny olives and sweet tomatoes create these flavor bombs throughout the bread, while the feta adds tangy pockets that cut through all the richness. It's like taking a vacation to the Greek islands without leaving your kitchen.
The Dessert Detour
Okay, this one might sound crazy, but dessert pull-apart bread is absolutely a thing and it's incredible. Replace the savory oil with melted butter mixed with cinnamon and sugar, stuff the dough with cream cheese and chocolate chips, and serve it with warm caramel sauce for dipping. The technique is exactly the same, but the result is like monkey bread meets cheesecake. I make this for brunches and watch people's minds get blown when they realize they're eating dessert in pull-apart form. It's especially fun to serve this after people have had the savory version — the confusion on their faces is priceless.
Storing and Bringing It Back to Life
Fridge Storage
Here's the reality — you're probably not going to have leftovers because this stuff disappears faster than free samples at Costco. But if you do somehow manage to exercise superhuman restraint, let the bread cool completely, then wrap it tightly in plastic wrap followed by aluminum foil. It'll keep in the refrigerator for up to 3 days, though honestly, it's best within the first 24 hours. The cold makes the cheese firm up and the bread gets a bit dense, but we've got tricks for bringing it back to life. Store any leftover pizza sauce in a separate airtight container — don't be tempted to store them together or you'll end up with soggy, sad bread.
Freezer Friendly
This is where things get interesting because this bread freezes beautifully, both before and after baking. For the ultimate make-ahead party trick, assemble the entire thing up to the baking step, wrap it tightly in plastic wrap and foil, and freeze for up to a month. When you're ready to bake, remove the plastic wrap, replace the foil, and bake from frozen at 350°F for about 45-50 minutes, removing the foil for the last 10 minutes to brown the top. It's like having a secret weapon in your freezer for impromptu gatherings or those nights when you need serious comfort food but don't want to cook.
If you're freezing already-baked bread, let it cool completely, then wrap individual portions. This way you can pull out exactly what you need without defrosting the whole thing. Reheat from frozen at 325°F for about 15 minutes, wrapped in foil to prevent over-browning. The texture won't be quite as perfect as fresh-baked, but it's about 95% there, which is pretty miraculous for something that was rock-solid an hour ago.
Best Reheating Method
Whatever you do, please don't microwave this bread — it turns the dough rubbery and the cheese into a strange, plasticky substance that no amount of pizza sauce can save. Instead, add a tiny splash of water to the bottom of a baking dish, place your bread on top, and cover tightly with foil. The water creates steam that brings the bread back to life, making it almost as good as fresh. Heat at 325°F for about 10-15 minutes until warmed through, then uncover for the last 2-3 minutes to crisp up the top again.
For individual pieces, wrap them in foil with a damp paper towel and heat at 350°F for about 8-10 minutes. The damp paper towel creates just enough steam to rehydrate the bread without making it soggy. If you're really in a rush, you can use a toaster oven, but keep a close eye on it — it goes from perfect to burnt in the blink of an eye. And here's a pro tip: if the bread seems a bit dry after storing, brush it lightly with olive oil before reheating — it brings back that fresh-baked shine and flavor.