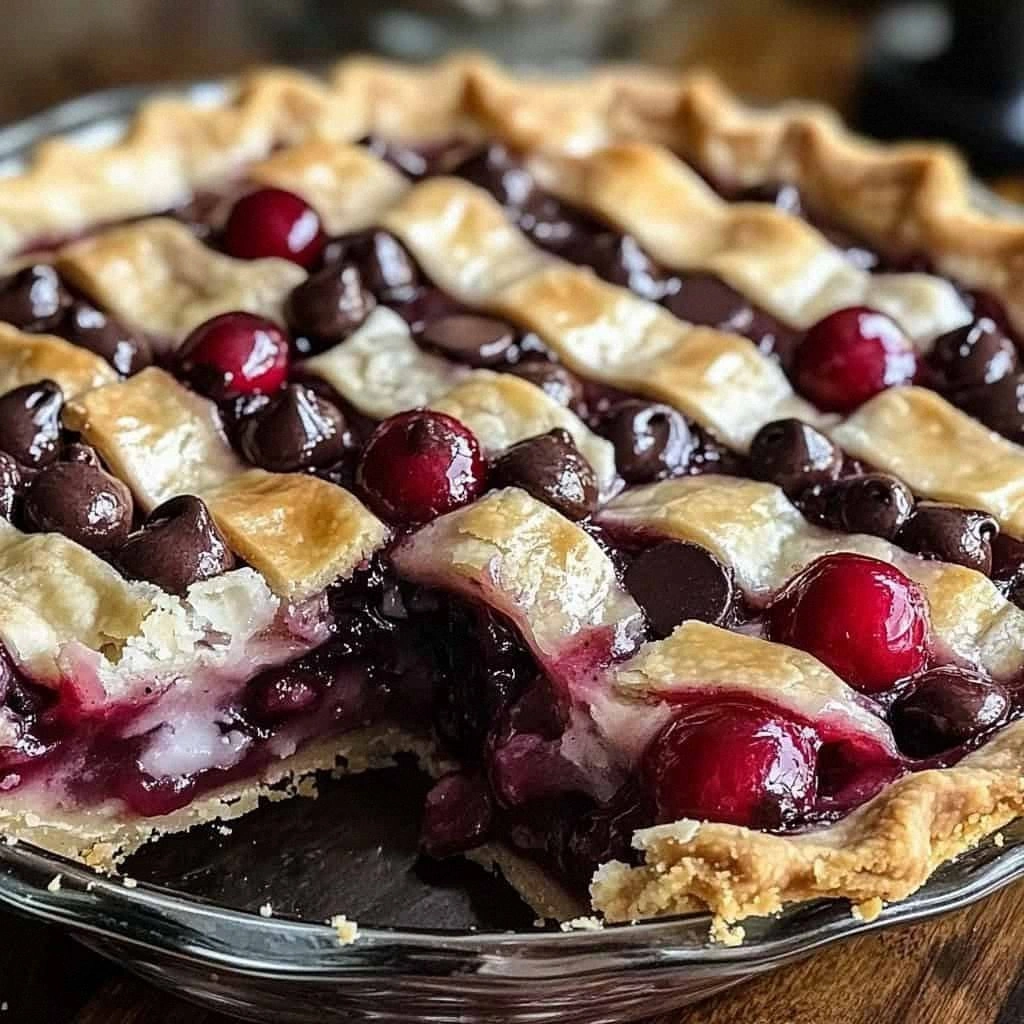
Picture this: it's a sweltering July afternoon, the kind where the air sticks to your skin like plastic wrap and the cicadas are screaming their summer anthem. I'm standing in my kitchen, fan blasting, cherry juice running down my forearms like I've committed some kind of fruit felony. There are pits on the counter, chocolate smears on the fridge door, and a pie crust draped over the rolling pin like a lazy cat. I was supposed to be making a "simple" cherry pie for the neighborhood potluck, but somewhere between pitting four pounds of cherries and sneaking handfuls of chocolate chips, I went rogue. The result? A pie so obnoxiously good that I actually hid the last slice behind the Greek yogurt in the fridge just so I wouldn't have to share.
Here's the thing: most cherry pies are fine. They're polite. They show up to the party in their little red dress, smile for photos, and leave without making a scene. But this cherry chocolate chip pie? It arrives late, spills wine on the carpet, and convinces everyone to dance on the furniture. It's the dessert equivalent of that friend who convinces you to get matching tattoos after three margaritas. The chocolate doesn't just sit there like a wallflower — it melts into little pockets of molten heaven that burst when you hit them with your fork, creating these rivers of bittersweet bliss that cut through the tangy cherries like a plot twist you never saw coming.
I've been perfecting this recipe for three years now, ever since that fateful day when my chocolate addiction collided head-on with my cherry obsession. The first attempt was a disaster — chocolate seized, cherries turned to mush, crust tasted like cardboard's sad cousin. But something magical happened when I got the ratios right, when I learned that almond extract is basically cherries' secret handshake, when I discovered that a little cornstarch goes a long way toward preventing that dreaded fruit pie soup. Now? I dare you to taste this and not go back for seconds. I double-dog dare you to make it for your next family gathering and watch grown adults fight over the last piece like it's the last lifeboat on the Titanic.
What makes this version different from every other cherry chocolate chip pie recipe cluttering up the internet? Oh, just everything. We're talking about a crust that's so flaky it practically levitates, cherries that maintain their personality instead of turning to baby food, and chocolate that stays distributed instead of sinking to the bottom like it's trying to escape. Plus, I've figured out the temperature trick that prevents the dreaded soggy bottom (yes, that's a technical term, and no, it's not just a great band name). Let me walk you through every single step — by the end, you'll wonder how you ever made it any other way.
What Makes This Version Stand Out
Flaky Factor: This isn't just a pie crust; it's architectural marvel made of butter and dreams. The combination of cold butter and vegetable shortening creates layers so delicate they practically dissolve on your tongue, while maintaining enough structure to hold in all that juicy filling without collapsing like a house of cards in a hurricane.
Chocolate Distribution System: Most recipes just toss chocolate chips into the filling and hope for the best. Hope is not a strategy, friends. I coat the chips in a light dusting of flour before folding them in, which prevents them from sinking to the bottom and creates even little surprises throughout every single bite.
Cherry Integrity: Nobody wants cherry pie that tastes like cherry-flavored baby food. The secret? A quick maceration with sugar and lemon juice that draws out excess liquid before baking, concentrating the flavor while keeping the fruit plump and recognizable instead of turning into red mush.
Almond Extract Alchemy: Just a whisper of almond extract transforms the entire pie from "pretty good" to "why am I eating this straight from the pan at 2 AM." It's like cherries' best friend who always makes them look better at parties — subtle but absolutely essential.
Temperature Precision: Starting the pie at a higher temperature sets the crust quickly, preventing soggy bottom syndrome (SBS — it's real, look it up), then dropping the temp ensures the filling cooks through without turning the edges darker than your ex's heart.
Make-Ahead Magic: This pie actually tastes better the next day after the flavors have had time to mingle and get to know each other better. Make it Sunday, serve it Tuesday, and watch everyone assume you're some kind of pastry wizard.
Alright, let's break down exactly what goes into this masterpiece...
Inside the Ingredient List
The Flavor Base
The cherries are obviously the star here, but not all cherries are created equal. Fresh, in-season cherries will give you the brightest, most complex flavor — think of them as the difference between a live concert and a Spotify recording. If you're using fresh, go for a mix of sweet and tart varieties; I like three-quarters sweet cherries and one-quarter tart for that perfect sweet-tart balance that makes your taste buds do a happy dance. Frozen cherries work beautifully too — just make sure to thaw them completely and drain off all that liquid, or you'll end up with cherry soup in a crust bowl. And here's the kicker: if you're really in a pinch, good quality canned cherries (packed in water, not syrup) can work, but you'll want to reduce the sugar in the recipe by about a third since they're typically sweeter than fresh.
The chocolate chips aren't just there for decoration — they're co-stars in this production. Semi-sweet is the way to go here; milk chocolate would make the whole thing cloyingly sweet like a candy bar melted over fruit, and bittersweet can be too aggressive, like that person at the dinner party who won't stop talking politics. The key is getting good quality chips that actually taste like chocolate, not just brown wax. I've made this with everything from grocery store basics to fancy artisanal chips, and while the pie is still good with cheap chocolate, using the good stuff is like upgrading from economy to first class — suddenly you understand what all the fuss was about.
The Texture Crew
Cornstarch is your insurance policy against fruit pie soup, and don't let anyone tell you different. Some recipes use flour, but flour can make the filling cloudy and give it a pasty texture like bad elementary school cafeteria pie. Cornstarch thickens clear and clean, letting those beautiful cherry juices shine through while still giving you that perfect sliceable consistency. The ratio is crucial — too little and your pie bleeds like it's been in a bar fight; too much and it turns into cherry rubber. I've found that a quarter cup for four cups of fruit hits the sweet spot every time.
Lemon juice might seem counterintuitive — cherries are already tart, right? But here's the thing: lemon juice doesn't just add tartness, it brightens all the other flavors like turning up the contrast on a photo. It's the difference between a good pie and a pie that makes people close their eyes when they take the first bite. Just a tablespoon is enough to make the cherries taste more like themselves, the same way a pinch of salt makes chocolate taste more chocolatey.
The Unexpected Star
Almond extract is the secret handshake of the cherry world — they just get each other. Cherries and almonds are botanical cousins, both members of the rose family, which explains why a tiny bit of almond makes cherries taste more cherry-like than cherries taste on their own. But here's where people mess up: they get heavy-handed with it. You want just an eighth of a teaspoon — barely enough to register, but enough to make people ask "what's that amazing flavor?" Too much and your pie tastes like a marzipan factory exploded. Trust me on this one; I've made almond-cherry pies that could strip paint.
The Final Flourish
Turbinado sugar on top isn't just for looks (though it does create these gorgeous caramelized sparkly bits that make the pie look like it's wearing a tiara). Those big sugar crystals add a delicate crunch that contrasts beautifully with the tender fruit filling — it's like the pie is wearing a little crown of texture. Regular granulated sugar works in a pinch, but it melts into a smooth surface. Turbinado stays partially crystallized, giving you these little pockets of caramelized sweetness that crack under your fork. Plus, it photographs beautifully for all those Instagram shots you're definitely going to take.
Everything's prepped? Good. Let's get into the real action...
The Method — Step by Step
- Make the crust first because it needs to chill while you question your life choices. In a large bowl, whisk together the flour and salt like you're trying to create a tiny flour snowstorm. Add the cold butter cubes and shortening pieces, then get your hands in there — yes, your actual hands — and start smearing the fat into the flour. You're not just mixing here; you're creating a texture that's part peas, part coarse sand, part tiny treasures that'll melt into flaky layers. This should take about 3-4 minutes, and your fingers should be freezing but not numb. If the butter starts getting soft and friendly, throw the whole bowl in the freezer for 5 minutes. Cold is your friend; warm is the enemy of flakiness.
- Drizzle in the ice water one tablespoon at a time, tossing with a fork like you're trying to keep everything moving without overworking it. This is where people mess up — they add all the water at once and end up with a soggy, tough mess. You want to add just enough water that the dough starts to clump together when you squeeze it, but not so much that it becomes a cohesive ball. Think of it as herding cats rather than creating a unified front. The dough should look shaggy and slightly dry in places — those dry bits will hydrate during the rest and create extra flakiness.
- Divide the dough roughly in half (one piece slightly larger than the other since you'll need more for the bottom crust), wrap each in plastic wrap, and press into flat disks. Refrigerate for at least an hour or up to three days. Here's the part where impatient people ruin everything — if you don't let it rest, the gluten will be tight and angry, and your crust will shrink like cotton in hot water. While it's chilling, make the filling and try not to eat all the chocolate chips straight from the bag.
- For the filling, combine the cherries, sugar, cornstarch, almond extract, lemon juice, and salt in a large bowl. Stir gently like you're trying not to wake a sleeping baby — you want to coat the cherries without turning them into mash. Let this mixture sit for 15-20 minutes while the cherries release some of their juice and the sugar starts to dissolve. This isn't just waiting time; it's flavor-concentration time. The cherries will get glossy and start to look like they're wearing a light syrup coat. If you're using frozen cherries, make sure they're completely thawed and drained, or you'll end up with enough liquid to fill a small swimming pool.
- Roll out the larger piece of dough on a floured surface, rotating it a quarter turn every few rolls to keep it from sticking and to maintain a rough circle shape. You're aiming for about 12 inches in diameter — big enough to hang over the edges of your 9-inch pie plate by about an inch. Transfer it to the plate by rolling it loosely around your rolling pin, then unrolling it like you're laying down a delicate dough carpet. Don't stretch it to fit; just gently ease it into the corners. If it tears, patch it with a little water and some dough scraps — nobody will ever know except you and your pie therapist.
- Pour the cherry filling into the crust, making sure to scrape in all the sugary juices that have accumulated at the bottom of the bowl. Dot the top with chocolate chips, distributing them as evenly as possible. Here's where I like to press about half of them down slightly into the filling so they don't all migrate to the top during baking. The remaining chips will create that gorgeous chocolate-studded surface that makes people involuntarily say "ooooh" when you slice it.
- Roll out the second piece of dough for the top. You can go traditional with a full top crust (cut a few slits for steam), get fancy with a lattice, or go rustic with cut-outs. I'm partial to a lattice because it shows off the gorgeous filling and makes you look like you went to pastry school, even if you learned everything from YouTube videos and sheer determination. Whatever you choose, make sure to seal the edges well — you don't want cherry lava oozing out and burning onto your baking sheet.
- Brush the top crust with the beaten egg mixed with milk, getting into all the nooks and crannies. This isn't just for looks (though it does create that gorgeous golden-brown shine); it also helps seal the crust and adds a subtle richness. Sprinkle generously with turbinado sugar — be aggressive here, those sugar crystals are going to caramelize into little crunchy jewels that'll make you wonder why you don't put sugar on everything.
That's it — you did it. But hold on, I've got a few more tricks that'll take this to another level...
Insider Tricks for Flawless Results
The Temperature Rule Nobody Follows
Here's where home bakers consistently sabotage their own success: they don't adjust their oven temperature based on what they're baking. For fruit pies, you want to start hot at 425°F for the first 15 minutes — this blast of heat sets the crust quickly, preventing it from getting soggy underneath all that juicy filling. Then drop it down to 375°F for the remaining 35-45 minutes. This two-temperature method is the difference between a crust that's crisp and flaky versus one that's sad and soggy like wet cardboard. I learned this the hard way after serving what I now refer to as the "Cherry Soup Pie Incident of 2019" to my book club. Never again.
Why Your Nose Knows Best
Forget timers — your nose is the best pie detector you own. When the pie is almost done, your kitchen will start to smell like cherry jam and toasted butter with hints of chocolate. That's when you want to start checking. The crust should be deep golden brown, not pale like it's afraid of color. The filling should be bubbling up through the vents or lattice, looking thick and glossy like lava in a very delicious volcano. If the edges are getting too dark before the center is done (this happens to the best of us), tent them with foil. Don't wait for the filling to look completely set — it'll continue to thicken as it cools, and pulling it when it's still slightly jiggly in the center ensures you don't overbake it into rubber.
The 5-Minute Rest That Changes Everything
After you pull the pie from the oven, let it cool for exactly 5 minutes, then run a thin knife around the edge between the crust and the pie plate. This prevents the filling from gluing the crust to the dish as it cools, which can cause the crust to tear when you try to slice it later. It's like giving your pie a little spa treatment — those five minutes of attention pay off in clean slices that don't look like they've been through a food processor. A friend tried skipping this step once and ended up serving what she described as "deconstructed pie." It tasted great, but it looked like modern art.
Creative Twists and Variations
This recipe is a playground. Here are some of my favorite ways to switch things up:
The Bourbon Street Version
Add two tablespoons of good bourbon to the cherry filling along with a pinch of cinnamon and a scrape of fresh nutmeg. The bourbon cooks off but leaves behind this incredible depth that makes people ask if you used some kind of fancy artisanal cherries. I like to use a smoky bourbon here — it plays beautifully with the chocolate and gives the whole pie a sophisticated edge that pairs perfectly with coffee after dinner.
The White Chocolate Raspberry Remix
Swap the cherries for raspberries and use white chocolate chips instead of semi-sweet. The tartness of raspberries against the sweet creaminess of white chocolate is like summer in dessert form. Reduce the sugar by two tablespoons since white chocolate is sweeter than dark, and add an extra teaspoon of lemon juice to keep the balance. This version is dangerously good — I once ate half a pie while binge-watching period dramas and pretending I was British nobility.
The Adulting is Hard Version
Add a tablespoon of instant espresso powder to the filling and use dark chocolate chips instead of semi-sweet. The coffee enhances the chocolate flavor while adding a subtle bitterness that makes this feel like a very grown-up dessert. Serve it with barely sweetened whipped cream and watch your dinner guests suddenly start discussing philosophy and their feelings. This is the pie that makes people overshare.
The Tropical Getaway
Replace half the cherries with diced fresh mango and add a tablespoon of rum to the filling. Use coconut flakes instead of chocolate chips (or go wild and use both). The tropical fruit adds this sunny brightness that makes you feel like you're on vacation even if you're eating it in your cramped apartment while it's snowing outside. I make this in February when I can't stand another day of winter — it's like edible sunshine.
The Breakfast of Champions
Add a quarter cup of rolled oats to the filling and use half cherries and half blueberries. The oats absorb some of the juice and add a pleasant texture, while the blueberry-cherry combo tastes like someone bottled summer. This version is slightly less indulgent, which means you can absolutely eat it for breakfast and call it fruit and whole grains. I won't tell anyone.
The Spicy Sophisticate
Add a pinch of cayenne and a teaspoon of cinnamon to the filling, and use Mexican chocolate instead of regular chocolate chips. The subtle heat builds slowly and pairs beautifully with the fruit, while the cinnamon and Mexican chocolate add warmth and complexity. This is the pie that converts people who think they don't like fruit desserts. Serve it with cinnamon ice cream and prepare for people to propose marriage.
Storing and Bringing It Back to Life
Fridge Storage
Once the pie has cooled completely (this takes about 2 hours — don't rush it or you'll end up with cherry soup), cover it loosely with foil or plastic wrap and refrigerate. It'll keep for up to 4 days, though honestly, if you still have pie after 4 days, you're doing life wrong. The crust will start to soften after day 2, but here's the trick: reheat individual slices in a 350°F oven for 8-10 minutes. The crust crisps back up, the chocolate re-melts, and it's almost as good as day one. Microwaving works in a pinch, but it makes the crust rubbery and sad — like the difference between fresh bread and bread that's been left in a plastic bag too long.
Freezer Friendly
This pie freezes beautifully, which is dangerous information to have. Let it cool completely, then wrap the whole pie (or individual slices) tightly in plastic wrap followed by foil. It'll keep for up to 3 months in the freezer. To thaw, transfer to the fridge overnight, then reheat in a 350°F oven for 15-20 minutes. Pro tip: freeze slices on a baking sheet first, then wrap them individually. This way you can pull out single servings whenever you need a pick-me-up, which might be every day during certain weeks of the year. I won't judge.
Best Reheating Method
The oven is your friend here, always and forever. Preheat to 350°F, place the pie (or slice) on a baking sheet, and heat for 10-15 minutes for a whole pie, 8-10 minutes for slices. If the crust edges are already quite brown, cover them with foil to prevent burning. Add a tiny splash of water to the baking sheet before reheating — it'll create steam that helps re-crisp the bottom crust without drying out the filling. Whatever you do, don't reheat at too high a temperature or the chocolate will seize and turn grainy, and nobody wants grainy chocolate. Well, maybe someone does, but they're wrong.