Picture this: it’s a cold, rainy afternoon, the kind that makes you wish you could wrap yourself in a blanket of chocolate and never leave the couch. I was halfway through a marathon of “just one more episode” when the craving hit me like a freight train—intense, unavoidable, and absolutely non‑negotiable. I raided the pantry, found a lone packet of hot cocoa mix, and thought, “What if I turned this into a cookie that literally melts in your mouth?” Spoiler alert: the experiment turned into a full‑blown love affair, and I’m still buzzing from the first bite.
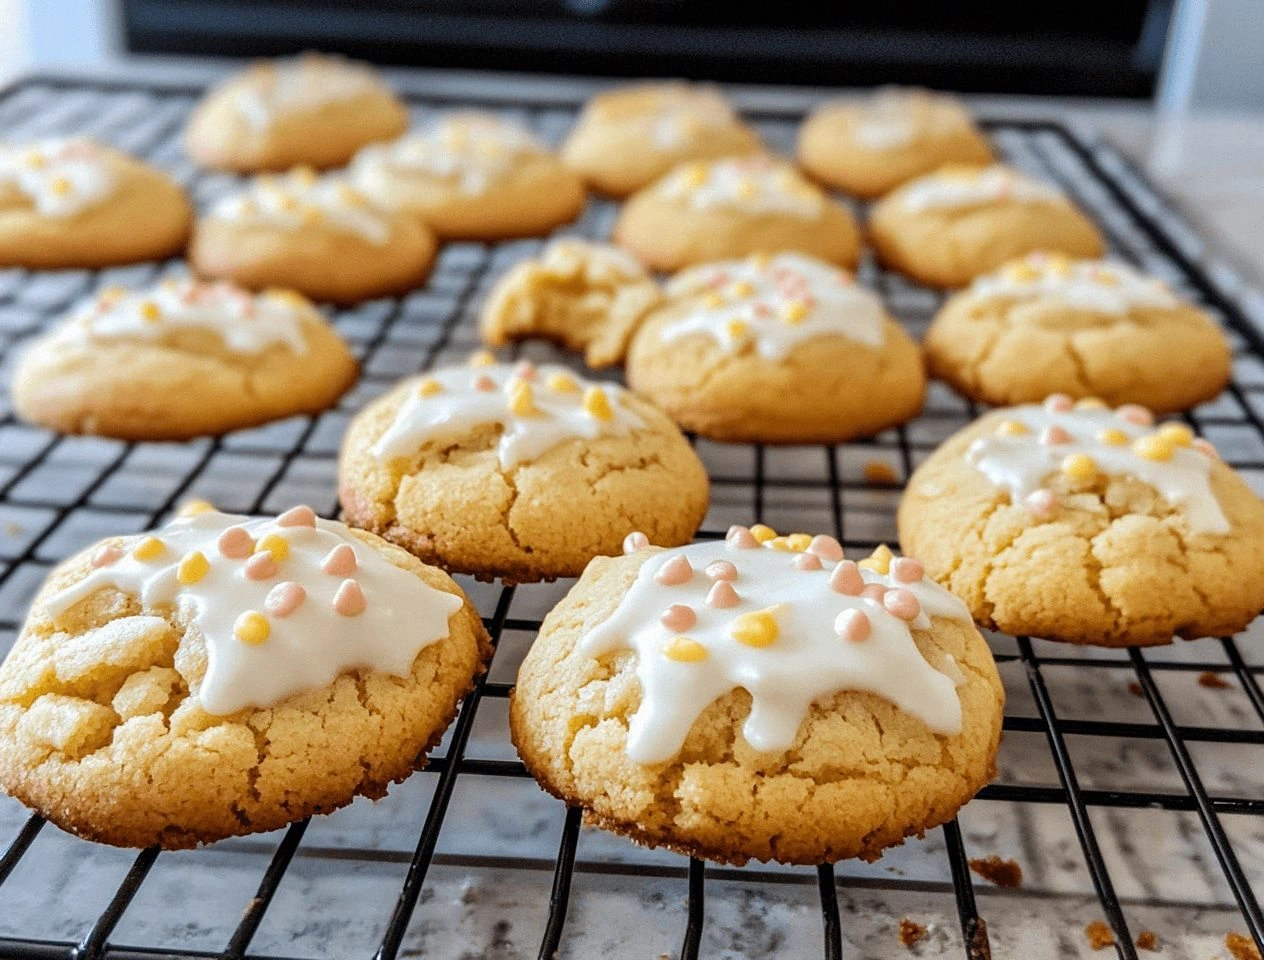
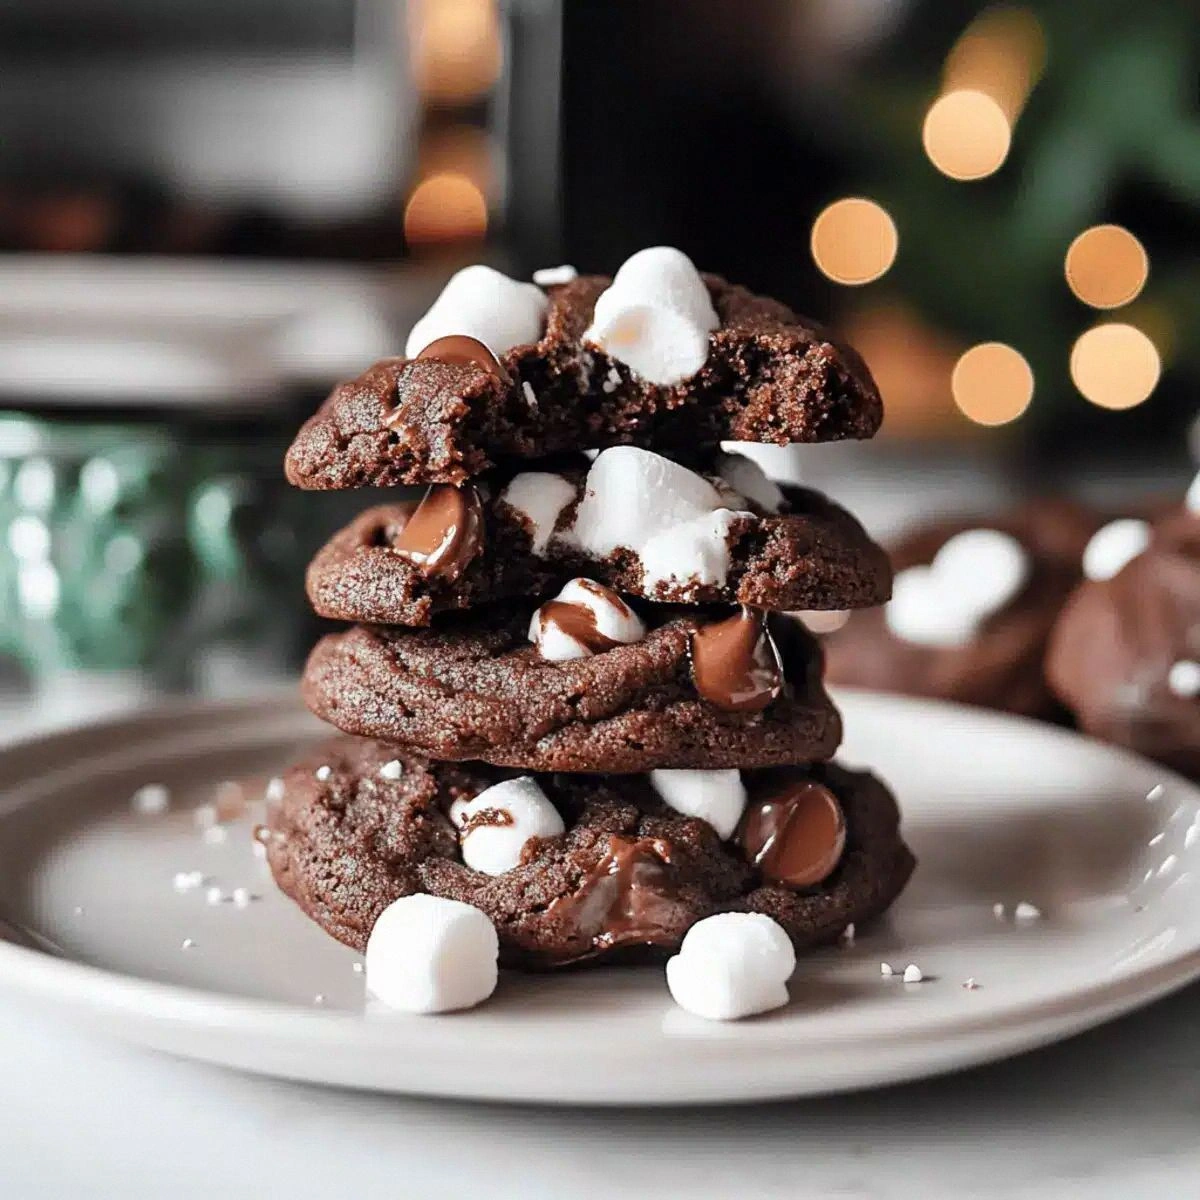
The kitchen was a chaotic symphony of clanking bowls, the whirr of the mixer, and the sweet, earthy perfume of cocoa swirling in the air. My hands were covered in buttery goodness, and the oven’s heat whispered promises of caramelized edges and gooey centers. When the first batch emerged, the cookies were a glossy, dark‑brown masterpiece, each one studded with marshmallow bits that puffed up like tiny clouds. I took a bite, and the world seemed to pause—soft, melt‑in‑your‑mouth texture that hugged my tongue, a rich chocolate flavor that sang louder than any coffee‑laced dessert I’d ever known.
Most chocolate cookie recipes get this completely wrong: they’re either cakey, overly crunchy, or they miss that magical balance of melt‑away softness and a slight chew. This version? It’s hands down the best version you’ll ever make at home, and I’m not exaggerating. The secret isn’t just the extra cocoa; it’s a precise dance of butter temperature, the right amount of milk for moisture, and a dash of baking soda that lifts the cookie just enough to keep it tender. I dare you to taste this and not go back for seconds.
Okay, ready for the game‑changer? I’m about to walk you through every single step—by the end, you’ll wonder how you ever settled for anything less. I’ll spill the beans on the technique that makes the marshmallow bits stay fluffy, the moment when the dough should look like a glossy river of chocolate, and the exact oven rhythm that gives you that perfect, crackly edge. Stay with me here—this is worth it.
What Makes This Version Stand Out
- Texture: A buttery melt‑in‑your‑mouth crumb that’s airy on the inside yet holds a slight snap at the edges, creating a delightful contrast.
- Flavor Depth: The combination of hot cocoa mix and unsweetened cocoa powder delivers a deep, almost espresso‑like chocolate richness without bitterness.
- Marshmallow Magic: Marshmallow bits stay pillowy, providing bursts of sweet, airy goodness that melt into the cookie as they bake.
- Simplicity: Only twelve pantry staples, all measured in cups and teaspoons, make this recipe approachable for beginners and pros alike.
- Crowd Reaction: Expect the “where did you get these?” chorus at any gathering; these cookies are the undisputed conversation starter.
- Ingredient Quality: Using real butter and premium cocoa transforms a humble snack into a decadent treat.
- Method Mastery: The creaming technique and precise oven timing ensure consistent results every single bake.
- Make‑Ahead Potential: Freeze the dough balls for up to a month; pop them in the oven whenever the craving strikes.
Inside the Ingredient List
The Flavor Base
Unsalted Butter (1 cup): This is the foundation of any great cookie. It provides richness and helps create that melt‑away texture. If you substitute with margarine, you’ll lose the buttery aroma that makes these cookies unforgettable. Pro tip: Use butter that’s just softened—think “soft enough to leave an imprint of your finger” but not melted.
Granulated Sugar (1 cup): Sugar not only sweetens but also contributes to the spread and crispness of the edges. Skipping it or reducing it will make the cookies dense and less caramelized. For a deeper flavor, you can swap half with demerara sugar, but keep the total volume the same.
Brown Sugar (½ cup): The molasses in brown sugar adds moisture and a subtle, caramel‑like undertone that balances the bitter cocoa. If you’re out of brown sugar, mix ½ cup granulated sugar with 1 tablespoon molasses as a quick fix.
The Texture Crew
Egg (1 large): The egg binds the dough, adds lift, and contributes to the tender crumb. Using a smaller egg will make the dough too dry; a larger one will cause spreading. If you’re vegan, replace with ¼ cup unsweetened applesauce.
Milk (1 cup): Milk introduces liquid that keeps the dough supple and helps the marshmallow bits stay puffed. Too much milk makes the dough runny; too little makes it crumbly. Whole milk is best for richness, but 2% works fine.
Vanilla Extract (2 teaspoons): Vanilla amplifies the chocolate flavor and adds a warm, fragrant backdrop. Real vanilla beans are even better—scrape the seeds for an extra punch.
The Unexpected Star
Hot Cocoa Mix (1 cup): This isn’t just for flavor; it contains sugar, cocoa, and a pinch of salt that enhances the overall taste profile. It also contributes to the cookie’s dark, glossy appearance. If you prefer a less sweet version, reduce the granulated sugar by ¼ cup.
Unsweetened Cocoa Powder (½ cup): Pure cocoa adds depth without extra sweetness, giving the cookies that “dark chocolate” intensity. Sift it with the flour to avoid clumps.
Marshmallow Bits (1 cup): These little clouds melt slightly during baking, creating pockets of gooey sweetness. If you use mini marshmallows, they’ll disperse more evenly, but the big bits give a more dramatic texture.
The Final Flourish
All‑Purpose Flour (2 cups): Flour provides structure. Using cake flour would make them too soft; bread flour would make them too tough. Measure by spooning the flour into the cup and leveling off for accuracy.
Semi‑Sweet Chocolate Chips (1 cup): Chocolate chips add melty pockets of pure chocolate bliss. They also provide a contrast to the bittersweet cocoa base. For a richer taste, substitute half with dark chocolate chunks.
Baking Soda (1 teaspoon): This leavening agent creates a slight rise, ensuring the cookies stay fluffy. Too much soda will give a metallic aftertaste; too little and they’ll be dense.
Salt (½ teaspoon): Salt balances sweetness and accentuates the chocolate flavor. Sea salt flakes sprinkled on top before baking give a subtle crunch.
Everything's prepped? Good. Let’s get into the real action…
The Method — Step by Step
-
Preheat your oven to 350°F (175°C) and line two baking sheets with parchment paper. While the oven warms, take a moment to appreciate the aroma of butter melting in the mixing bowl—this is the first promise of what’s to come. Let the butter soften to a creamy consistency; if it’s too soft, the cookies will spread excessively.
Kitchen Hack: Use a silicone spatula to scrape every last buttery morsel from the bowl; this ensures an even cream. -
In the bowl, cream together the softened butter, granulated sugar, and brown sugar on medium speed until the mixture is light, fluffy, and pale yellow—think “cloud nine” texture. This should take about 3‑4 minutes; the mixture will have a subtle caramel scent, indicating the sugars are beginning to aerate.
-
Beat in the egg, then pour in the milk and vanilla extract. Mix just until everything is incorporated; you’ll notice the batter turning glossy, almost like liquid chocolate silk. Watch out: Over‑mixing at this stage can develop gluten, leading to a tougher cookie.
Watch Out: If the dough looks too runny, add a tablespoon of flour; if too thick, a splash of milk will rescue it. -
Sift together the all‑purpose flour, hot cocoa mix, unsweetened cocoa powder, baking soda, and salt into a separate bowl. This step is crucial for eliminating lumps and ensuring an even distribution of leavening agents.
-
Gradually fold the dry ingredients into the wet mixture using a spatula, stirring just until combined. The dough will be thick and slightly sticky—don’t worry, that’s the secret to the melt‑in‑your‑mouth texture. At this point, the batter should smell like a chocolate bakery on a winter morning.
-
Gently stir in the marshmallow bits and semi‑sweet chocolate chips, ensuring they are evenly dispersed. The marshmallows will puff up a bit as they coat the dough, creating little pockets of sweet air.
Kitchen Hack: If you prefer a more uniform distribution, toss the marshmallows and chips in a zip‑top bag, add the dough, and give it a gentle shake. -
Cover the dough with plastic wrap and chill in the refrigerator for at least 30 minutes. This step firms up the butter, preventing excessive spreading, and lets the flavors meld. While you wait, picture the moment when the cookies first hit the hot oven and the edges begin to pull away—pure magic.
-
Using a cookie scoop (about 2‑tablespoon size), drop rounded balls onto the prepared baking sheets, spacing them 2 inches apart. For a perfectly uniform look, roll the scooped dough between your palms before placing it on the sheet.
-
Bake for 10‑12 minutes, or until the tops look set and the edges are just beginning to turn a golden brown. The cookies will continue to cook slightly on the hot sheet after removal, so resist the urge to over‑bake. When you lift a cookie, the edges should start pulling away from the parchment—this is your visual cue that they’re done.
Cool on the sheet for 2 minutes, then transfer to a wire rack to finish cooling. The moment they hit the rack, you’ll notice the aroma intensify, and the cookies will firm just enough to handle without crumbling.
That’s it—you did it. But hold on, I’ve got a few more tricks that’ll take this to another level…
Insider Tricks for Flawless Results
The Temperature Rule Nobody Follows
Never bake cookies straight from a warm kitchen. If your dough is even a few degrees above room temperature, the butter will melt too quickly, causing flat, crispy cookies. Chill the dough for at least 30 minutes, or even up to 24 hours for a denser, chewier center. I once tried skipping this step, and the result was a sad, pancake‑like cookie that fell apart at the first bite.
Why Your Nose Knows Best
When the cookies are in the oven, trust the scent more than the timer. Around the 9‑minute mark, you’ll notice a sweet, toasted chocolate aroma that tells you the cookies are nearing perfection. If the smell turns slightly nutty, that’s a sign the edges are caramelizing just right. Relying solely on minutes can lead to over‑baking, especially if your oven runs hot.
The 5‑Minute Rest That Changes Everything
After you pull the cookies from the oven, let them rest on the baking sheet for exactly five minutes. This short pause lets the interior finish cooking from residual heat while the exterior sets, preventing a crumbly texture. Skipping this rest makes the cookies too fragile to move without breaking.
Swap the Sugar, Swap the Mood
If you’re craving a deeper, almost caramel flavor, replace half of the granulated sugar with dark brown sugar. The molasses in the brown sugar adds a subtle bitterness that balances the cocoa’s richness. Just remember to keep the total volume the same to maintain the cookie’s structure.
Double‑Chocolate Finish
For an extra decadent finish, sprinkle a pinch of sea salt and a drizzle of melted dark chocolate on the warm cookies. The salt heightens the chocolate flavor, while the drizzle adds a glossy, professional look. This is the perfect finishing touch for impressing guests at a holiday party.
Creative Twists and Variations
This recipe is a playground. Here are some of my favorite ways to switch things up:
Peanut Butter Swirl
Swirl in ¼ cup of creamy peanut butter just before baking. The nutty undertone pairs beautifully with chocolate, and the ribbons create a visual treat that’s as satisfying to look at as it is to eat.
White Chocolate & Raspberry
Replace half of the semi‑sweet chocolate chips with white chocolate chips and fold in ½ cup of freeze‑dried raspberry pieces. The tangy raspberry cuts through the richness, while the white chocolate adds a creamy sweetness.
Spiced Holiday
Add ½ teaspoon of ground cinnamon, a pinch of nutmeg, and a dash of cayenne pepper for a warm, festive twist. The subtle heat from the cayenne brings a surprising depth that’s perfect for winter gatherings.
Mint‑Infused Delight
Mix in 1 teaspoon of peppermint extract (or a few drops of mint essence) and swap the chocolate chips for dark chocolate mint chips. The cool mint balances the deep cocoa, creating a refreshing after‑taste.
Nutty Crunch
Stir in ¾ cup of chopped toasted hazelnuts or almonds. The nuts add a satisfying crunch and a buttery note that complements the marshmallow bits.
Vegan Version
Replace butter with coconut oil, use almond milk instead of dairy, and swap the egg for a “flax egg” (1 tablespoon ground flaxseed mixed with 3 tablespoons water). The flavor profile stays rich, and the texture remains delightfully soft.
Storing and Bringing It Back to Life
Fridge Storage
Place cooled cookies in an airtight container with a paper towel at the bottom to absorb excess moisture. They’ll stay fresh for up to a week. If you notice any condensation, open the lid for a minute to let the humidity escape.
Freezer Friendly
Separate a layer of parchment between each cookie, then seal the container or zip‑top bag. Freeze for up to three months. When you’re ready, bake from frozen for an extra 2‑3 minutes; the cookies will emerge as if freshly made.
Best Reheating Method
To revive that melt‑in‑your‑mouth texture, preheat your oven to 300°F (150°C) and warm the cookies for 5 minutes. Add a tiny splash (about a teaspoon) of water to the bottom of the container before reheating; the steam revives the softness without making them soggy.