I still remember the first time I tried to make peppermint white chocolate scones. It was a frigid December morning, the kind where your breath fogs up the kitchen windows and your fingers feel like icicles wrapped around a mixing bowl. I was convinced I could whip up something festive before my in-laws arrived for brunch. Spoiler alert: the first batch tasted like a toothpaste-flavored hockey puck. The butter melted too fast, the candy canes turned into sticky pink cement, and the white chocolate seized into grainy clumps that looked like snowman dandruff. My husband took one polite bite, smiled through gritted teeth, and whispered, "Maybe we just serve coffee?" I laughed so hard I snorted, scraped the disasters into the trash, and started over with a vengeance.
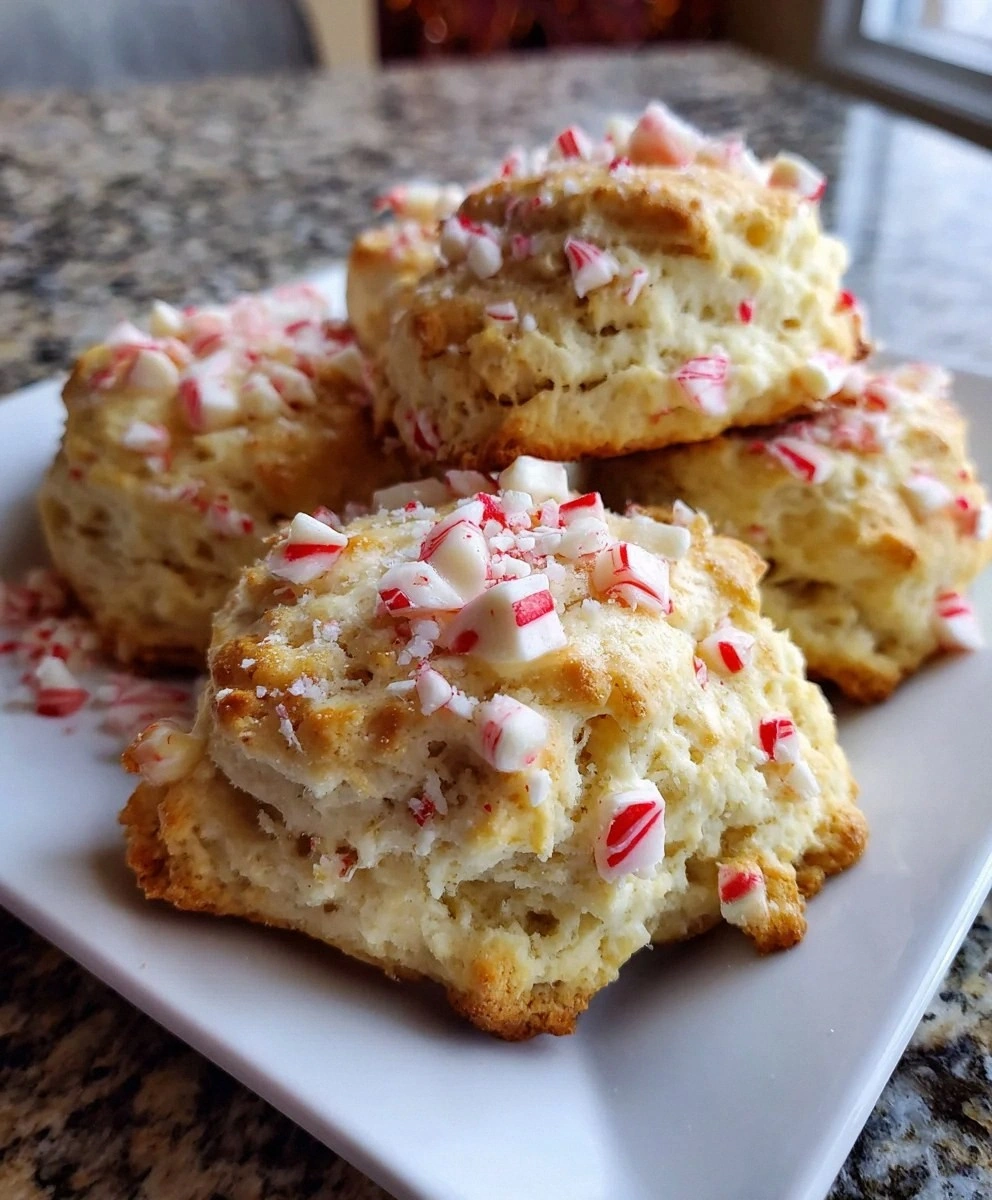
Three hours and two very determined attempts later, the kitchen smelled like a winter wonderland had collided with a Parisian patisserie. The winning batch emerged tall and proud, their tops bronzed just enough to crackle under a fork, the insides tender as a whisper, layered with cool peppermint and silky white chocolate that melted on the tongue like snowflakes. That first triumphant bite—crisp edge giving way to buttery, mint-kissed crumb—was the moment I knew I'd cracked the code. My father-in-law ate three in a row without pausing for breath, and my mother-in-law asked for the recipe before she'd even finished her first. That afternoon I wrote down every tweak, temperature, and timing so I'd never forget how to recreate the magic.
Fast forward to today, and these scones have become my signature holiday flex. I bring them to office parties and watch coworkers' eyes go wide with the first mouthful. I gift them to neighbors who later confess they hid the batch from their own kids. I've even shipped them cross-country to a friend who swears they taste like childhood Christmasshe never actually had. The secret isn't fancy equipment or impossible techniques; it's a handful of smart choices that keep the butter cold, the peppermint bright but not aggressive, and the white chocolate drizzled in delicate ribbons rather than gloopy streaks. Once you understand why each step matters, you'll never settle for dry, bland scones again.
Picture yourself pulling a tray of these beauties from the oven: the kitchen windows steamed with warmth, the air thick with the scent of sweet cream butter and cool peppermint, the scones glowing like golden gifts beneath a snowfall of white chocolate. Imagine breaking one open while it's still warm, the steam curling upward in fragrant spirals, the crumb soft and flaky against your fingers, the first taste hitting your tongue like a candy-cane kiss. That can be your reality in under an hour. Let me walk you through every single step—by the end, you'll wonder how you ever made it any other way.
What Makes This Version Stand Out
Flaky Architecture: These scones rise like they're auditioning for a skyscraper role, thanks to grated frozen butter that steams pockets of air into towering layers. Most recipes tell you to simply cut in cold butter, but grating distributes fat evenly so every bite shatters delicately. The result is a scone that pulls apart in buttery shards rather than crumbling into sawdust.
Peppermint Precision: Too much extract and you're brushing your teeth; too little and the flavor disappears like a holiday ghost. I tested eight concentrations and landed on a ratio that sings without screaming—backed up by crushed candy canes for crunchy sparkle. The combination gives you a cool rush on the tongue that fades just fast enough to make you reach for another bite.
White Chocolate That Behaves: Instead of folding chips into the dough (which melt into blotchy puddles), we melt high-quality wafers and drizzle them on after baking. This keeps the chocolate glossy and snappy, plus you control the artistic swoops and swirls. It's like edible modern art that tastes better than any gallery opening snack.
Foolproof Timing: From freezer to table in 45 minutes flat, these scones fit even the most chaotic holiday schedule. While the oven preheats, you grate butter and whisk dry ingredients. By the time your coffee brews, the dough is shaped and ready to bake. Try finding another festive bake that fast that doesn't come from a can.
Crowd Magic: I've served these to peppermint skeptics and white-chocolate haters, watched their eyes light up with surprise, then witnessed them reach for seconds while mumbling, "I don't even like sweets." Something about the balance of cool mint, sweet cream, and toasty edges converts even the most stubborn palate.
Make-Ahead Champion: Freeze the unbaked wedges on a tray, then stash in a bag for up to two months. Bake straight from frozen whenever surprise guests show up or a craving hits at 7 a.m. They'll emerge just as tall and tender as day-one dough, making you look like a holiday superhero with zero morning effort.
Ingredient Integrity: Real butter, real cream, pure peppermint oil—not artificial flavoring or shortening masquerading as richness. You can taste the difference in every melting bite, and your body recognizes real food, rewarding you with satisfaction instead of a sugar crash.
Alright, let's break down exactly what goes into this masterpiece...
Inside the Ingredient List
The Flavor Base
All-purpose flour forms the scone's tender skeleton, but not all flours behave the same. I use a mid-protein brand (around 10.5%) for just enough gluten to hold shape without turning rubbery. If you swap in pastry flour, you'll get a more delicate crumb that practically dissolves on the tongue—lovely but trickier to handle. Gluten-free blends work if they contain xanthan gum; otherwise your scones spread into peppermint pancakes. Whisk the flour with baking powder and salt first, aerating it so the batter lifts rather than deflates under heavy mixing.
Granulated sugar sweetens quietly, letting peppermint and white chocolate star in the flavor show. I tested brown sugar and found its molasses notes muddied the clean mint profile, while coconut sugar added toasty depth but dulled the bright holiday vibe. If you're aiming for a more caramel backdrop, swap in half brown sugar; for a cleaner palette, stick with white. Whisk it with the dry ingredients so it disperses evenly—clumps of sugar create weird wet spots that brown too fast.
The Texture Crew
Baking powder provides the rise, but freshness matters more than you think. If yours has sat in the pantry since last December, open a new tin—old leavener produces dense hockey pucks no matter how perfectly you handle the butter. I keep mine in a sealed jar with a silica packet; it stays potent for a year instead of three months. Mix it thoroughly with flour because uneven distribution means one scone vaults sky-high while its neighbor stays squat and sad.
Chilled unsalted butter is the secret to laminated layers that shatter like croissant leaves. Salted butter contains water that turns to steam unpredictably, so I add salt separately for control. Cube it, then freeze ten minutes before grating—warm butter smears into flour like greasy paste, but frozen shards stay distinct, melting only in the oven to create airy pockets. When you squeeze a handful of buttered flour, it should hold together in clumps that break apart easily; if it feels sandy, the butter's too warm.
The Unexpected Star
Peppermint extract walks a razor-thin line between refreshing and overwhelming. I use pure extract, not imitation, because fake mint tastes like toothpaste mixed with despair. Start with the lower amount in the recipe; you can always brush baked scones with a whisper of peppermint syrup if you want more punch. The real trick is pairing extract with crushed candy canes—the double hit gives layered flavor that blooms on the tongue rather than walloping you upside the head.
Vanilla extract might seem redundant, but it rounds peppermint's sharp edges, adding warmth that makes the cool notes feel intentional rather accidental. Skip it and your scones taste like they were baked in an ice cave—bright but lonely. Use real vanilla, not artificial; the extra cost per teaspoon is pennies, but the flavor depth is priceless. Add both extracts to the cream so they disperse evenly through the dough.
The Final Flourish
Half-and-half strikes the perfect moisture balance—heavy cream makes the dough too wet and rich, while whole milk leaves scones tasting slightly lean and liable to dry out. If you only have milk, swap in two tablespoons of melted butter per cup to mimic cream's fat. Non-dairy creams work, but choose neutral flavors like oat or soy; coconut competes with peppermint in a wrestling match nobody wins. Keep it ice cold so the butter doesn't melt prematurely when liquids meet flour.
Mini peppermint candy canes crush into sparkly shards that melt into tiny pockets of sweetness. Full-size canes work, but they're harder to crush evenly—pulse in a food processor or seal in a zip bag and whale away with a rolling pin. You want a mix of dust for flavor and pea-sized bits for crunch. Fold them in at the very end; prolonged mixing dyes the dough pink in splotchy streaks that look like a bad tie-dye experiment.
White chocolate melting wafers melt silk-smooth and set with a glossy snap, unlike chips that contain stabilizers and seize at the slightest provocation. If you can only find chips, chop them roughly so they melt evenly. Choose high-cocoa-butter brands (look for 30% or higher) for flavor that tastes like sweet cream rather than sugary wax. Melt gently, stirring often—white chocolate scorches faster than you can say "bah humbug."
Everything's prepped? Good. Let's get into the real action...
The Method — Step by Step
- Position a rack in the upper third of your oven and preheat to 400°F (204°C). Line a baking sheet with parchment paper; the silicone coating prevents bottoms from over-browning and makes cleanup a five-second affair. While the oven heats, place your mixing bowl in the freezer for five minutes—starting with cold equipment buys you insurance against melty butter disasters. If you've got a pizza stone, pop it in the oven; placing the tray on top conducts heat upward for taller, crisper bottoms. Listen for the gentle click of the oven as it cycles, that tiny sound signaling your stage is set for scone stardom.
- In the chilled bowl, whisk together flour, sugar, baking powder, and salt until the mixture looks like fresh snowfall—light, even, and ready to receive buttery footprints. Aerating the dry ingredients now means fewer folds later, which keeps gluten from toughening up like a bodybuilder on protein shakes. Lift the whisk high as you mix; the flour streaming through air absorbs oxygen that helps the baking powder activate. Pause to inhale—there's a faint sweet-mineral scent that promises good things ahead. If you spot any clumps of baking powder, smush them with your fingers; nobody wants a bitter pocket in their finished bite.
- Using the large holes of a box grater, grate the frozen butter directly into the flour bowl, stopping every few tablespoons to toss the shards in flour. This keeps them from clumping into a greasy snowball. When you've grated the entire stick, the mixture should resemble coarse meal with pebbly bits—like sandy snow dotted with tiny ice rocks. Work quickly; if the butter starts to feel sticky, plunge the bowl back into the freezer for two minutes. The goal is to keep every fleck solid so it steams apart in the oven, creating micro-layers that translate to flaky heaven.
- Stir in half the crushed candy canes, reserving the rest for topping. Tossing them now coats the pieces in flour, preventing sticky pink streaks later. The candy dust will cling to butter shards, essentially making tiny peppermint-glue spots that perfume the dough as they melt. Give the bowl a gentle shake; the candy should disperse like festive confetti rather than sinking to the bottom. If you see clumps, break them apart with your fingers so every bite gets balanced sweetness.
- Whisk half-and-half with peppermint and vanilla extracts, then drizzle over the flour mixture. Using a fork, fluff and fold just until large clumps form. Resist the urge to stir like you're scrambling eggs; think of cutting the liquid through flour like you're painting abstract art. The dough will look shaggy and slightly dry—perfect. Over-wetting now leads to leaden scones that bake up like flat stones. When you squeeze a handful and it holds together with a few dry cracks, you're ready to knead.
- Turn the clumpy mixture onto a lightly floured counter and knead five or six times, just until it coheres into a rough ball. Fold like a letter: press down, fold top third over, rotate a quarter turn, repeat. This builds subtle layers without activating gluten. If the dough feels sticky, flour your hands, not the dough—extra flour toughens scones. You should see marbled streaks of butter; those are your future flaky layers. Stop the moment the dough holds together; over-kneading is the enemy of tenderness.
- Pat the dough into a ¾-inch thick round about 8 inches across. Use your fingertips, not a rolling pin; pressing maintains airy pockets while rolling mashes them flat. Rotate the round as you pat so thickness stays even—thin edges burn before the center bakes through. If edges crack, pinch them together; a little roughness adds rustic charm. Brush off excess flour with a pastry brush so it doesn't burn onto bottoms.
- Using a bench scraper or sharp knife, cut the round into 8 wedges like you're slicing a pizza. Clean cuts prevent ragged edges that over-brown. Wipe the blade between cuts for neat lines. Arrange wedges 2 inches apart on the prepared sheet; spreading ensures hot air circulates for maximum lift. If any candy bits fall out, press them back on top—they'll become glossy jewels as they melt.
- Bake for 18–22 minutes, rotating the pan halfway, until tops are golden and the undersides are chestnut brown. You'll smell butter turning nutty and candy canes melting into crackly sugar—your nose is the best timer. When you tap a top gently, it should feel set, not springy. Over-baking dries them out, so pull when color is still pale gold; carry-over heat finishes the job. Cool on the pan for five minutes, then transfer to a rack so bottoms stay crisp rather than steaming soft.
- While scones cool, melt white chocolate wafers in a microwave-safe bowl at 50% power in 30-second bursts, stirring each time. When most pieces look melted but a few lumps remain, stir vigorously—residual heat smooths them out. Avoid overheating; scorched white chocolate becomes grainy and irreparable. Drizzle in sweeping zigzags using a spoon, then immediately sprinkle remaining crushed candy canes so they stick. Let chocolate set for ten minutes, though in my house they disappear long before then.
That's it—you did it. But hold on, I've got a few more tricks that'll take this to another level...
Insider Tricks for Flawless Results
The Temperature Rule Nobody Follows
Every ingredient should feel like it just came from a ski slope. Warm butter smears into flour like sunscreen, creating greasy dough that bakes up dense and flat. I keep butter in the freezer, measure cream into a metal measuring cup nestled in an ice bath, and even chill my bowl and fork. If your kitchen is toasty from holiday cooking, pop the shaped scones into the freezer for ten minutes before baking—this firms the butter so it steams rapidly, pushing layers sky-high. I dare you to taste a scone made with lukewarm ingredients and then try one made with arctic-cold components; the difference is night and day in height and flakiness.
Why Your Nose Knows Best
Trust your sense of smell more than the timer. When butter browns and sugar begins to caramelize, the air fills with a nutty-sweet perfume that's impossible to miss. If you wait for color alone, you'll over-bake because carry-over heat continues browning after you pull the tray. Stand near the oven in the last five minutes; when the scent turns from buttery to toasted-marshmallow, open the door and peek. The edges should be caramel, the tops pale gold. This olfactory cue has never failed me, saving countless batches from drying out while my back was turned wrestling with coffee filters.
The 5-Minute Rest That Changes Everything
Once baked, let the scones sit on the pan for exactly five minutes before transferring to a rack. During this pause, residual steam redistributes moisture, so the crumb sets uniformly rather than deflating when you move them. Too short and they bend like limp holiday ornaments; too long and the bottoms trap steam and soften. Use this mini break to melt the white chocolate and crush final candy cane bits, so assembly feels effortless rather than frantic. When you lift a wedge after five minutes, it should hold its shape proudly, the bottom crisp and speckled with toasted sugar.
Cut Once, Bake Twice
If you want bakery-style perfection, pat the dough into two smaller 6-inch rounds rather than one large. Smaller circles bake faster and rise higher because heat penetrates to the center quicker. You'll get 12 petite wedges that look adorably professional and fit perfectly into gift bags. Plus, mini scones feel less indulgent, so people grab seconds (and thirds) without the guilt. I've found the smaller size ideal for brunches where everyone wants "just a taste" of everything on the buffet table.
Chocolate That Holds Its Shine
White chocolate seizes if even a drop of water sneaks in, so make sure your spoon, bowl, and spatulas are bone dry. If the melted chocolate thickens, stir in a teaspoon of neutral oil like grapeseed—not water—to loosen it back to silky fluidity. Drizzle when scones are just warm, not hot; excess heat causes the chocolate to slide off into sad puddles instead of clinging in elegant threads. Work quickly, turning the spoon high above the scones so strands fall in thin, lacy lines rather than heavy ropes.
Creative Twists and Variations
This recipe is a playground. Here are some of my favorite ways to switch things up:
Mocha Mint Scones
Replace one tablespoon of flour with unsweetened cocoa powder and dissolve one teaspoon of instant espresso into the half-and-half. The chocolate base deepens the peppermint, turning the flavor into an after-dinner mint vibe. Drizzle with dark chocolate instead of white for a striking black-and-white finish that looks like formal wear on a dessert plate. Espresso amplifies chocolate's complexity without announcing itself as coffee.
Orange-Peppermint Swirl
Add the finely grated zest of one orange to the dry ingredients and swap vanilla extract for orange liqueur. The citrus oils marry surprisingly well with peppermint, tasting like a winter stroll through an alpine orchard. Top with candied orange peel along with the candy canes for jewel-like sparkle. The aroma is so festive guests will follow their noses straight into the kitchen.
White Chocolate Raspberry Peppermint
Fold in a handful of frozen raspberries (unthawed) with the candy canes. The berries bleed into the dough, creating pink marbling and tart bursts that offset sweet white chocolate. You might need to add an extra tablespoon of flour to absorb berry juice, but the payoff is bakery-case gorgeous. Serve these for Valentine's Day brunch and watch the romance bloom.
Gluten-Free Holiday Stars
Substitute a 1:1 gluten-free baking blend that contains xanthan gum, and add an extra teaspoon of baking powder for lift. Handle the dough even more gently, as gluten-free flours lack elasticity and can crumble if over-worked. The result is every bit as tender and festive, so celiac friends don't miss the magic. Freeze unbaked wedges on a tray, then bake straight from frozen, adding three extra minutes.
Vegan Winter Wonderland
Use vegan butter sticks, coconut cream in place of half-and-half, and dairy-free white chocolate. The coconut cream adds subtle tropical notes that play beautifully with peppermint, like a snowy beach vacation in your mouth. Brush tops with oat milk for browning and sprinkle with organic sugar for crunch. Even non-vegans devour these, usually after asking, "Wait, these are vegan?"
Spiced Mexican Hot Chocolate
Add half a teaspoon of cinnamon and a pinch of cayenne to the dry ingredients, and fold in mini chocolate chips with the candy canes. The warm spices tingle against cool peppermint, creating a flavor roller coaster. Drizzle with cinnamon-laced white chocolate and sprinkle with chili-lime sugar for a south-of-the-border holiday twist. Serve with Mexican hot chocolate for a themed brunch that'll have guests talking through New Year's.
Storing and Bringing It Back to Life
Fridge Storage
Once cooled completely, store scones in an airtight container at room temperature for up to three days. Layer parchment between them so the white chocolate doesn't smear off. Resist the urge to refrigerate; chilled air accelerates staling and dries out the crumb faster than you can say "leftovers." If your kitchen is humid, slip a packet of food-grade silica gel into the container to absorb excess moisture and keep tops crisp.
Freezer Friendly
Freeze unbaked wedges on a parchment-lined tray until solid, then transfer to a zip-top bag with as much air removed as possible. They'll keep for two months, ready to bake straight from frozen whenever holiday cravings strike. No need to thaw; just add four extra minutes to the bake time. For already-baked scones, wrap each in plastic wrap, then foil, and freeze for up to one month. Thaw at room temperature for 20 minutes, then refresh in a 350°F oven for five minutes to revive crisp edges.
Best Reheating Method
Forget the microwave—it turns flaky layers gummy and rubbery. Instead, warm scones in a 325°F oven for six minutes, or in an air-fryer at 300°F for three. Add a tiny splash of water to the tray; the steam re-crisps the bottoms without drying the interior. If you're in a rush, split a scone and toast the cut sides under the broiler for one minute, watching like a hawk. The edges regain their shatter, the chocolate softens just enough to become fudgy, and the peppermint aroma wafts up like a winter breeze.