Picture this: it's 11:37 p.m. on a Tuesday, you're standing in your kitchen wearing mismatched socks, and you're hit with a craving so intense it feels like a sugar-coated lightning bolt just struck your taste buds. You want something creamy, something crunchy, something that tastes like the carnival came to town and decided to throw a party in your mouth. Most people would settle for a sad bowl of cereal or maybe some store-bought cookies if they're feeling fancy. Not us. We're about to embark on a journey that transforms humble ingredients into little spheres of pure joy that'll make your late-night self thank your past self for being such a genius.
These aren't just any cheesecake bites, my friend. These are the kind of treats that make grown adults do a little happy dance in their kitchen at midnight. The kind of dessert that has people texting you at 2 a.m. asking if you have any more of "those magical things." They're what happens when cotton candy dreams meet cheesecake reality, all wrapped up in a crunchy coat that shatters like the surface of a frozen pond under your teeth. I stumbled upon this combination after a failed attempt at making regular cheesecake truffles — they were too boring, too predictable, too much like something you'd find at a grocery store bakery. So I did what any self-respecting sugar addict would do: I raided my pantry like a dessert-obsessed raccoon and created something extraordinary.
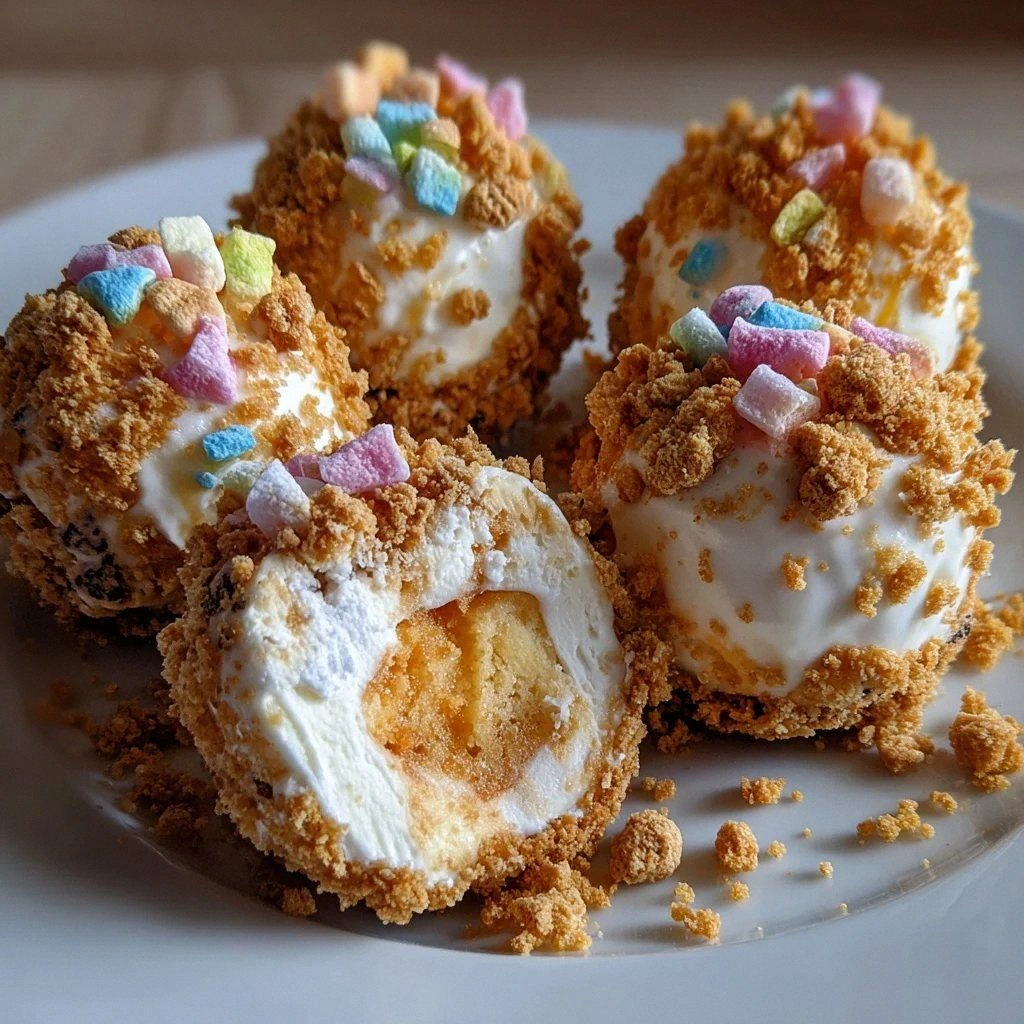
The magic happens when you bite through that crisp cookie coating into the cloud-soft cheesecake center, and just when you think it can't get any better, you hit those pockets of marshmallow that stretch like edible silk threads. But here's the real kicker — the cotton candy isn't just for show. It melts into the cheesecake mixture creating these ethereal swirls that taste like childhood summers and first dates at the fair. I dare you to taste this and not go back for seconds. Actually, I double-dog dare you, because I ate half the batch before anyone else got to try it, and I'm not even sorry.
What makes these little bombs of happiness truly special is the contrast. Most recipes get this completely wrong by making everything soft and sweet. Not here. We've got the creamy cheesecake playing against the crunchy cookie coating, the fluffy marshmallow bits providing chewy surprises, and that whisper of cotton candy that dissolves on your tongue like morning mist. Stay with me here — this is worth it. Let me walk you through every single step — by the end, you'll wonder how you ever made it any other way.
What Makes This Version Stand Out
Texture Paradise: This isn't just another soft dessert that melts into sugary oblivion. We're creating a full sensory experience with a crunchy exterior that gives way to creamy cheesecake studded with stretchy marshmallow bits. It's like your mouth discovered a theme park and every ride is delicious.
Cotton Candy Integration: Most recipes just sprinkle cotton candy on top like an afterthought. We're folding it directly into the cheesecake mixture where it dissolves into sweet, nostalgic pockets that taste like summer carnivals and first kisses behind the funhouse.
No-Bake Brilliance: Forget about water baths, cracked tops, or wondering if your cheesecake is done. These babies come together in one bowl, set in the fridge, and emerge perfect every single time. Even if you've ever struggled with traditional cheesecake, you're not alone — and I've got the fix.
Make-Ahead Magic: Picture yourself pulling these out of the freezer next weekend when friends drop by unexpectedly. They'll think you're some kind of dessert wizard who has secret pastry training. The truth? You made these in your pajamas three days ago.
Cookie Coat Customization: While everyone else is stuck using graham crackers, we're getting creative with Lotus cookies, Oreos, or even those fancy French Petibör biscuits. Each one creates a completely different flavor profile that'll make people wonder if you went to culinary school.
Instagram Gold: These look like something from a boutique dessert shop in Tokyo. The cotton candy creates natural color swirls, the cookie coating adds visual texture, and when you bite into them? Pure social media magic that'll have your DMs blowing up.
Portion Control (Sort Of): Theoretically, these are individual servings. Realistically, you'll eat four and tell yourself they're "mini" so calories don't count. I won't tell if you won't.
Alright, let's break down exactly what goes into this masterpiece...
Inside the Ingredient List
The Flavor Base
Cream cheese is the undisputed star here, and I cannot stress this enough — it needs to be at room temperature. Cold cream cheese will fight you like a stubborn cat, creating lumps that no amount of mixing will smooth out. You want it soft and compliant, ready to whip into silky submission. If you skip this step, you'll end up with cheesecake bombs that have the texture of cottage cheese mixed with regret. Let it sit out for at least two hours, or if you're impatient like me, cube it and let it warm up faster. Trust me, this is the difference between dessert that tastes like clouds and dessert that tastes like you made it while angry.
The Texture Crew
Powdered sugar isn't just here for sweetness — it's creating the smooth, dreamy texture that makes these bombs melt on your tongue. Granulated sugar would give you that gritty, sandy feeling like you just bit into sweet beach sand. Nobody wants that. The powdered version dissolves instantly, creating a cheesecake mixture so smooth it could star in a skincare commercial. Vanilla extract might seem basic, but it's the background singer that makes the whole band sound better. Just a teaspoon adds those warm, familiar notes that make people say "I can't quite place it, but this tastes like home."
The Unexpected Star
Mini marshmallows or marshmallow fluff — use whatever you have, because I'm not about to send you to the store for one ingredient when magic is waiting in your pantry. The marshmallows create these delightful chewy surprises throughout the cheesecake, like finding treasure in every bite. They don't melt completely, so you get these little pockets of stretchy sweetness that make eating these feel like a playful experience rather than just another dessert. If you're using mini marshmallows, cut them in half so they're not overwhelming. If you're using fluff, just dollop it in and watch it create beautiful swirls.
The Final Flourish
White chocolate for coating needs to be treated with respect — it's not just a barrier, it's a flavor component that ties everything together. Use a double boiler or microwave in 30-second bursts, stirring between each one. Burnt white chocolate tastes like disappointment and broken dreams. The crushed cookies aren't just for crunch — they're absorbing any condensation from the fridge and keeping the coating crisp. I love using Lotus cookies for their caramel notes, but Oreos give you that cookies-and-cream vibe that never gets old. The cotton candy or sprinkles on top? That's your chance to get artistic. Channel your inner Jackson Pollock and make it rain colorful sugar.
Everything's prepped? Good. Let's get into the real action...
The Method — Step by Step
- Beat the cream cheese in a large bowl until it's smoother than your best pickup line. This takes about 2-3 minutes with an electric mixer on medium speed. You're looking for that moment when it transforms from a dense block into something that looks like thick clouds. Scrape down the sides of the bowl twice during this process — there's always stubborn bits that think they can escape. The sound will change too, from that thud-thud-thud to a gentle whirring that sounds like the bowl is whispering secrets about how delicious this is going to be.
- Add the powdered sugar gradually, not all at once like an overenthusiastic sugar bomber. I like to add it in three parts, beating well between each addition. This prevents the sugar from creating a sweet mushroom cloud in your kitchen and ensures it incorporates smoothly. The mixture will lighten in color and get fluffier — that's the sugar doing its magic. Don't rush this; good things come to those who wait, and your patience will be rewarded with a texture so smooth it could star in a luxury car commercial.
- Time for vanilla and a pinch of salt. Yes, salt in dessert — it's the unsung hero that makes sweet things taste sweeter and brings out all the complex flavors. Add the vanilla and beat for just 30 seconds more. The mixture should smell like the best cheesecake you've ever imagined, with warm vanilla notes that make you want to face-plant right into the bowl. This is the moment when anyone walking into your kitchen will stop and say "what is that amazing smell?"
- Fold in the marshmallows like you're tucking them into bed. Use a spatula, not the mixer, and make gentle figure-eight motions. You want them distributed evenly but not crushed into oblivion. The marshmallows should peek out like little white pillows in a cloud of cheesecake. If you're using fluff, drop it in by spoonfuls and give it just 3-4 folds — you want ribbons, not complete incorporation. This is where the texture magic happens, so don't go crazy with the mixing.
- Now for the game-changer: the cotton candy. Tear it into bite-sized pieces and gently fold it in. Watch as it creates these beautiful color swirls throughout the mixture. Don't overmix or you'll lose those gorgeous ribbons and end up with a uniform pink mess. The cotton candy will start to dissolve immediately, creating sweet pockets of flavor that taste like childhood summers. Work quickly but gently — this is the moment of truth where your dessert transforms from good to legendary.
- Cover the bowl with plastic wrap and refrigerate for 30 minutes. This isn't just about patience — it's about letting the flavors meld and the mixture firm up enough to scoop. You want it cold enough to hold its shape but not so cold that it becomes impossible to work with. While it chills, line a baking sheet with parchment paper and clear some space in your fridge. Trust me, you'll need it.
- Use a small cookie scoop or two spoons to form 1-inch balls. Work quickly so the mixture stays cold, rolling them gently between your palms to make them round but not perfect — rustic is charming here. Place them on the prepared baking sheet as you go. If they start getting too soft, pop the whole tray back in the fridge for 10 minutes. This isn't a race, unless you're like me and you eat three of them while making the rest.
- Freeze the formed balls for at least 2 hours, or overnight if you can wait that long. This step is crucial — they need to be rock solid before coating or you'll end up with a melty mess that would make a kindergarten art project look sophisticated. The freezing also helps the cotton candy create these beautiful crystalline patterns throughout. Don't skip this step no matter how impatient you are.
- Melt the white chocolate using a double boiler or microwave method. If using a microwave, heat for 30 seconds, stir, repeat until smooth. White chocolate scorches easily, so err on the side of caution. You want it fluid but not hot — think warm bath temperature, not molten lava. If it gets too thick, add a teaspoon of coconut oil to thin it out. The chocolate should coat your spoon like liquid velvet.
- Crush your chosen cookies into fine crumbs but leave some larger pieces for texture variety. I like to use a rolling pin and a zip-top bag, but a food processor works too. Just don't turn them into dust — you want some crunch. Set up an assembly line: frozen cheesecake balls, melted chocolate, cookie crumbs, then back to the tray. Work with just 3-4 balls at a time so they stay frozen.
- Dip each frozen ball into the white chocolate, roll to coat completely, then immediately roll in the cookie crumbs. The chocolate will set almost instantly on the frozen surface, creating a beautiful shell. Place them back on the parchment-lined tray and immediately sprinkle with cotton candy pieces or sprinkles. The contrast of the warm chocolate and cold cheesecake creates a slight crackling effect that's absolutely mesmerizing.
- Return the completed bombs to the fridge for 30 minutes to set completely. This final rest allows the chocolate to fully crystallize and the cheesecake to thaw just enough for that perfect creamy center. Serve them slightly chilled but not frozen solid — about 10 minutes out of the fridge is ideal. They'll keep in an airtight container in the fridge for up to 5 days, though I've never had them last more than 24 hours in my house.
That's it — you did it. But hold on, I've got a few more tricks that'll take this to another level...
Insider Tricks for Flawless Results
The Temperature Rule Nobody Follows
Here's the thing that separates the dessert heroes from the zeroes: temperature control is everything. Your cream cheese needs to be room temperature, but your formed balls need to be frozen solid. Your chocolate needs to be warm but not hot. It's like a culinary Goldilocks situation, and getting it right makes the difference between Instagram-worthy treats and something that looks like it melted in your car. I keep a thermometer handy for the chocolate — 105°F is the sweet spot where it flows beautifully without being so hot it melts the cheesecake centers.
Why Your Nose Knows Best
Don't underestimate the power of smell during each step. When the cream cheese is properly whipped, it should smell fresh and slightly tangy. The vanilla should make you want to close your eyes and inhale deeply. If your white chocolate smells even slightly burnt, start over — there's no saving burnt chocolate, only disguising it with other flavors. A friend tried skipping this step once — let's just say it didn't end well and her kitchen smelled like disappointment for days.
The 5-Minute Rest That Changes Everything
After you coat the bombs in chocolate and cookies, resist the urge to eat them immediately. I know, I know — they're calling to you like dessert sirens. But giving them that 5-minute rest at room temperature before refrigerating allows the chocolate to develop that beautiful matte finish instead of staying glossy. It's the difference between looking homemade and looking like they came from a boutique chocolate shop where everything costs more than your monthly car payment.
The Freezer vs. Fridge Debate
Everyone asks: should I store these in the freezer or fridge? Here's my take: fridge for serving, freezer for longevity. In the fridge, they stay perfectly creamy with that satisfying chocolate snap. In the freezer, they'll last up to 2 months, but you need to let them sit out for 10-15 minutes before serving or you'll break a tooth. I label mine with the date because time moves differently in the dessert dimension, and "I'll eat them soon" can mysteriously become "found these archaeological gems from 2019."
Presentation Perfection
These deserve better than being dumped in a plastic container. Arrange them on a pretty plate with some extra cotton candy for drama, or package them in clear boxes with colorful tissue paper. They're the perfect gift for anyone who needs a reminder that life can be sweet and whimsical. Just don't expect them to last long enough to give away — I've eaten three while writing this paragraph alone.
Creative Twists and Variations
This recipe is a playground. Here are some of my favorite ways to switch things up:
The Chocolate Lover's Dream
Swap the white chocolate for dark chocolate and add a teaspoon of instant espresso powder to the cheesecake mixture. The bitterness of the dark chocolate and coffee notes create this sophisticated flavor that makes people think you trained in France. Use crushed chocolate cookies for the coating and top with chocolate shavings. It's like a mocha cheesecake had a baby with a truffle, and that baby grew up to be delicious.
The Birthday Cake Remix
Use cream cheese mixed with funfetti cake mix for the base, coat in white chocolate, and roll in rainbow sprinkles plus crushed vanilla wafers. These taste like someone bottled up birthday parties and turned them into dessert. I make these for actual birthdays and people lose their minds. Pro tip: add a few drops of almond extract to really sell that birthday cake flavor profile.
The S'mores Situation
Add crushed graham crackers and mini chocolate chips to the cheesecake mixture, coat in milk chocolate, then roll in more graham cracker crumbs and mini marshmallows. Use a kitchen torch to lightly toast the marshmallows on top. These taste like summer camp and childhood memories, minus the mosquito bites and awkward social dynamics.
The Tropical Escape
Add crushed pineapple (well-drained) and coconut extract to the cheesecake mixture, coat in white chocolate mixed with a touch of coconut oil, then roll in toasted coconut flakes. These transport you to a beach where calories don't exist and the biggest worry is whether your sunscreen is reef-safe. They're particularly amazing in winter when you need a mental vacation.
The Holiday Special
Add peppermint extract and crushed candy canes to the mixture, coat in white chocolate tinted pink, and roll in more candy cane pieces. These are like Christmas morning in dessert form. I make them for holiday parties and people hoard them like they're made of gold. The peppermint cuts through the richness perfectly, making them dangerously easy to eat.
The Peanut Butter Paradise
Mix peanut butter into the cheesecake base (reduce the cream cheese slightly), coat in milk chocolate, and roll in crushed peanuts and pretzels. It's like a peanut butter cup went to finishing school and came back sophisticated. The salty pretzels provide the perfect contrast to the sweet peanut butter cheesecake. Just don't serve these to anyone with nut allergies unless you're trying to eliminate competition for seconds.
Storing and Bringing It Back to Life
Fridge Storage
Store these in an airtight container in the fridge for up to 5 days, though I challenge you to make them last that long. Place parchment paper between layers to prevent them from sticking together and ruining that beautiful coating. If they start to look a little dull, you can brush them with a tiny bit of neutral oil to bring back the shine. Keep them away from strong-smelling foods — cheesecake is like a sponge for refrigerator odors, and nobody wants garlic-infused dessert bombs.
Freezer Friendly
These freeze beautifully for up to 2 months in a freezer-safe container. Flash-freeze them first on a baking sheet, then transfer to containers — this prevents them from becoming one giant dessert blob. When you're ready to serve, transfer to the fridge overnight or let them sit at room temperature for 15-20 minutes. They'll taste just as good as fresh, making them perfect for emergency dessert situations or surprise guests who don't appreciate the artistry of your creation.
Best Reheating Method
Okay, technically you don't reheat these, but you do want to serve them at the right temperature. Too cold and you lose the creamy texture; too warm and the chocolate gets soft and the cheesecake too loose. The sweet spot is 10-15 minutes out of the fridge or 5-7 minutes at room temperature if they were frozen. Add a tiny splash of water to the container before serving — it creates just enough humidity to bring back that perfect texture without making anything soggy.