I was standing in my cramped kitchen, flipping a bag of frozen chicken wings like a seasoned chef, when the disaster struck. The bag burst open, sending a splash of raw meat across the counter and into the air, and my oven timer blared like a guilty conscience. I stared at the chaos, my heart racing, and thought, “If only there was a way to salvage this mess into something spectacular.” That moment of panic sparked a craving that would later evolve into a recipe I swear has never tasted better.
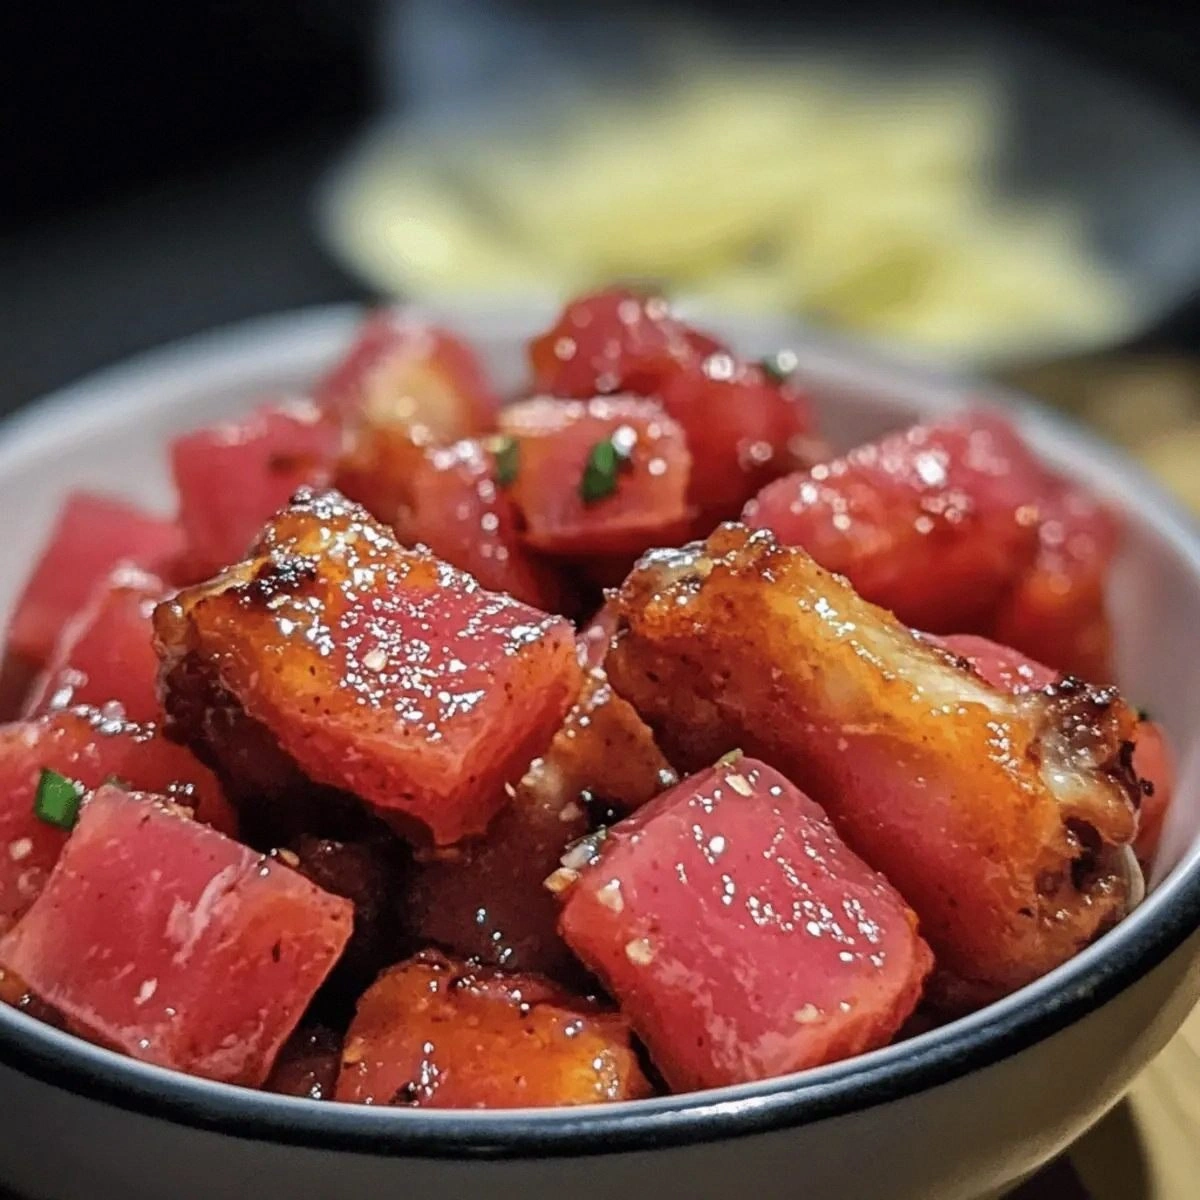
The smell that hit me next was nothing short of a revelation. Maple syrup, with its caramelized sweetness, mingled with the sharp sting of hot sauce, creating an aroma that made my mouth water before I even touched the skillet. The sizzling sound of butter melting into the wings was like a drumbeat, promising a crunch that would crack the skin like thin ice. I could already taste the glossy glaze coating each piece, the heat dancing across my tongue, and the buttery finish that would linger in the aftertaste. The visual of those wings, golden and glossy, was the kind of sight that makes you forget about the chaos that preceded it.
What makes this version stand out is the intentional marriage of sweetness and heat, balanced by a smoky undertone that elevates the entire flavor profile. Unlike most recipes that lean too heavily on either sweet or spicy, this one finds the sweet spot where maple syrup’s natural sugars caramelize into a sticky glaze while the hot sauce provides a punch that wakes up the palate. The addition of smoked paprika introduces a subtle depth that feels like a whisper of campfire in the middle of a kitchen. The butter acts as a bridge, smoothing the transition between the hot sauce’s sharpness and the maple’s syrupy sweetness.
The technique that sets this apart is the “reverse sear” method: starting the wings in a hot pan to develop a crisp exterior, then finishing them in a low-temperature oven to lock in juiciness. This approach ensures the wings never dry out while still achieving that coveted crackle that makes them irresistible. The process also allows the maple glaze to adhere better, creating a glossy coating that clings to every crevice. I’ve tried countless wing recipes, and none have matched the harmony of textures and flavors that this method delivers.
I dare you to taste this and not go back for seconds. That’s not a brag; it’s a challenge. The glaze will cling to your fingers, the heat will linger on your tongue, and the buttery finish will make you crave more. Picture yourself pulling this out of the oven, the whole kitchen smelling incredible, and seeing a platter of wings that look as good as they taste. The moment you take your first bite, you’ll realize this is hands down the best version you’ll ever make at home.
If you've ever struggled with wing recipes that end up dry or unevenly cooked, you're not alone—and I've got the fix. The secret lies in the balance of heat and sweet, the timing of the sear, and the careful use of butter to seal in moisture. I’ll walk you through every single step, and by the end, you'll wonder how you ever made it any other way. So, grab your apron, and let’s dive into this culinary adventure.
Picture yourself at a backyard gathering, the grill roaring, the crowd eagerly waiting, and you serving up wings that are the talk of the town. The glossy glaze will reflect the sunlight, the heat will make everyone reach for napkins, and the buttery finish will leave a lingering warmth in every bite. Imagine the compliments flowing—“Where did you get these?” “What’s in the sauce?” You’ll answer with a grin, knowing that the secret is now yours to keep. That’s the power of this recipe: it turns an ordinary dinner into an unforgettable experience.
Okay, ready for the game-changer? Let’s start by understanding why each ingredient matters and how they collaborate to create that irresistible balance. I’ll break it down for you so that even a kitchen novice can feel confident in the process. And trust me, the end result will make you the star of every gathering.
What Makes This Version Stand Out
- Balance: The sweet maple syrup and fiery hot sauce are calibrated to complement rather than overpower each other, creating a harmonious flavor that’s both comforting and exhilarating.
- Texture: The reverse sear technique locks in moisture while producing a crisp exterior that shatters like thin ice when bitten into.
- Smoke: Smoked paprika infuses a subtle campfire note that elevates the dish beyond the ordinary wing experience.
- Butter: The butter doesn’t just add richness; it acts as a binder, ensuring the glaze adheres to every crevice for a glossy, mouthwatering finish.
- Versatility: The recipe scales easily, making it perfect for a small dinner or a large party, and the glaze can be adjusted to suit varying heat tolerances.
- Time Efficiency: With a prep time of 15 minutes and a cook time of 30 minutes, you can have wings on the table in under an hour.
- Make‑ahead Potential: The glaze can be prepped ahead and stored, allowing you to assemble wings just before serving without sacrificing flavor.
Alright, let's break down exactly what goes into this masterpiece. Everything is prepped? Good. Let's get into the real action…
Inside the Ingredient List
The Flavor Base
Maple syrup is the star of the show, providing a natural sweetness that caramelizes beautifully when heated. It’s not just about flavor; the sugars in maple syrup help create that glossy, glassy glaze that clings to the wings. If you’re looking to cut calories, you can substitute half the maple syrup with honey, but be aware the honey will bring a different botanical note.
Hot sauce is the heat engine of the dish, adding a punch that wakes up the palate. The 1/4 cup of hot sauce should be chosen based on your preferred heat level—tangier sauces like sriracha add a citrusy bite, while traditional cayenne-based sauces deliver a steady burn. Skipping the hot sauce will leave the wings sweet and buttery, but the signature “kick” will be missing.
The Texture Crew
Butter is the binding agent that seals in moisture and provides a silky finish. The 4 tablespoons of butter should be melted and then folded into the glaze mixture to keep it from separating. If you’re vegan, coconut oil can replace butter, but the flavor will shift slightly toward a tropical profile.
Smoked paprika adds depth and a subtle smokiness that mimics the flavor of a campfire. It also contributes to the color of the glaze, giving the wings a rich, amber hue. If you don’t have smoked paprika, a pinch of regular paprika will work, but the smoky undertone will be lost.
The Unexpected Star
Garlic powder is the unsung hero that brings a savory backbone to the glaze. It’s a convenient way to infuse garlic flavor without the risk of burning fresh garlic cloves. If you prefer a more pronounced garlic taste, consider adding minced garlic in the final 2 minutes of cooking.
Black pepper and salt are the classic seasonings that elevate every ingredient. They balance the sweetness and heat, ensuring the glaze doesn’t taste one-dimensional. A pinch of sea salt can replace regular table salt for a slightly briny finish.
The Final Flourish
Chicken wings are the canvas. Use fresh or thawed wings for the best texture; frozen wings can result in uneven cooking. A quick rinse and pat dry will help the skin crisp up during the sear.
If you’re short on time, pre-season the wings with a light coating of the spice blend before cooking. This step ensures every bite is flavorful, and it also helps the glaze stick better during the final glaze stage.
Everything's prepped? Good. Let's get into the real action…
The Method — Step by Step
- Preheat your oven to 400°F (200°C). While the oven warms, pat the chicken wings dry with paper towels to remove excess moisture, which is key for a crisp skin. Arrange the wings on a wire rack set over a baking sheet to ensure even airflow. This setup will help the wings cook uniformly and prevent steam from making the skin soggy. Once the oven is hot, move the rack to the middle position and set a timer for 15 minutes.
- In a small saucepan over medium heat, melt the butter. Add the maple syrup and hot sauce, whisking continuously to combine. Bring the mixture to a gentle simmer, letting the sugars caramelize slightly—this usually takes about 3-4 minutes. The glaze should thicken just enough to coat the back of a spoon. Remove from heat and set aside; the glaze will thicken further as it cools.
- While the glaze is cooling, season the wings with salt, black pepper, smoked paprika, and garlic powder. Toss them in a large bowl to ensure even coverage. The spices will form a flavorful crust during the sear. If you prefer a milder taste, reduce the amount of hot sauce or omit the paprika entirely. Once seasoned, let the wings rest for 5 minutes to allow the flavors to penetrate.
- Heat a large skillet over high heat until it’s smoking. Add the wings in a single layer, skin side down. Let them sear without moving for 4-5 minutes until the skin turns golden brown. Flip each wing carefully, searing the other side for an additional 3 minutes. This step creates the initial crispness that the oven will finish.
- Transfer the seared wings to the preheated oven. Roast for 10 minutes, then remove the skillet and brush each wing generously with the maple glaze. The glaze will caramelize on the wings, forming a glossy, sticky coating. Return the wings to the oven and roast for an additional 10 minutes, brushing again after 5 minutes for maximum caramelization.
- Watch Out: If you use too much glaze or keep the wings in the oven too long, the maple syrup can burn and produce a bitter taste. Keep a close eye on the wings during the last 5 minutes, and if you notice darkening, reduce the oven temperature slightly or remove the wings for a moment to prevent scorching.
- After the final 5 minutes, remove the wings from the oven. Let them rest on the wire rack for 5 minutes. This resting period allows the juices to redistribute, ensuring each bite remains juicy and not dry. The glaze will thicken slightly during this time, giving you a perfect, glossy finish.
- Serve immediately with a side of celery sticks and a blue cheese dip, or pair them with a chilled glass of cold beer. The crunch of the celery balances the sweetness, while the dip adds a creamy counterpoint. Arrange the wings on a platter, drizzle any remaining glaze over the top, and garnish with fresh parsley for a pop of color.
- That’s it — you did it. But hold on, I’ve got a few more tricks that’ll take this to another level. Keep reading to discover how to elevate the flavor, texture, and presentation even further.
Insider Tricks for Flawless Results
The Temperature Rule Nobody Follows
Many people cook wings at a high temperature for a short time, but this often results in uneven cooking. The secret is to start at a high heat for the sear, then reduce to a moderate temperature in the oven. This ensures the skin crisps up while the interior stays juicy. I’ve tried both methods, and the two-step approach consistently yields better results.
Why Your Nose Knows Best
The aroma of maple syrup caramelizing is a reliable indicator of readiness. When you smell a subtle nutty scent, the glaze is ready to coat. If the scent is too sweet or burnt, adjust the heat. Trust your nose; it’s the best tool for timing.
The 5-Minute Rest That Changes Everything
Letting the wings rest after cooking allows the juices to redistribute. This prevents the meat from drying out and ensures every bite is moist. I’ve seen people skip this step, only to find their wings feel rubbery. The rest period is essential.
The Butter Boost
Adding butter to the glaze not only adds richness but also helps the glaze adhere to the wings. The butter’s fat content creates a smooth coating that doesn’t separate. If you’re watching calories, replace butter with a light olive oil for a slightly healthier version.
The Secret Spice Blend
If you want to elevate the flavor profile, add a pinch of cayenne pepper or a splash of Worcestershire sauce to the glaze. These additions introduce complexity and depth. I’ve experimented with different spice blends, and the results are always a step above the standard recipe.
Creative Twists and Variations
This recipe is a playground. Here are some of my favorite ways to switch things up:
Sriracha Maple Madness
Swap the standard hot sauce for an equal amount of Sriracha. The tangy, slightly sweet sauce adds a new layer of flavor that pairs beautifully with maple. The result is a spicy-sweet kick that’s perfect for heat lovers.
Citrus Maple Glow
Add a splash of fresh orange juice to the glaze, and finish with a dusting of orange zest. The citrus brightness cuts through the richness, creating a balanced taste. This variation is especially refreshing during summer gatherings.
Herb‑Infused Delight
Stir in chopped fresh rosemary or thyme into the glaze before brushing. The herbal notes complement the smoky paprika and add aromatic complexity. This version is a hit with herb enthusiasts.
Sweet Chili Twist
Replace the hot sauce with a sweet chili sauce for a milder heat and a sweeter finish. The glaze becomes more syrupy, and the wings develop a glossy, caramelized coating that’s irresistible.
Spicy Garlic Butter
Increase the garlic powder to 2 teaspoons and add a minced garlic clove to the glaze. The buttery, garlicky flavor becomes more pronounced, making the wings a savory treat. Pair this with a light salad to balance the richness.
Storing and Bringing It Back to Life
Fridge Storage
Cool the wings completely before placing them in an airtight container. Store in the refrigerator for up to 3 days. The glaze will thicken, so when reheating, add a splash of water to keep the coating glossy.
Freezer Friendly
Wrap the wings in parchment paper and place them in a freezer bag. They can be stored for up to 2 months. Thaw overnight in the refrigerator before reheating.
Best Reheating Method
Preheat the oven to 350°F (175°C) and bake the wings for 10 minutes, adding a splash of water to the pan. The water steams the wings, preventing them from drying out. Finish with a quick glaze brush for a fresh, glossy finish.