If you’ve ever struggled with sticky, uneven bites, you’re not alone—and I’ve got the fix. The secret is to let the mixture rest for a few minutes before shaping; this allows the peanut butter to firm up slightly, making it easier to roll without it falling apart. I’ll be honest—I ate half the batch before anyone else got to try it, and the next round was a frenzy of “where did you get this?” moments. Picture yourself pulling these out of the fridge, the whole kitchen smelling incredible, and the first bite melting on your tongue like a velvety chocolate bar. Stay with me here—this is worth it, and by the end, you’ll wonder how you ever made it any other way.
What Makes This Version Stand Out
- Taste: The harmonious blend of peanut butter, honey, and vanilla creates a depth that feels both nostalgic and sophisticated. The chocolate chips add a subtle bittersweet counterpoint that balances the natural sweetness of the honey.
- Texture: The oats and flaxseed deliver a satisfying chew, while the chia seeds provide a micro‑crunch that keeps each bite from feeling too soft.
- Simplicity: No baking, no measuring cups, no complicated steps—just mix, roll, chill, and enjoy. The recipe is designed for busy mornings, late‑night cravings, or pre‑workout fuel.
- Uniqueness: The addition of dried fruit and a touch of vanilla extract turns a basic snack into a gourmet treat that feels indulgent yet wholesome.
- Crowd Reaction: Friends and family rave about the “just right” chew and the instant energy boost, making these bites a hit at potlucks, game nights, and office snack stations.
- Ingredient Quality: Using high‑quality peanut butter and raw honey ensures a richer flavor profile and a healthier nutritional profile.
- Make‑ahead Potential: These bites keep well in the fridge for up to a week, so you can prep them in bulk and grab a quick snack on the go.
Alright, let's break down exactly what goes into this masterpiece…
Inside the Ingredient List
The Flavor Base
The rolled oats are the backbone of the mixture, providing a hearty, nutty flavor that anchors the other components. They absorb the honey and peanut butter, creating a cohesive texture that holds the bite together. If you skip the oats, the mixture will be too runny and won’t form proper balls. For a smoother bite, you can pulse the oats in a food processor until they reach a fine, flour‑like consistency.
The Texture Crew
Ground flaxseed and chia seeds act as natural binders, adding a silky, slightly fibrous quality that prevents the bites from falling apart. Flaxseed also brings omega‑3 fatty acids, while chia seeds add a pop of crunch and a subtle nutty flavor. If you prefer a crunchier bite, increase the chia seeds by a tablespoon; if you want a softer bite, reduce them slightly.
The Unexpected Star
Mini chocolate chips may seem like an indulgence, but they actually add a burst of sweetness and a glossy sheen that makes the bites visually appealing. The chocolate melts just enough to seep into the oats, creating a subtle, chocolate‑oat harmony. If you’re avoiding chocolate, substitute with cacao nibs or a small amount of dark chocolate chips for a slightly bitter edge.
The Final Flourish
Chopped nuts and dried fruit bring layers of flavor and texture—nuts add a buttery crunch, while dried fruit offers chewy bursts of natural sweetness. The combination of almonds, walnuts, or pecans with raisins, cranberries, or chopped dates creates a complex flavor profile that’s both satisfying and energizing. If you’re allergic to nuts, replace them with pumpkin seeds or sunflower seeds for a similar crunch.
Everything's prepped? Good. Let's get into the real action…
The Method — Step by Step
- In a medium mixing bowl, combine the rolled oats, ground flaxseed, and chia seeds. Stir them together so the dry ingredients are evenly distributed; this prevents clumping later on. I dare you to taste a spoonful of the dry mix—it should have a slightly nutty, earthy flavor that hints at the final bite.
- In a small saucepan, gently heat the peanut butter, honey, and vanilla extract over low heat, stirring until the mixture is smooth and pourable. The heat should be low enough that the peanut butter doesn’t burn; a gentle swirl of the mixture indicates the right temperature. The aroma should be sweet and buttery, like a warm, freshly opened jar of peanut butter.
- Pour the warm peanut butter mixture into the bowl of dry ingredients. Using a wooden spoon or spatula, mix until every oat and seed is coated and the mixture begins to clump together. At this point, the mixture should feel slightly sticky but not overly wet—think of a thick, damp sand that holds its shape.
- Fold in the mini chocolate chips, chopped nuts, and dried fruit until evenly distributed. The chocolate should start to melt slightly, coating the oats with a glossy sheen. The nuts and fruit add a delightful crunch and chewy bursts that contrast beautifully with the smooth peanut butter.
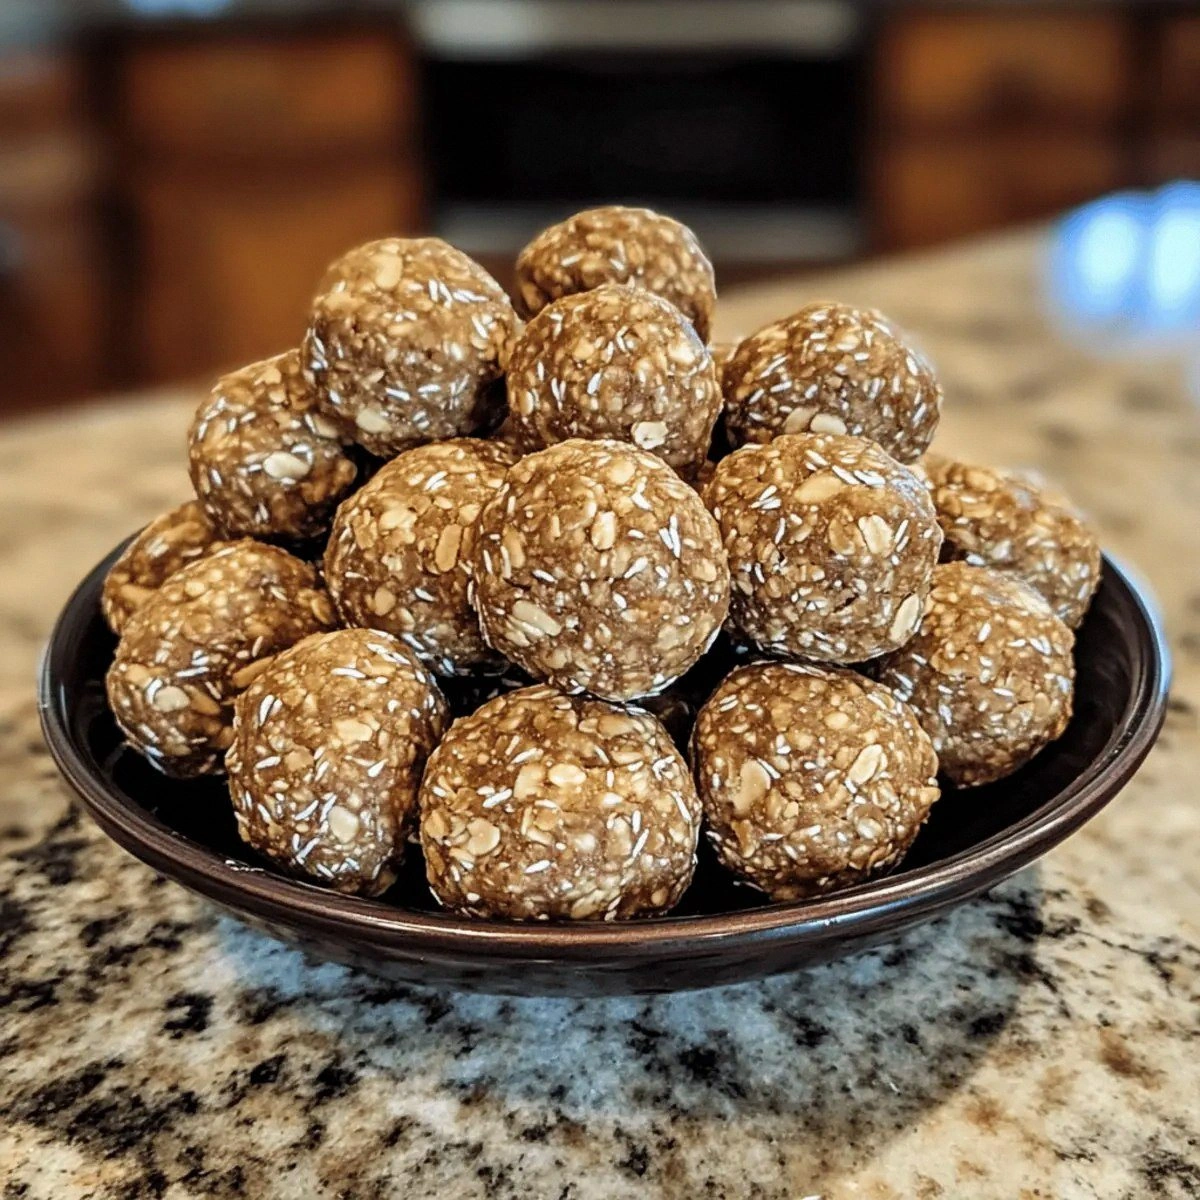
- Line a baking sheet with parchment paper or a silicone mat. Using a small cookie scoop or tablespoon, portion the mixture into 1‑inch balls, rolling them between your palms to form smooth spheres. If the mixture sticks to your hands, dampen them with a little water or spray a light mist of cooking spray.
- Place the formed balls on the prepared sheet and refrigerate for at least 30 minutes, or until firm. The chilling process allows the peanut butter to set, giving each bite a firm yet chewy texture. During this time, the flavors meld together, creating a harmonious taste profile.
- After chilling, transfer the bites to an airtight container or zip‑lock bag. Store them in the refrigerator for up to a week or freeze them for longer storage. When you’re ready to eat, let them sit at room temperature for a few minutes to soften slightly—this enhances the flavor and makes them easier to bite.
That's it — you did it. But hold on, I've got a few more tricks that'll take this to another level…
Insider Tricks for Flawless Results
The Temperature Rule Nobody Follows
Many people think that a warm peanut butter mixture is the only way to get a smooth blend, but the trick is to keep it just below boiling. If it’s too hot, the honey will separate, and the mixture will become too liquid. Keep the heat low and stir constantly; the moment the mixture starts to bubble, remove it from the stove.
Why Your Nose Knows Best
Smell the mixture as you mix. A sweet, buttery aroma indicates the right consistency. If you notice a metallic or burnt scent, the peanut butter has overheated. Trust your nose—if it smells like toasted marshmallows, you’re on the right track.
The 5‑Minute Rest That Changes Everything
After mixing, let the mixture sit for 5 minutes before shaping. This pause allows the oats to fully absorb the liquids, creating a cohesive, firm texture. I’ve seen batches that were too sticky immediately after mixing; a short rest eliminates that issue.
Chilling Isn’t Just for Flavor
Refrigerating the bites not only sets the texture but also intensifies the peanut butter flavor. The cold temperature brings out the nutty undertones, making each bite taste richer. If you’re in a hurry, you can skip the chill, but the result will be softer and less structured.
Storage Secrets
Store the bites in a sealed container to prevent them from absorbing odors from other foods. A small, airtight container works best because the bites can expand slightly when chilled. If you’re traveling, pack them in a small cooler bag with an ice pack to keep them fresh.
Reheating Tips
To revive a chilled bite, microwave it for 10–15 seconds. This short burst of heat softens the peanut butter, restoring the original chew. Be careful not to over‑heat, or the bite will become too soft and lose its structure.
Creative Twists and Variations
This recipe is a playground. Here are some of my favorite ways to switch things up:
Spicy Chipotle Crunch
Add a pinch of chipotle powder to the dry mix for a smoky heat that contrasts the sweetness. Swap the mini chocolate chips for cacao nibs to keep the flavor balanced. This version is perfect for those who love a little spice in their snacks.
Berry‑Burst Delight
Replace the dried fruit with fresh blueberries or raspberries, and add a splash of lemon zest to brighten the flavor. The berries provide a juicy burst that pairs wonderfully with the peanut butter base. Keep the nuts for crunch.
Almond‑Coconut Fusion
Use almond butter instead of peanut butter and add shredded coconut to the mix. The coconut gives a tropical twist, and the almond butter adds a slightly sweeter, lighter taste. Finish with a drizzle of dark chocolate for a decadent touch.
Chocolate‑Mint Madness
Fold in a teaspoon of peppermint extract and use dark chocolate chips instead of mini ones. The mint adds a refreshing aftertaste that lingers on the palate. This variation is ideal for holiday parties or a summer treat.
Protein Power Pack
Stir in a scoop of vanilla whey protein powder to boost the protein content. Replace the dried fruit with dried apricots for a chewy texture that complements the protein. This version is great for pre‑workout or post‑workout snacking.
Maple‑Glazed Edition
Swap honey for pure maple syrup and add a pinch of sea salt. The maple gives a subtle caramel flavor that pairs beautifully with the peanut butter. Finish with a sprinkle of crushed sea salt for a sweet‑savory finish.
Storing and Bringing It Back to Life
Fridge Storage
Place the bites in an airtight container and store them in the refrigerator for up to 7 days. The cold environment keeps the peanut butter firm, preserving the chewy texture. Check for any signs of mold or off‑odors before consuming.
Freezer Friendly
For longer storage, freeze the bites in a single layer on a baking sheet before transferring them to a freezer bag. They can stay in the freezer for up to 3 months. Thaw them at room temperature for 10 minutes before serving to restore the ideal chew.
Best Reheating Method
To reheat, place the bite on a microwave‑safe plate and microwave on high for 10–15 seconds. The brief heat will soften the peanut butter without melting the chocolate chips. If you prefer a warm snack, you can also place the bite in a preheated oven at 300°F for 3 minutes.