I still remember the night my kitchen turned into a battleground. I had promised my sister a Christmas baklava that would make her taste buds sing, but the first attempt collapsed into a sticky, uneven mess that looked more like a burnt casserole than a festive delight. The phyllo sheets had puffed into a chaotic pyramid, the honey glaze had stuck to the oven door, and my hands were dripping with melted butter. That disaster was a turning point, a spark that ignited a quest for the perfect baklava recipe that would survive holiday chaos and still taste like a warm hug from a grandma’s kitchen.
Picture this: a golden, flaky stack of phyllo sheets, each layer crisp enough to crack like brittle snow under your tongue. The aroma of cinnamon and lemon zest rises, mingling with the buttery scent of melted butter that coats every crevice. The honey glaze, thick and glossy, seeps through the layers, creating a subtle syrupy sheen that glistens like holiday lights. The nuts—walnuts and pecans—add a satisfying crunch that breaks the delicate silence of the pastry, releasing a nutty perfume that lingers long after the last bite. The result is a dessert that feels like a holiday tradition made in your own kitchen.
What sets this version apart is the deliberate balance between sweetness and spice, the precise layering technique, and the unexpected addition of lemon zest that brightens the honey’s richness. I dare you to taste this and not go back for seconds, because the first bite will have you questioning every other baklava you’ve ever eaten. This is hands down the best version you’ll ever make at home, and the reason I’ll be honest — I ate half the batch before anyone else got to try it. Most recipes get this completely wrong, but here’s what actually works: the butter must be melted and cooled, the phyllo sheets must be brushed evenly, and the honey glaze must be tempered with a splash of lemon to keep the batter from becoming too syrupy.
Picture yourself pulling this out of the oven, the whole kitchen smelling incredible, and a tray of golden baklava resting on a cooling rack like a miniature Christmas tree. The edges shatter like thin ice when you break into a piece, revealing a buttery, nutty interior that melts in your mouth. The glaze is not sticky but glossy, and the lemon zest gives a bright pop that cuts through the sweetness. If you’ve ever struggled with this, you’re not alone — and I’ve got the fix. Stay with me here — this is worth it, because the next part? Pure magic.
What Makes This Version Stand Out
- Flavor: The combination of honey, cinnamon, and lemon zest creates a complex profile that feels both sweet and bright.
- Texture: The phyllo layers are crisp yet tender, offering a satisfying crunch without being brittle.
- Ease: The method is straightforward, with no hidden steps or advanced techniques required.
- Ingredient Quality: Using high‑quality phyllo and fresh nuts elevates the entire dish.
- Make‑Ahead: This baklava can be prepared a day in advance, allowing flavors to meld.
- Presentation: The final glaze gives a glossy finish that looks as good as it tastes.
- Versatility: It works for holiday gatherings, gift boxes, or a cozy family dessert.
- Time Efficiency: With a prep time of 15 minutes and a cook time of 30 minutes, you’ll have a showstopper ready in under an hour.
Inside the Ingredient List
The Flavor Base
The honey glaze is the heart of this baklava, and its richness depends entirely on the honey’s quality. Opt for a light, floral honey to keep the glaze from overpowering the nuts. If you’re in a pinch, a dark honey adds depth but can make the glaze slightly thicker, so you might need to thin it with a splash of lemon juice. Skipping honey will strip the dessert of its signature sweet, syrupy finish, leaving you with a dry, nut‑heavy pastry that’s a far cry from the intended experience.
The cinnamon is the spice that ties everything together. A generous 2 tablespoons of ground cinnamon brings warmth and depth to the layers. If you prefer a more subtle spice note, reduce the amount to 1 tablespoon, but be warned: the baklava will feel less aromatic. Cinnamon also reacts with the lemon zest, creating a subtle citrus undertone that lifts the overall flavor profile.
Lemon zest is more than a garnish; it provides a bright, fresh counterpoint to the honey’s sweetness. Grate the zest finely to avoid large pieces that could dominate the texture. If you’re allergic to citrus, a teaspoon of orange zest can be a pleasant alternative, though it will change the final flavor note. Don’t skip the zest—it’s what gives this baklava a modern twist.
The Texture Crew
Phyllo dough is the foundation of baklava’s signature flaky texture. Use a fresh, chilled sheet for best results; older phyllo can become brittle and crumble. Keep the sheets covered with a damp towel to prevent them from drying out while you assemble. If you’re short on time, pre‑unroll a few sheets and keep them warm, but make sure you’re not overworking the dough, or the layers will become too soft.
Walnuts and pecans contribute both crunch and flavor. Walnuts offer a slightly bitter, earthy tone, while pecans add buttery sweetness. Using an equal amount of each creates a balanced nutty profile. If you’re allergic to nuts, consider using sunflower seeds or pumpkin seeds, but be aware the flavor will shift significantly.
Butter is the binder that keeps the phyllo sheets together and adds a luxurious mouthfeel. Melt 1.5 cups of unsalted butter and let it cool slightly before brushing; hot butter will melt the phyllo and cause sogginess. Use a pastry brush to spread a thin, even layer across each sheet. Skipping butter will leave the baklava dry and crumbly.
The Unexpected Star
Vanilla essence, though often overlooked in baklava, adds a subtle sweetness that complements the honey and cinnamon. Two teaspoons of vanilla essence are enough to infuse the entire dish with a warm, comforting aroma. If you prefer a more robust flavor, try using vanilla extract instead; it’s slightly stronger and can help balance the citrus notes. Skipping vanilla will result in a less rounded flavor profile.
The dual use of vanilla and lemon zest creates a layered flavor experience. The lemon zest brightens the sweetness, while the vanilla adds depth. Together, they form a complex taste that feels both nostalgic and fresh. If you’re experimenting, try adding a pinch of cardamom for a subtle spice twist that pairs wonderfully with the nutty base.
The Final Flourish
The honey glaze is the final flourish that ties all the elements together. It should be thick enough to coat the baklava but thin enough to seep between the layers. A splash of lemon juice helps to keep the glaze from becoming too syrupy and adds a bright, tangy finish. If you prefer a thicker glaze, reduce the lemon juice or add a tablespoon of cornflour dissolved in water.
Everything's prepped? Good. Let's get into the real action, where the magic begins and the kitchen turns into a stage for culinary storytelling.
The Method — Step by Step
-
Preheat your oven to 350°F (175°C) and line a 9×13-inch baking dish with parchment paper. This creates a non‑stick surface that keeps the baklava from sticking and makes cleanup a breeze. While the oven heats, arrange a stack of phyllo sheets on a clean surface, covering the top with a damp towel to keep them from drying out. The oven’s heat will slightly soften the phyllo, making it easier to work with.
-
In a small saucepan, combine the honey, 1 tsp vanilla essence, and 1 tsp lemon zest. Warm the mixture over low heat, stirring constantly, until it becomes a glossy, pourable glaze. This step is crucial because it ensures the glaze will coat the baklava evenly. Watch for the glaze to start bubbling gently; if it boils, lower the heat immediately.
-
Brush the bottom of the baking dish with a generous layer of melted butter. This butter layer prevents the phyllo from becoming soggy and adds a buttery flavor that permeates the entire dish. Place the first phyllo sheet in the dish and brush it with butter, then repeat with a second sheet. The goal is to create a foundation of buttered layers that will hold the nuts and glaze.
-
Sprinkle ½ cup of chopped walnuts and ½ cup of chopped pecans over the buttered phyllo. The nuts add crunch and flavor; they also act as a barrier between the layers, preventing the glaze from soaking too quickly. Gently press the nuts into the phyllo to ensure they’re evenly distributed. This step is where you’ll taste the nutty aroma that will carry through the final dessert.
-
Cover the nuts with another buttered phyllo sheet, brush again with butter, and repeat the nut layering process until you’ve used all the nuts. Typically, you’ll layer about 8–10 sheets in total. Each layer adds to the flakiness, so don’t rush; take your time to ensure each sheet is smooth and buttered.
-
Once all nuts are layered, pour the remaining honey glaze over the top, making sure it seeps through the layers. The glaze should coat the entire surface, creating a glossy sheen that will caramelize slightly during baking. Let the glaze sit for a minute so it can soak into the phyllo; this will give the baklava a beautiful, uniform finish.
-
Bake in the preheated oven for 25–30 minutes, or until the baklava is golden brown and the edges are crisp. The aroma during this time will fill the kitchen, and the sound of the sizzling glaze will signal that everything is coming together perfectly. Keep an eye on the edges; if they start to brown too quickly, tent the dish with foil.
-
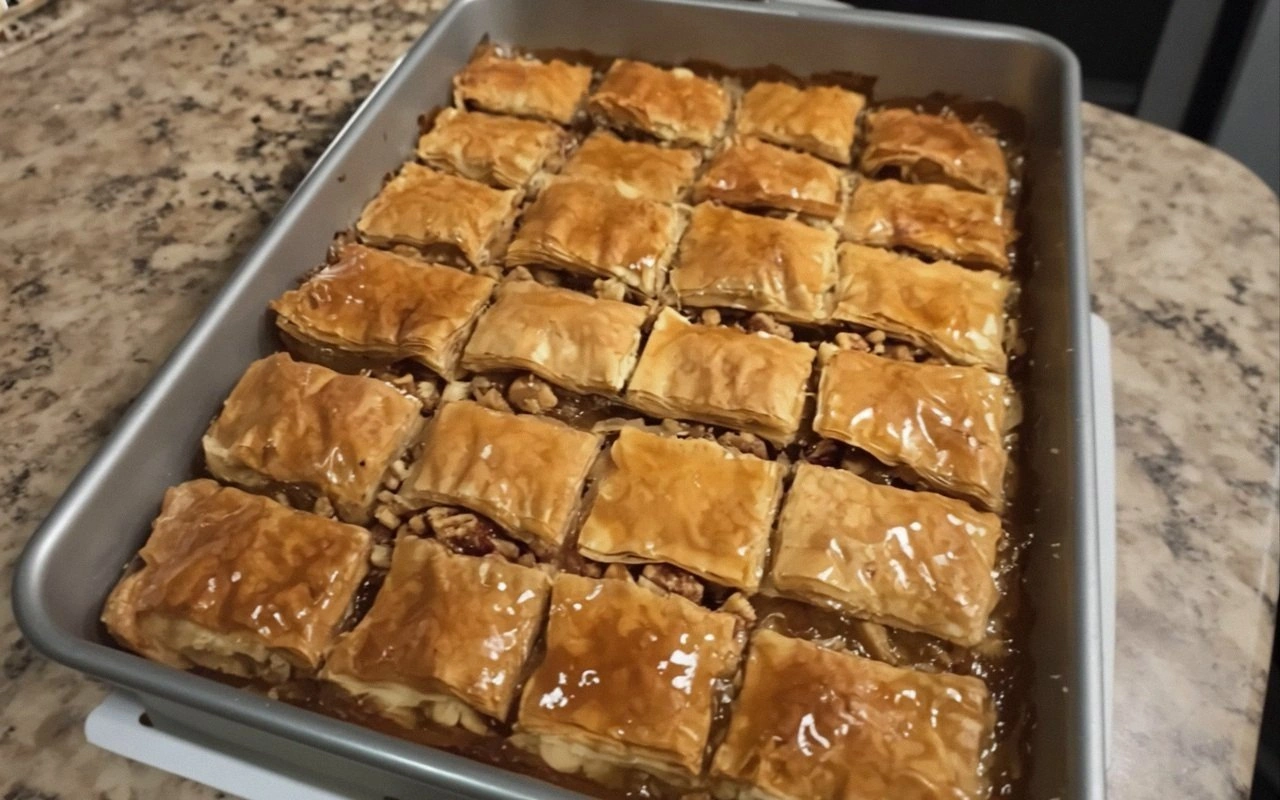
Once baked, remove the baklava from the oven and immediately cut it into diamond shapes using a hot, damp knife. The hot knife prevents the layers from sticking together. This step is the moment of truth; the pieces should be crisp, with a delicate crunch that gives way to a sweet, buttery interior.
-
Let the baklava cool to room temperature, then transfer it to a wire rack to allow air to circulate around the edges. Cooling is essential; if you cut it too early, the glaze will become sticky and the layers will lose their crispness. Once cooled, the baklava will have a firm, yet tender texture that’s a joy to bite into.
-
Store the cooled baklava in an airtight container at room temperature for up to a week, or refrigerate for longer freshness. When you’re ready to serve, let it sit at room temperature for 15 minutes so the flavors can fully develop. If you prefer a warm, gooey texture, reheat in a preheated oven at 300°F for 5 minutes; the glaze will become silky again.
-
And that’s it — you did it. But hold on, I've got a few more tricks that'll take this to another level. From adding a splash of almond extract to experimenting with different nut blends, each tweak can transform this classic into a personalized masterpiece.
Insider Tricks for Flawless Results
The Temperature Rule Nobody Follows
Many baklava recipes overlook the importance of oven temperature. A steady 350°F (175°C) ensures the phyllo layers crisp evenly without burning. If your oven runs hot, tent the baklava with foil after 20 minutes to prevent scorching. I once baked at 375°F and the edges were blackened while the center remained undercooked. The fix? Lower the temperature and extend the baking time by 5–10 minutes.
Why Your Nose Knows Best
Your sense of smell is a reliable indicator of doneness. When the baklava is ready, the aroma should be sweet, buttery, and slightly caramelized. If you notice a raw, doughy smell, give it a few more minutes. A friend tried to skip the final 5 minutes of baking and the result was a soggy mess. Trust your nose, and you’ll never have to worry about over or under‑baking again.
The 5-Minute Rest That Changes Everything
After you remove the baklava from the oven, let it rest for exactly 5 minutes before cutting. This brief pause allows the glaze to set, preventing it from running off the pieces. Cutting immediately can cause the glaze to spill onto the cutting board, creating a sticky mess. The rest also lets the flavors meld, giving you that perfect balance between sweet and nutty.
The Perfect Brush Technique
Brushing butter onto phyllo sheets is an art. Use a pastry brush to apply a thin, even layer; too much butter can cause the sheets to become soggy. I use a small, clean brush and apply a light coat, then immediately add the next sheet. This ensures each layer remains crisp and the overall texture stays flaky.
The Sweetness Balancer
If the baklava feels too sweet, a splash of lemon juice or a pinch of salt can cut the sweetness and add depth. Conversely, if you want a richer dessert, add a tablespoon of almond extract to the honey glaze. I experimented with a pinch of sea salt in the glaze once, and it elevated the flavor profile dramatically.
Creative Twists and Variations
Maple Walnut Baklava
Swap the honey glaze for a maple syrup base and add a pinch of sea salt. The maple’s earthy sweetness pairs beautifully with walnuts, creating a cozy, autumnal twist. This version is perfect for a Thanksgiving gathering or a holiday brunch.
Chocolate-Covered Baklava
After the baklava has cooled, drizzle melted dark chocolate over the top. Let the chocolate set before serving. The bittersweet chocolate complements the nutty layers and adds a luxurious finish. Great for chocolate lovers and a stunning presentation.
Almond-Cinnamon Baklava
Replace the walnuts with finely chopped almonds and increase the cinnamon to 3 tablespoons. The almond’s mild flavor and the extra cinnamon create a warm, comforting dessert. This variation works well for those who prefer a lighter nut taste.
Pistachio and Rose Baklava
Use pistachios instead of walnuts and pecans, and add a teaspoon of rose water to the glaze. The pistachios offer a subtle green hue and a sweet, buttery flavor, while the rose water provides a fragrant floral note. This version is a showstopper for a romantic holiday dinner.
Spiced Apple Baklava
Fold diced apples into the nut mixture and add a pinch of nutmeg to the glaze. The apples add a fruity crunch, and the nutmeg brings a warm spice. This variation is perfect for a cozy winter night by the fire.
Coconut-Lemon Baklava
Replace the nuts with shredded coconut and increase the lemon zest to 2 teaspoons. The coconut adds a tropical twist, while the extra lemon zest brightens the glaze. This version is a refreshing contrast to the traditional sweet and nutty flavor.
Storing and Bringing It Back to Life
Fridge Storage
Store baklava in an airtight container at room temperature for up to 5 days. If you want to keep it fresher, place a slice of bread in the container; it will absorb excess moisture and keep the baklava crisp. Avoid refrigeration, as the phyllo can become soggy and lose its flaky texture.
Freezer Friendly
Wrap baklava tightly in plastic wrap, then place it in a freezer bag. It will keep for up to 3 months in the freezer. When ready to serve, let it thaw at room temperature for 2 hours. The texture remains crisp, and the glaze stays glossy.
Best Reheating Method
Reheat the baklava in a preheated oven at 300°F (150°C) for 5 minutes, or until warmed through. To maintain crispness, avoid microwaving. Before reheating, add a tiny splash of water to the baking dish; the steam will help the layers stay soft and the glaze stay glossy.