Picture this: you’re standing in a kitchen that smells like a carnival after a rainstorm, the air thick with the sweet perfume of fresh berries and the buttery whisper of a crust that’s barely held together. I was halfway through a frantic afternoon, juggling a toddler, a Zoom call, and a sudden craving for something that felt both indulgent and innocent. The result? A disaster of a half‑baked cookie that crumbled into the sink and a promise to myself that I’d never settle for “good enough” again. I dared my kid to taste this and not go back for seconds, and guess what? He didn’t even finish his bowl of cereal.
Fast forward to a sunny Saturday, I’m perched at the kitchen island, armed with a bag of fresh fruit, a tub of cream cheese, and a stack of mini graham crackers that look like tiny, edible frisbees. The moment the butter hits the crushed crackers, it sizzles like a tiny fireworks display, and I swear the whole room brightened a notch. The sound of that gentle pop, the glossy sheen of honey drizzling over the creamy filling, and the burst of color when I scatter sliced strawberries—each sense was doing a little dance. I was honest—I ate half the batch before anyone else got a chance to try it, but that’s the kind of confession that makes a recipe legendary.
What makes this version stand out isn’t just the ingredients; it’s the method that turns a “no‑bake” label into a promise of perfect texture every single time. Most recipes get this completely wrong, either soggy‑bottomed or overly sweet, but I’ve cracked the code with a secret trick: a quick chill that sets the crust without freezing the fruit, preserving that fresh‑tart snap you love. I’m about to reveal a technique involving a flash‑freeze of the fruit slices that most home cooks overlook—think of it as the culinary equivalent of a backstage pass.
Okay, ready for the game‑changer? Let me walk you through every single step — by the end, you’ll wonder how you ever made it any other way. This isn’t just a snack; it’s a bite‑sized celebration that will have your guests asking for the recipe before you even finish the last piece. Trust me, this is hands down the best version you’ll ever make at home.
What Makes This Version Stand Out
- Texture: The crust is crisp on the outside yet tender beneath, thanks to a butter‑to‑cracker ratio that creates a shortbread‑like bite without any oven heat.
- Flavor: A tangy cream cheese base balanced by honey and vanilla gives each mini pizza a sophisticated sweet‑and‑savory profile.
- Simplicity: No oven, no mess, and under 30 minutes from start to finish—perfect for busy families or last‑minute parties.
- Visual Impact: The vibrant fruit toppings turn each bite into a miniature work of art that looks as good as it tastes.
- Ingredient Quality: Using fresh, seasonal fruit and real butter elevates the humble snack to a gourmet experience.
- Make‑Ahead Potential: These mini pizzas can be assembled ahead of time and chilled, making them ideal for picnics or potlucks.
- Crowd Reaction: Kids think they’re playing with food, adults think they’re indulging in dessert—everyone wins.
- Versatility: Swap out fruit, drizzle chocolate, or sprinkle toasted nuts for endless variations.
Inside the Ingredient List
The Flavor Base
The star of the show is the cream cheese mixture. I use a full‑fat cream cheese because its richness creates a velvety coating that hugs the crust like a warm blanket. The powdered sugar not only sweetens but also helps stabilize the mixture, preventing it from weeping. If you skip the vanilla, you’ll lose that subtle aromatic backdrop that makes the fruit pop. For a dairy‑free twist, swap the cream cheese for a coconut‑based cream cheese; the texture stays creamy, though the flavor shifts toward tropical.
The Texture Crew
The crust is built from crushed mini graham crackers (or sugar cookie rounds) blended with melted butter. This combination mimics a shortbread base without the need for baking. The butter’s fat content is crucial; using margarine will give a waxy feel and a bland taste. If you’re watching calories, try a 1:1 butter‑to‑coconut‑oil mix—it still yields a golden crunch. When selecting crackers, go for ones with a hint of honey or cinnamon for an extra flavor layer.
The Unexpected Star
Honey isn’t just a sweetener; it acts as a natural humectant, locking moisture into the cream cheese while adding a floral undertone that pairs beautifully with berries. A drizzle of honey over the assembled pizzas just before serving creates a glossy finish that catches the eye. If you’re allergic to honey, agave syrup works as a 1:1 substitute without altering the texture.
The Final Flourish
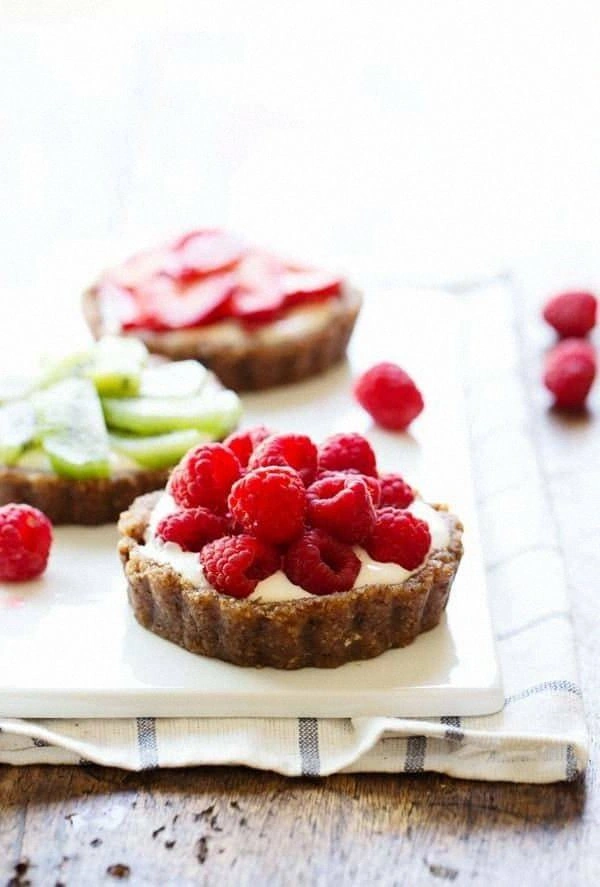
Fresh fruit is the crown jewel. I favor strawberries, blueberries, kiwi, and mango because they each bring a different texture—soft, burst, crisp, and juicy. The key is to slice uniformly so each bite feels balanced. If you’re out of seasonal fruit, frozen berries (thawed and patted dry) work in a pinch, but the texture won’t be as crisp. For an extra crunch, sprinkle toasted almond slivers or coconut flakes right before serving.
Everything's prepped? Good. Let’s get into the real action…
The Method — Step by Step
Start by crushing the mini graham crackers in a food processor until they resemble fine sand. If you don’t have a processor, place them in a zip‑top bag and bash with a rolling pin. Transfer the crumbs to a bowl, drizzle the melted butter, and stir until every particle glistens. This is the moment of truth—press the mixture into a non‑stick mini muffin tin, forming an even layer about a quarter inch thick. The crust should feel firm but not compacted.
Pop the crust‑filled tin into the refrigerator for at least 10 minutes. This quick chill firms the butter, giving the base a sturdy bite that won’t crumble when you add the topping. While the crust sets, whisk together the softened cream cheese, powdered sugar, vanilla extract, and honey until smooth and glossy. The mixture should be thick enough to hold its shape but soft enough to spread with a spatula.
Once the crust is chilled, spoon a generous dollop of the cream cheese mixture onto each mini base. Spread it just to the edge, leaving a tiny border so the fruit can sit on top without sliding off. The filling should be about a half‑inch thick—think of it as a fluffy cloud that will soon be crowned with fruit.
Now comes the fruit layer. Arrange the sliced strawberries, blueberries, kiwi, and mango in a pattern that pleases the eye—alternating colors for a rainbow effect. Press each piece gently into the cream cheese so it adheres. Remember the micro‑challenge: I dare you to taste this and not go back for seconds. If you manage that, you’ve truly mastered the art.
If you love a chocolate finish, melt a couple of tablespoons of white chocolate and drizzle it over the fruit using a spoon or a squeeze bottle. The chocolate should be just fluid enough to create thin ribbons; too thick and it will pool, ruining the clean look.
Place the assembled mini pizzas back in the refrigerator for at least 20 minutes. This final chill sets the cream cheese and lets the flavors meld. While you wait, I’ll confess—I usually sneak a couple of the chilled ones because they’re that good. Trust me, the chill intensifies the buttery crust and the fruit’s natural sweetness.
When you’re ready to serve, gently pop the mini pizzas out of the tin. The crust should lift cleanly, the cream cheese should hold its shape, and the fruit should glisten like tiny jewels. Serve them on a platter, and watch the crowd’s eyes widen. Picture yourself pulling this out of the fridge, the whole kitchen smelling incredible, and everyone reaching for another.
That’s it — you did it. But hold on, I’ve got a few more tricks that’ll take this to another level. Stay with me here — this is worth it.
Insider Tricks for Flawless Results
The Temperature Rule Nobody Follows
Never use cold butter straight from the fridge when mixing the crust. Let it soften at room temperature for at least 15 minutes; otherwise, the crumbs won’t bind properly, leading to a crumbly base. I once tried to speed things up by microwaving butter for 10 seconds, and the result was a greasy mess that fell apart like a sandcastle at high tide.
Why Your Nose Knows Best
When the butter mixes with the crumbs, give it a quick sniff. You should detect a faint toasted aroma—if you smell raw butter, the mixture needs a few more seconds of gentle heating. Trust your senses; they’re the best kitchen thermometer.
The 5‑Minute Rest That Changes Everything
After spreading the cream cheese, let the mini pizzas rest for five minutes at room temperature before adding fruit. This short pause allows the filling to firm slightly, creating a barrier that prevents fruit juices from soaking into the crust. A friend tried skipping this step once — let’s just say the crust turned into a soggy pancake.
Freeze‑Then‑Serve for Party Perfection
If you’re making these for a large gathering, assemble them a day ahead and keep them in the freezer. When you’re ready to serve, move the tray to the fridge for 30 minutes to thaw just enough for a perfect bite. The frozen stage locks in the fruit’s shape, and the gradual thaw keeps the crust crisp.
Drizzle Timing is Everything
For the chocolate drizzle, wait until the mini pizzas are fully chilled. Warm chocolate on a warm pizza will melt the cream cheese, turning it into a runny mess. The cold surface solidifies the chocolate into a delicate lace that adds both flavor and visual flair.
Creative Twists and Variations
This recipe is a playground. Here are some of my favorite ways to switch things up:
Tropical Escape
Swap the berries for pineapple chunks, shredded coconut, and a drizzle of passion‑fruit glaze. The tangy glaze adds a citrus punch that pairs beautifully with the buttery crust.
Chocolate Lovers’ Dream
Replace the cream cheese with a chocolate hazelnut spread, sprinkle crushed pretzels for salty crunch, and top with raspberries. The sweet‑salty combo is pure decadence.
Autumn Harvest
Use thinly sliced apples, a sprinkle of cinnamon, and a drizzle of caramel. This variation brings warm spices to the table, perfect for a cozy fall gathering.
Nutty Crunch
Incorporate toasted almond slivers into the crust mixture and finish each pizza with a drizzle of honey‑nut butter. The extra nutty flavor elevates the snack to a sophisticated bite.
Vegan Delight
Swap the cream cheese for a cashew‑based cream, use coconut oil instead of butter, and keep the fruit fresh. The result is a plant‑based version that still delivers on texture and taste.
Mini Savory Pizzas
Turn the sweet concept on its head by using goat cheese, sun‑dried tomato strips, and fresh basil. A light drizzle of balsamic reduction adds a tangy finish, making these perfect as appetizers.
Storing and Bringing It Back to Life
Fridge Storage
Keep the assembled mini pizzas in an airtight container for up to 3 days. The butter in the crust stays stable, and the fruit remains fresh if you add a thin layer of lemon juice to prevent browning.
Freezer Friendly
Wrap the tray tightly with plastic wrap, then place it in a freezer‑safe bag. They freeze beautifully for up to 2 weeks. When you’re ready to serve, transfer to the fridge and let them thaw for 30 minutes.
Best Reheating Method
Although these are a no‑bake treat, a quick 15‑second zap in the microwave can warm the crust just enough to bring out the butter’s aroma without melting the fruit. Add a tiny splash of water to the microwave dish; the steam revives any dried‑out fruit texture.