Picture this: you’re in the middle of a Sunday dinner prep, the kitchen is a whirlwind of chopping, sautéing, and the occasional splatter that turns the floor into a glittering mosaic of tomato sauce. Suddenly, the phone rings—your friend, a notorious foodie, challenges you to outdo the last taco night you hosted. You’re staring at a pile of tortillas, a half‑filled bowl of seasoned ground beef, and a stack of cheese, feeling the pressure of that friendly dare. The moment you hear the sizzling of the pan, you know something extraordinary is about to happen. I was ready to turn that kitchen chaos into culinary triumph, and this is how I turned a simple taco pocket into the ultimate comfort food that will have everyone begging for seconds.
If you’ve ever tried to make taco pockets that turned out either soggy or too dry, you’ve felt that gut‑wracking disappointment. I’ve been there—watching the dough collapse, the filling spill, the disappointment in the eyes of my guests. But this version? It’s a game‑changer. The dough is supple yet sturdy, the filling is a symphony of textures, and the flavor punch is so authentic it feels like a hug in every bite. I’ve spent hours tweaking the ratios, testing different flours, and discovering that a splash of buttermilk is the secret that gives those pockets a golden, flaky edge. Trust me, once you taste the first bite, you’ll be asking, “What’s the secret?” and I’ll just grin and say, “It’s all in the dough.”
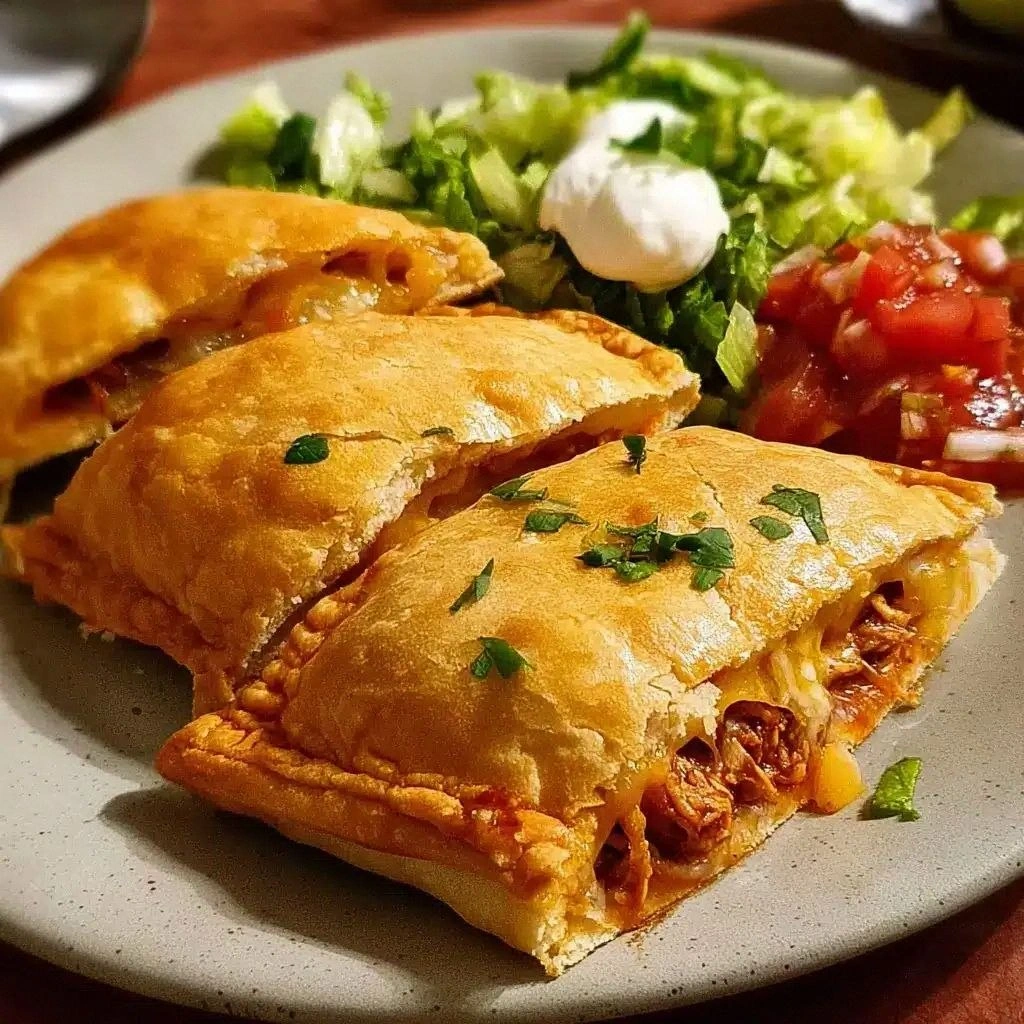
The first bite is a revelation. The crisp outside gives way to a molten interior of seasoned meat, melted cheese, and a hint of fresh salsa that bursts with citrusy tang. The crunch of the tortilla is like a satisfying snap that echoes the rhythm of a drumbeat, while the creamy layers inside melt like butter on a hot stone. You’ll find yourself reaching for the next pocket before you’ve even finished the first, because this isn’t just a dish—it’s a craving in a bite‑size package. The aroma that fills the kitchen is a heady mix of cumin, chili powder, and that unmistakable scent of fresh cilantro, making every inhale a promise of flavor to come. And if you’re a skeptic, I dare you to taste this and not go back for seconds.
The best part? This recipe isn’t just a set of instructions; it’s a living, breathing story of experimentation, failure, and ultimate triumph. I’ve been known to laugh at my own kitchen mishaps—like that time I accidentally added salt to the dough instead of the filling, turning my pockets into a salty surprise. But those moments taught me the importance of precision, timing, and the right balance of flavors. By the end of this guide, you’ll not only master the art of taco pockets but also learn the subtle science that makes them irresistibly delicious. So, let me walk you through every single step—by the end, you’ll wonder how you ever made them any other way.
What Makes This Version Stand Out
- Flavor: The seasoning blend is a balanced orchestra of cumin, chili, garlic, and smoked paprika, giving each pocket a deep, smoky undertone that lingers on the palate. It’s the difference between a bland snack and a flavor explosion that stays in your memory.
- Texture: The dough’s combination of all‑purpose flour, baking powder, and buttermilk creates a tender yet crisp exterior that folds beautifully without tearing. The result is a pocket that snaps open with a satisfying crunch.
- Simplicity: You’ll need only a handful of pantry staples, and every step is straightforward enough that even a kitchen novice can follow along. No fancy equipment or exotic ingredients required.
- Uniqueness: The inclusion of a subtle lime zest infusion in the dough adds a bright citrus lift that sets this recipe apart from standard taco shells.
- Crowd‑Pleaser: Whether you’re feeding a family dinner or a potluck, these pockets are guaranteed to be the star of the show. Their portability and bite‑size nature make them perfect for any gathering.
- Ingredient Quality: Using fresh, high‑quality ground beef or turkey, and hand‑picked cilantro, ensures each pocket bursts with authentic flavor.
- Cooking Method: The method of baking the pockets instead of frying keeps them lighter while still delivering that coveted crunch.
- Make‑Ahead Potential: You can prepare the dough and filling a day ahead, refrigerate, and bake fresh when ready—perfect for busy weeknights.
Alright, let’s break down exactly what goes into this masterpiece…
Inside the Ingredient List
The Flavor Base
Ground beef or turkey forms the heart of the pockets. Cook it with a splash of olive oil, then season it with a blend of cumin, chili powder, smoked paprika, garlic powder, onion powder, and a pinch of cayenne. This mix is what brings depth and heat without overpowering the other flavors. If you’re vegetarian, swap the meat for crumbled tofu or a hearty bean mix, and keep the seasoning the same for a comparable punch.
The Texture Crew
The dough is a marriage of all‑purpose flour, baking powder, salt, and buttermilk. The baking powder introduces lift, while the buttermilk adds moisture and a slight tang that balances the richness of the filling. A teaspoon of melted butter brings a buttery sheen to the crust, and a dash of lime zest brightens the overall profile. If you prefer a gluten‑free version, replace the all‑purpose flour with a blend of rice flour, tapioca starch, and xanthan gum.
The Unexpected Star
Fresh cilantro, chopped, is the unsung hero that adds a burst of herbal freshness. It’s added to the filling after it’s cooked and cooled, so it retains its vibrant green color and bright flavor. Skipping cilantro would leave a noticeable void in the final taste; the pockets would feel flat. A good alternative is chopped green onions or even parsley if you’re looking for a milder taste.
The Final Flourish
A generous layer of shredded cheddar or Monterey Jack cheese melts over the hot filling, creating a gooey, melty barrier that locks in juices. A spoonful of salsa or pico de gallo on top before baking adds a tangy kick that cuts through the richness. For an extra twist, sprinkle a handful of crushed tortilla chips over the cheese before the final bake for a crunchy topping.
Everything's prepped? Good. Let's get into the real action…
The Method — Step by Step
- Start by preheating your oven to 425°F (220°C). While the oven warms, bring a large pot of salted water to a gentle boil; this will be used to blanch the dough later. Once the oven is hot, set a baking sheet lined with parchment paper aside—this will keep the pockets from sticking. This step ensures that the dough will have a clean, crisp surface once baked.
- In a large mixing bowl, whisk together the flour, baking powder, salt, and a pinch of cayenne pepper. Add the buttermilk and melted butter, stirring until the dough begins to coalesce. The dough should be slightly sticky but manageable; if it’s too dry, add a tablespoon of milk. This is where the magic begins—feel the dough’s texture as it comes together.
- Turn the dough onto a lightly floured surface and knead for about 2 minutes until it’s smooth. Divide the dough into 12 equal portions, each about the size of a golf ball. Roll each portion into a flat disc, about 3 inches in diameter, using a rolling pin. The key is even thickness to ensure uniform baking.
- Heat a large skillet over medium heat and add a splash of oil. Place the dough discs in the skillet, cooking each side for about 30 seconds until lightly browned. This quick sear locks in moisture and gives the pockets a golden crust. Flip carefully with tongs to avoid tearing.
- In a separate skillet, cook the ground beef or turkey over medium heat until browned and crumbly. Drain excess grease and stir in the cumin, chili powder, smoked paprika, garlic powder, onion powder, and a pinch of cayenne. Cook for an additional 2 minutes, letting the spices bloom. The aroma at this stage is the first hint of the pockets’ flavor.
- Remove the cooked meat from the heat and let it cool slightly. Fold in the chopped cilantro, diced tomatoes, and a handful of shredded cheese. This mixture should be warm enough to melt the cheese slightly, creating a silky filling that clings to the dough.
- Place a spoonful of the meat mixture onto the center of each dough disc. Fold the edges over to form a half‑moon shape, pinching the seam to seal. If you prefer a more traditional taco shape, simply fold the dough in half and press the edges. The sealing process is crucial to keep the filling inside.
- Arrange the formed pockets on the prepared baking sheet, spacing them about an inch apart. Brush each pocket lightly with beaten egg or milk to give them a shiny, golden finish. Sprinkle a pinch of sea salt over the top for added flavor.
- Bake in the preheated oven for 12–15 minutes, or until the pockets are golden brown and the cheese has melted into a bubbly, golden layer. The timer will also give you a crisp edge that’s perfectly crunchy. Keep a close eye on the pockets; they can brown quickly.
- Remove the pockets from the oven and let them cool on a wire rack for 5 minutes before serving. This brief rest allows the fillings to set, making it easier to bite into them without the cheese oozing out. Serve immediately with a side of salsa, guacamole, or a fresh green salad.
That's it — you did it. But hold on, I've got a few more tricks that'll take this to another level...
Insider Tricks for Flawless Results
The Temperature Rule Nobody Follows
Many cooks bake at 375°F, thinking it’s safe. However, 425°F is the sweet spot that gives the pockets a crisp exterior while keeping the interior tender. The higher temperature ensures a golden crust and a faster bake, reducing the risk of sogginess. If you’re using a convection oven, lower the temperature by 25°F to avoid over‑browning.
Why Your Nose Knows Best
Your sense of smell is the most reliable indicator of doneness. As the pockets bake, the aroma of melted cheese and toasted spices will intensify. When the scent turns nutty and the edges look golden, you’re ready to pull them out. Trusting your nose saves you from overcooking or undercooking.
The 5-Minute Rest That Changes Everything
Letting the pockets rest for 5 minutes after baking is more than a courtesy; it allows the fillings to set, preventing cheese from leaking when you bite into them. The rest also lets the crust firm up slightly, giving that satisfying snap. Skipping this step often results in a messy, cheese‑dripping mess.
Keep It Moist, Not Wet
If you notice the dough sticking to the skillet or parchment, it’s likely too moist. A quick flip to the other side can help evaporate excess moisture. Alternatively, reduce the amount of buttermilk by a tablespoon to keep the dough from becoming soggy.
Make‑Ahead Tip for Busy Nights
You can prepare the dough and filling up to 24 hours in advance. Store the dough in a sealed container in the refrigerator, and refrigerate the filling separately. When ready to bake, let the dough sit at room temperature for 15 minutes, then proceed as usual. This prep saves precious time on hectic evenings.
Creative Twists and Variations
This recipe is a playground. Here are some of my favorite ways to switch things up:
Mexican Street Tacos
Swap the ground beef for seasoned shredded chicken, add diced mango, and top with a drizzle of lime‑y yogurt sauce. The sweet and spicy combo turns the pockets into a street‑food favorite that’s sure to impress.
Vegan Fiesta
Replace the meat with crumbled tempeh, use a plant‑based cheese, and finish with a spoonful of roasted red pepper salsa. This version is protein‑rich, flavorful, and fully plant‑based.
Breakfast Burrito Pockets
Fill the pockets with scrambled eggs, chorizo, and shredded cheddar. Serve with a side of hot sauce and a sprinkle of fresh cilantro for a hearty breakfast that feels like a taco‑filled breakfast burrito.
Spicy Shrimp Delight
Cook shrimp with a touch of garlic and a splash of lime juice, then fold into the pockets with a handful of diced avocado. The shrimp’s sweet, briny flavor pairs perfectly with the zesty filling.
Cheese‑Only Gourmet
Omit the meat entirely and fill the pockets with a mixture of ricotta, mozzarella, and Parmesan. Add a handful of fresh basil leaves before baking for an Italian‑inspired twist that’s surprisingly delightful.
Sweet & Savory Surprise
For a dessert‑style pocket, fill with a mix of mascarpone, fresh berries, and a drizzle of honey. The pockets become a sweet, creamy treat that’s a fun departure from the savory norm.
Storing and Bringing It Back to Life
Fridge Storage
Store uncooked pockets in an airtight container in the refrigerator for up to 24 hours. When ready to serve, bake as directed, adding an extra 2 minutes to account for the cold dough. The pockets stay fresh and crisp, making them ideal for quick lunches.
Freezer Friendly
Wrap individual pockets tightly in plastic wrap and place them in a freezer bag. They can be frozen for up to 3 months. To reheat, bake at 375°F for 15 minutes, or microwave on a paper towel for 1 minute, then finish in the oven for a crisp finish.
Best Reheating Method
The secret to reviving a frozen pocket is to add a splash of water to the bottom of a skillet, cover, and heat until steam forms. This steams the interior, preventing dryness. Then finish under the broiler for a crispy edge. The result is a pocket that tastes almost as good as fresh.