Picture this: I’m in the middle of a Saturday brunch prep, the kitchen alive with the aroma of fresh berries and sugar, when my phone buzzes with a frantic text from a friend. “I need the best jam ever, now!” she screams. I grin, because I’ve been toying with a new Instant Pot jam recipe that has been a game‑changer for me, and I know I can deliver. I’m not talking about a bland, run‑on‑the‑bottom batch that sits on the counter for days; this is a jam that glazes like velvet, bursts with real fruit flavor, and is ready in under an hour. The moment you taste it, you’ll swear you’ve never had anything like it before.
The kitchen was a mess—berries scattered everywhere, the Instant Pot humming, and me humming a tune about how the future of jam is about convenience and flavor. The air was thick with the sweet scent of sugar, the sharp tang of lemon, and the earthy undertones of fresh berries. I could almost hear the clink of the pot’s lid as it sealed, the soft hiss of steam, and the faint crackle as the mixture thickened. My fingers were sticky, my apron a little damp, and the timer on my phone ticking down the seconds to perfection. That sensory overload was the moment I realized this jam would not only satisfy my taste buds but also become a staple in my pantry.
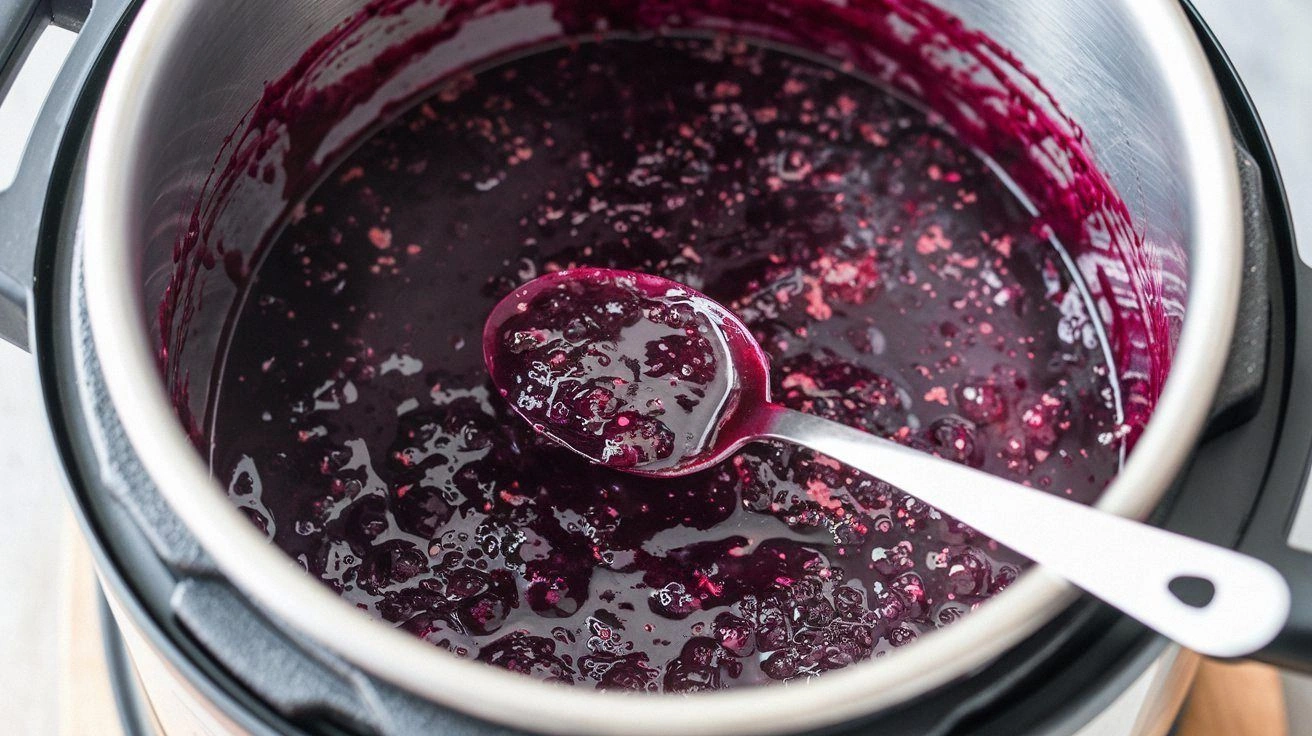
What makes this jam stand out? It’s the combination of a few simple ingredients, a clever use of the Instant Pot’s pressure and natural sauce settings, and a touch of pectin that creates a silky, spread‑ready consistency without the need for a long boil. I’ve tested countless recipes, and most either over‑cooked the berries into a mush or left the jam too runny. This version balances the fruit’s natural sugars with a measured amount of added sugar, uses lemon juice to brighten the flavor and help the pectin set, and finishes with a splash of vanilla for a subtle warmth. The result is a jam that stays bright in color, has a smooth but slightly textured mouthfeel, and keeps well for weeks.
And here’s the kicker: I discovered that adding a small amount of water—just enough to keep the mixture from scorching—actually improves the final texture. That tiny tweak is the secret I’ve been hiding, and I’m about to spill the beans. If you’ve ever tried making jam and ended up with a sticky mess, you’re not alone, and this recipe is going to change the way you think about fruit preserves.
What Makes This Version Stand Out
- Flavor: The berries retain their natural sweetness and tartness, thanks to the precise balance of sugar and lemon juice. The result is a jam that tastes like freshly picked fruit, not like a processed product.
- Texture: The Instant Pot’s pressure setting caramelizes the fruit’s natural sugars without over‑cooking them, giving a silky yet slightly chunky consistency that spreads effortlessly.
- Speed: From prep to finish, you’re looking at less than 45 minutes. The Instant Pot’s quick pressure release cuts down on waiting time, and the natural sauce setting does the thickening in a fraction of the time a stovetop method would.
- Convenience: No need for a heavy pot or constant stirring. The pot does the heavy lifting, and you can set it and forget it while you go about your day.
- Make‑ahead Potential: This jam freezes beautifully. A single batch can fill multiple jars, and you’ll have a ready‑to‑use spread for weeks.
- Ingredient Quality: Using high‑quality berries (fresh or frozen) and a good brand of pectin ensures that the jam sets properly and has a bright flavor.
- Versatility: It’s perfect on toast, in yogurt, as a glaze for meats, or even stirred into cocktails for a fruity twist.
- Minimal Cleanup: One pot, one set of utensils—clean up is a breeze.
Alright, let’s break down exactly what goes into this masterpiece…
Inside the Ingredient List
The Flavor Base
Mixed berries—strawberries, blueberries, raspberries, and blackberries—are the star of the show. They provide the core sweetness, acidity, and visual appeal. If you’re in a season where one type of berry dominates, feel free to adjust the mix; the key is to keep the overall balance of sweet to tart. Skipping the berries would turn this jam into a plain sugar syrup; the fruit is essential for both flavor and texture.
The Sweetener
Granulated sugar is the simplest and most reliable sweetener for jam. It dissolves easily, helps with the setting process, and enhances the fruit’s natural sugars. If you prefer a lower‑sugar option, you can replace half the sugar with honey or maple syrup, but be aware that the jam may set a bit looser and the flavor will shift slightly.
The Acidity Booster
Fresh lemon juice adds brightness and helps the pectin work its magic. The acid level is crucial; too little and the jam won’t set, too much and it’ll taste overly sharp. A tablespoon of lemon juice per cup of berries is a good rule of thumb. If you’re using bottled lemon juice, remember it’s usually more concentrated, so use slightly less.
The Setting Agent
Pectin is the binding agent that gives jam its characteristic thickness. A tablespoon of powdered pectin (or one packet) is enough for 4 cups of fruit. If you’re using a brand that comes in a liquid form, adjust the amount accordingly. Skipping pectin will result in a runny, jelly‑like consistency that won’t hold its shape.
The Final Touch
A pinch of sea salt balances the sweetness, and a teaspoon of vanilla extract adds a subtle warmth that rounds out the flavors. These small additions elevate the jam from basic to gourmet. If you’re vegan, you can omit the vanilla or use a plant‑based vanilla extract.
Everything’s prepped? Good. Let’s get into the real action…
The Method — Step by Step
- First, rinse your berries under cold water and drain them well. If you’re using strawberries, slice them into quarters; blueberries and raspberries can stay whole. This step ensures no grit or dirt ends up in your jam.
- Add the berries to the Instant Pot’s inner pot. Sprinkle the sugar evenly over the top. The sugar will help the berries release their juices and create a syrupy base.
- Pour in the water and stir gently to combine. This small amount of liquid prevents the berries from sticking to the bottom and helps the pectin dissolve evenly. Kitchen Hack: If you’re worried about the jam being too thick, add a splash of apple juice for a smoother finish.
- Seal the Instant Pot lid, set the valve to “Sealing,” and select the “Pressure Cook” or “Manual” setting at high pressure for 10 minutes. The pressure will cook the berries quickly, preserving their bright color and flavor.
- When the timer goes off, perform a quick release by carefully turning the valve to “Venting.” This stops the cooking process instantly and keeps the jam from over‑cooking. Watch Out: The pot will be hot and steam will be escaping—keep your face and hands away from the vent.
- Turn the Instant Pot to the “Sauté” setting. Add the pectin and stir until it’s fully dissolved. The mixture should start to thicken and become glossy. Keep an eye on it; if it thickens too quickly, reduce the heat.
- Add the lemon juice, sea salt, and vanilla extract. Stir until everything is fully incorporated. At this point, you can taste the jam—if it’s too sweet, a tiny pinch of salt can balance it out.
- Let the jam simmer for about 5 minutes, stirring occasionally. This allows the flavors to meld and the pectin to set fully. When the jam is ready, it should be thick enough to coat the back of a spoon but still pourable.
- Remove the pot from the heat and let it cool for a few minutes. Then, transfer the jam to sterilized jars, seal, and allow the jars to cool completely before refrigerating. The jam will thicken further as it cools.
That’s it—you did it. But hold on, I’ve got a few more tricks that will take this to another level…
Insider Tricks for Flawless Results
The Temperature Rule Nobody Follows
While the Instant Pot does most of the heavy lifting, the final consistency hinges on the temperature you let it cool to. Aim for 200°F (93°C) before you start the natural release. If you’re using a thermometer, this is the sweet spot where the jam will set without becoming too thick.
Why Your Nose Knows Best
Don’t rely solely on the timer. When the jam is done, the aroma will shift from fruity to caramel‑like. That scent is a reliable indicator that the pectin has set and the jam is ready to be removed from the pot.
The 5-Minute Rest That Changes Everything
After you’ve transferred the jam to the jars, let them sit at room temperature for 5 minutes before sealing. This brief rest allows the jam to settle and reduces the chance of condensation forming inside the jar, which can lead to spoilage.
The Jar‑Size Trick
Use 8-ounce jars for the best storage. Smaller jars mean you’ll have to open them more often, which can introduce air and reduce shelf life. Larger jars are great for bulk, but the jam will take longer to set.
The Quick‑Cool Method
If you’re in a hurry, place the jar on a tray of ice water for 10 minutes after sealing. This cools the jam rapidly, preventing the growth of mold or bacteria.
Creative Twists and Variations
This recipe is a playground. Here are some of my favorite ways to switch things up:
Berry‑Mint Fusion
Add a handful of fresh mint leaves to the pot during the sauté step. The mint infuses a refreshing herbal note that pairs wonderfully with the fruit’s sweetness.
Spiced Citrus Burst
Stir in a pinch of ground ginger or a splash of orange zest during the final simmer. The citrus and spice create a jam that’s perfect for savory dishes like pork glazes.
Chocolate‑Covered Jam
After the jam has cooled, swirl in a tablespoon of dark chocolate melted into the mixture. The chocolate adds a rich, bittersweet depth that’s ideal for desserts.
Low‑Sugar Delight
Replace half the granulated sugar with a natural sweetener such as stevia or monk fruit. The jam will still set, but you’ll get a lower‑calorie version suitable for diet‑conscious cooks.
Herb‑Infused Honey Jam
Swap the vanilla extract for a splash of honey and add a few rosemary sprigs. The honey’s floral notes and rosemary’s earthiness give the jam a unique flavor profile.
Vegan Coconut Twist
Replace the vanilla extract with coconut extract and use coconut water instead of plain water. The result is a tropical jam that’s both vegan and dairy‑free.
Storing and Bringing It Back to Life
Fridge Storage
Store the jar in the refrigerator for up to 4 weeks. The jam’s acidity and sugar content keep it safe and flavorful. Keep the jar sealed and avoid opening it more than once a day to reduce the risk of contamination.
Freezer Friendly
For longer storage, place the sealed jars in a freezer-safe container. The jam can last up to 6 months. When you’re ready to use it, thaw in the refrigerator overnight. The texture may be slightly looser, but it will still taste great.
Best Reheating Method
To reheat, transfer a portion of the jam to a small saucepan and warm over low heat, stirring frequently. Add a splash of water or fruit juice if the jam is too thick. A tiny splash of water before reheating steams it back to perfection, restoring that silky mouthfeel.