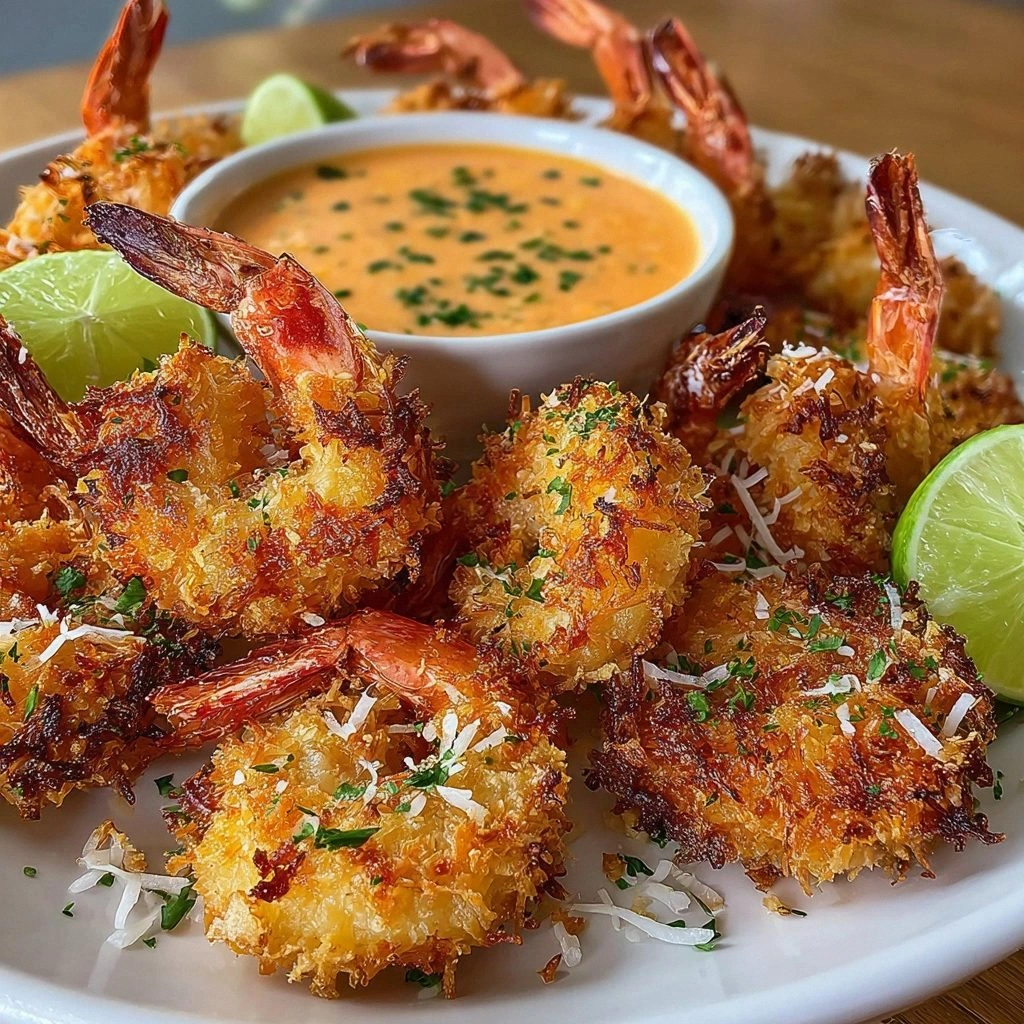
I was halfway through a Sunday brunch when the kitchen turned into a chaotic arena: a rogue shrimp pan, a splatter of lime, and a sudden craving for something that would make my taste buds sing. That moment sparked a culinary rebellion, and I set out to create a dish that would outshine any take‑out shrimp cocktail I've ever tasted. I’m talking about a golden, coconut‑coated shrimp that’s so crisp it cracks like a brittle shell, paired with a zesty lime‑chili dip that lingers on the tongue like a summer breeze. The aroma alone—sweet coconut, bright lime, and a hint of smoky paprika—fills the air with anticipation, while the visual promise of a glossy, golden crust tempts even the most disciplined foodie.
Picture this: you’re slicing through the shrimp, and the tiny pearls of garlic powder and paprika pop like confetti, releasing a savory perfume that mingles with the sharp citrus of lime. The kitchen hums as the skillet warms, the sound of sizzling shrimp becoming a rhythmic drumbeat that signals the impending feast. As the shrimp hit the pan, a satisfying crackle erupts, and the edges begin to turn a caramelized amber that feels like a promise of crunch. The first bite delivers a burst of sweet, salty, and spicy flavors that dance together, leaving a lingering, peppery finish that makes you reach for more. It’s not just food; it’s an edible fireworks display that captivates the senses.
What sets this version apart from the countless others you’ve seen online is the meticulous layering of textures and flavors. The coconut coating isn’t just sweet; it’s a subtle, nutty backdrop that enhances the shrimp’s natural brininess. The dip, meanwhile, is a harmonious blend of creamy mayonnaise, sharp lime, fiery chili sauce, and a whisper of honey that balances heat with a gentle sweetness. Every element is carefully measured, ensuring that no single component overwhelms the others. The result is a dish that feels both indulgent and refined, with a crunch that’s unmistakably satisfying and a sauce that’s bright, zesty, and unforgettable.
I’ll be honest—after I finished my first batch, I found myself reaching for a second plate before anyone else had a chance. Most recipes get this completely wrong by either overcooking the shrimp or using a dip that’s either too bland or too overpowering. The secret? A precise balance of coating, a quick, high‑heat fry, and a dip that’s both creamy and acidic. I dare you to taste this and not go back for seconds. Picture yourself pulling this out of the oven, the whole kitchen smelling incredible, and knowing that you’ve just created a dish that’s hands down the best version you'll ever make at home.
If you’ve ever struggled with achieving that perfect crunch or finding the right flavor profile for a shrimp dish, you’re not alone—and I’ve got the fix. The next few sections will walk you through every single step, from selecting the freshest shrimp to mastering the dip’s perfect consistency. I’ll share micro‑challenges, bold claims, and a few kitchen hacks that will make you wonder why you ever cooked without them. And trust me, the payoff is worth every minute you spend in the kitchen. Let me walk you through every single step—by the end, you'll wonder how you ever made it any other way.
What Makes This Version Stand Out
- Flavor: The coconut coating provides a sweet, nutty base that amplifies the shrimp’s natural brininess, while the lime‑chili dip offers a bright, spicy kick that cuts through the richness. This combination creates a multi‑layered taste experience that feels both tropical and fiery. It’s a flavor profile that’s rarely found in typical shrimp recipes.
- Texture: The use of shredded coconut and panko breadcrumbs results in a dual‑layered crunch that shatters like thin ice when you bite into it. The shrimp stays juicy inside, creating a satisfying contrast between the crispy exterior and tender interior. This textural play is what keeps diners coming back for more.
- Visual Appeal: The golden crust glistens with a subtle sheen, and the vibrant lime‑chili dip adds a splash of color that makes the dish Instagram‑ready. The plating feels festive, almost celebratory, which is perfect for both casual gatherings and special occasions.
- Ease of Preparation: While the flavors are complex, the technique is straightforward. The coating process is simple, and the dip can be whipped up in minutes. Even novice cooks will feel confident, and seasoned chefs will appreciate the precision.
- Ingredient Quality: Using fresh shrimp, real lime juice, and authentic chili sauce ensures that each bite delivers genuine, high‑quality flavors. The recipe rewards those who invest in quality ingredients, turning a simple dish into a gourmet experience.
- Make‑Ahead Potential: The shrimp can be coated and frozen before frying, and the dip can be prepared ahead of time and stored in the fridge. This makes the dish ideal for parties or meal prep, allowing you to focus on the final cooking step.
- Versatility: The recipe can be adapted for different dietary preferences—use gluten‑free breadcrumbs, low‑sodium mayo, or a dairy‑free alternative. Its core flavor profile remains intact, making it a flexible option for diverse palates.
Inside the Ingredient List
The Flavor Base
Large shrimp are the star of this dish, and using fresh or frozen shrimp that are peeled and deveined guarantees a clean, briny flavor that’s essential for balancing the sweet and spicy elements. Fresh shrimp tend to have a slightly sweeter taste, while frozen shrimp can offer a firmer bite; either works, but the key is to keep them chilled until you’re ready to cook. If you’re on a budget, you can buy shrimp in bulk and portion them out ahead of time, but avoid any that have a strong fishy odor, as that will overpower the delicate lime‑chili dip.
Shredded coconut is next in line, and its sweet, nutty flavor adds a tropical twist that pairs beautifully with the shrimp’s natural sweetness. Sweetened coconut gives a slightly sugary bite, while unsweetened coconut offers a more subtle, natural taste; either can be used depending on your preference. If you’re looking for extra crunch, opt for toasted coconut, but be careful not to overdo it, as it can become bitter if toasted too dark.
The Texture Crew
Panko breadcrumbs bring that signature Japanese crunch that’s lighter and crispier than regular breadcrumbs. They create a delicate, airy shell around the shrimp, preventing the coating from becoming too heavy or soggy. If you don’t have panko on hand, you can use fine breadcrumbs, but you may need to increase the amount to achieve the same crispness.
All‑purpose flour serves as the first layer that helps the coating stick to the shrimp. It creates a dry surface that allows the beaten eggs to adhere, ensuring the coconut and panko mixture doesn’t fall off during frying. If you’re aiming for a gluten‑free version, swap the flour for a gluten‑free blend or a cornstarch slurry, but keep the ratio the same to maintain the coating’s structure.
The Unexpected Star
Eggs are the binding agent that holds everything together. Beating the eggs to a light, fluffy consistency ensures they spread evenly over the shrimp, creating a uniform coating. If you prefer a lower‑fat option, you can use egg whites or a plant‑based egg substitute, but be prepared for a slightly different texture.
Mayonnaise is the creamy backbone of the dip, providing a rich, silky base that balances the sharpness of lime and the heat of chili sauce. Choosing a full‑fat mayo gives a luxuriously smooth mouthfeel, whereas a light mayo offers a lighter alternative. For a dairy‑free version, opt for a vegan mayo that has a similar consistency.
The Final Flourish
Lime juice is the bright, acidic element that cuts through the richness of the shrimp and the dip, giving the dish a lively, citrusy finish. Freshly squeezed lime juice is essential; bottled lime juice often lacks the vibrant flavor and can introduce a watery texture. Aim for about two tablespoons per batch to keep the dip balanced.
Chili sauce adds the heat that turns this dish from good to unforgettable. The level of spiciness can be adjusted to suit your tolerance—start with a tablespoon and taste before adding more. A good quality chili sauce with a balanced flavor profile ensures the heat doesn’t overpower the other ingredients.
Honey provides a subtle sweetness that counteracts the acidity of lime and the heat of chili, creating a harmonious dip that lingers pleasantly on the palate. A tablespoon is typically enough, but feel free to adjust based on your sweetness preference. If you’re avoiding honey, a splash of agave syrup or maple syrup can work as a substitute.
Everything’s prepped? Good. Let’s get into the real action...
The Method — Step by Step
- Prep the Shrimp: Pat the shrimp dry with paper towels to ensure the coating sticks. Season each piece with a pinch of salt, black pepper, garlic powder, and paprika. This subtle seasoning layer enhances the shrimp’s natural flavor without overpowering the coconut coating.
- Set Up the Dredging Stations: Place the flour in one shallow bowl, beaten eggs in a second bowl, and a mixture of shredded coconut and panko breadcrumbs in a third. This organized setup speeds up the coating process and prevents cross‑contamination of flavors.
- Coat the Shrimp: First, roll each shrimp in flour, tapping off excess. Then dip into the beaten eggs, allowing any excess to drip back into the bowl. Finally, coat with the coconut‑panko mixture, pressing lightly to ensure the coating adheres firmly. This three‑step method guarantees a crisp, even crust.
- Heat the Oil: Pour about 1/4 inch of neutral oil (such as canola or peanut) into a large skillet and heat to 350°F (175°C). The oil should shimmer but not smoke; if it does, lower the heat slightly. Proper oil temperature is key to achieving a golden finish without soaking the shrimp.
- Fry the Shrimp: Carefully place the coated shrimp in the hot oil, working in batches to avoid overcrowding. Fry for 2–3 minutes per side or until the coating turns a deep golden brown and the shrimp are opaque. The sound of sizzling is your cue that the shrimp is cooking perfectly.
- Drain and Rest: Transfer the shrimp to a plate lined with paper towels to remove excess oil. Let them rest for a minute; this allows the coating to firm up and prevents sogginess. The rest period also lets the flavors meld together.
- Make the Dip: In a small bowl, whisk together mayonnaise, lime juice, chili sauce, and honey until smooth. Adjust seasoning by adding more lime for acidity, more chili for heat, or more honey for sweetness. The dip should be creamy yet bright, with a balanced flavor profile.
- Serve: Plate the shrimp in a shallow bowl, drizzle the dip in a decorative swirl, and garnish with a sprig of fresh cilantro or a wedge of lime. The visual contrast of the golden shrimp against the vibrant dip makes for an eye‑catching presentation.
- Enjoy: Take a bite, and let the crunchy shell give way to juicy shrimp, followed by the zesty dip that lingers on your palate. The combination of textures and flavors creates a memorable experience that will leave you craving more.
That's it— you did it. But hold on, I've got a few more tricks that'll take this to another level. Stick around for insider tips that will elevate your shrimp game from good to unforgettable.
Insider Tricks for Flawless Results
The Temperature Rule Nobody Follows
Oil temperature is the unsung hero of any fried dish. If the oil is too hot, the coating will burn before the shrimp cooks; if it’s too cool, the shrimp will absorb excess oil and become greasy. Use a candy or deep‑fry thermometer to keep the temperature steady at 350°F. A quick test—drop a small piece of bread into the oil; if it browns in about 60 seconds, you’re good to go.
Why Your Nose Knows Best
When the shrimp starts to sizzle, a sweet, nutty aroma will begin to rise. This is the tell‑tale sign that the coating is crisping up. If you smell a metallic or burnt odor, the oil is too hot. Trust your nose to guide you, and you’ll avoid the dreaded “burnt shrimp” moment.
The 5‑Minute Rest That Changes Everything
After frying, let the shrimp rest on paper towels for exactly five minutes. This allows the steam to escape and the coating to set, giving you a crisp shell that won’t crumble when you bite into it. A friend once skipped this step and ended up with soggy shrimp—don’t let that happen to you.
Use Fresh Lime Juice, Not Bottled
Freshly squeezed lime juice provides a bright, acidic punch that bottled lime lacks. The natural oils from the lime skin also add a subtle aroma that enhances the dip. If you’re in a pinch, a splash of white wine vinegar can mimic the acidity, but it won’t give you the same fresh zing.
Keep the Dip Cool Until Serving
The dip’s creaminess is best when it’s chilled. Refrigerate it for at least 30 minutes before serving, and keep it on ice if you’re hosting a party. A cold dip balances the heat of the chili and the richness of the mayo, creating a refreshing contrast.
Creative Twists and Variations
This recipe is a playground. Here are some of my favorite ways to switch things up:
Spicy Cajun Shrimp
Swap the paprika for a Cajun spice blend, and replace the chili sauce with a smoky chipotle mayo. The result is a bold, smoky flavor that pairs beautifully with the coconut coating. Ideal for fans of Southern heat.
Sweet Pineapple Glaze
Add a splash of pineapple juice to the dip and drizzle a caramelized pineapple glaze over the shrimp before serving. The tropical sweetness amplifies the coconut flavor and gives the dish a glossy finish.
Herb‑Infused Coconut
Stir chopped fresh mint or basil into the shredded coconut before coating the shrimp. The herbs add a fresh, green note that cuts through the richness, making the dish feel lighter.
Gluten‑Free Version
Use a gluten‑free flour blend and gluten‑free panko breadcrumbs to keep the dish safe for those with celiac disease or gluten intolerance. The texture remains crisp, and the flavor stays true to the original.
Vegan Mayo Dip
Swap regular mayo for a vegan mayonnaise made from cashew or soy. The dip stays creamy, and the lime‑chili flavor profile remains intact, making it a great option for plant‑based diners.
Crispy Coconut Tater Tot Bites
Instead of shrimp, coat small tater tot pieces with the coconut‑panko mixture and fry until golden. Serve with the same lime‑chili dip for a comforting, crowd‑pleasing appetizer that’s perfect for game day.
Storing and Bringing It Back to Life
Fridge Storage
Store cooked shrimp in an airtight container in the refrigerator for up to two days. Keep the dip in a separate container with a tight lid to prevent the mayo from separating. When ready to serve, reheat the shrimp in a skillet over medium heat for 2–3 minutes, or until warmed through.
Freezer Friendly
For long‑term storage, freeze the coated, unfried shrimp in a single layer on a parchment‑lined tray for 30 minutes, then transfer to a freezer bag. This prevents clumping and allows you to fry them straight from the freezer. Freeze the dip separately in a freezer‑safe container for up to one month.
Best Reheating Method
Reheat the shrimp in a hot skillet or oven at 400°F for 5–7 minutes. Add a tiny splash of water or broth before reheating to create steam that helps restore the coating’s crispness. The dip should be warmed gently in a microwave or on the stovetop, then whisked to restore its smoothness.