Ever been halfway through a dessert and realized you’re missing that one burst of sunshine that turns a bland treat into a tropical escape? I was in the middle of a rainy Sunday, staring at a bowl of plain chocolate truffles that felt as flat as the weather outside. A sudden craving for something sweet, juicy, and a little bit exotic hit me like a splash of coconut water on a hot day. That moment sparked a frantic search through my pantry and fridge, and the answer was obvious: pineapple, coconut, and white chocolate, all rolled together into bite‑size bliss. I dared myself to make a version that would make my friends swoon and my taste buds dance.
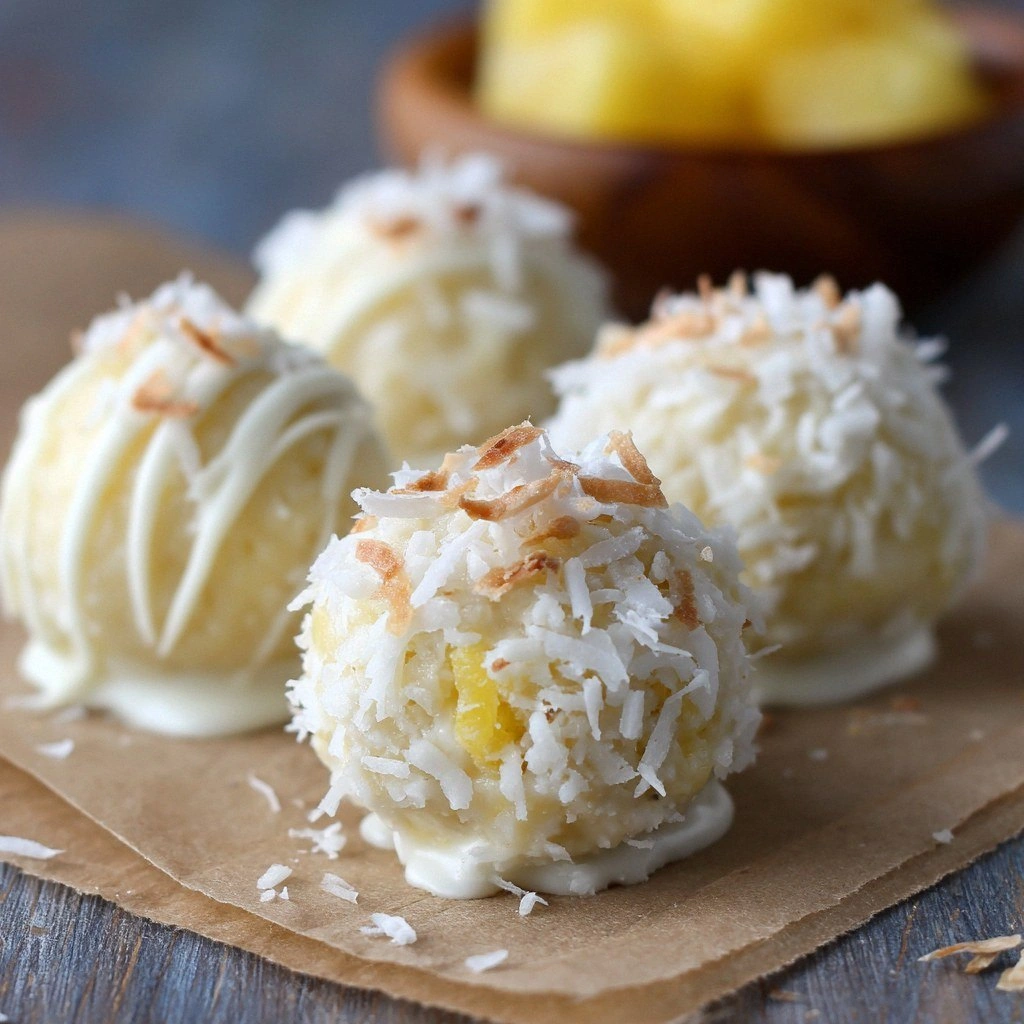
Picture this: a glossy, white chocolate shell that crumbles at the first touch, revealing a silky mixture of diced pineapple and shredded coconut that melts into a fragrant, tropical kiss. The scent alone—sweet pineapple, toasted coconut, and a hint of vanilla—will have your kitchen smelling like a beachside resort. When you bite, the crunch of toasted coconut gives way to a velvety interior that feels like a sun‑kissed dream. I swear, the first bite is a revelation; you’ll hear a faint, satisfying pop as the white chocolate cracks, followed by the gentle sigh of pineapple juice. If you’ve ever been disappointed by ordinary truffles, you’ll understand why this is hands down the best version you’ll ever make at home.
Now, before you roll up your sleeves and dive in, let me share a secret: the key to these truffles isn’t the ingredients themselves—though they’re undeniably stellar—it’s the technique that locks in flavor without a single minute of baking. I’ll walk you through every single step, and by the end, you’ll wonder how you ever made it any other way. Trust me, this is pure magic, and you’ll be shouting, “I dare you to taste this and not go back for seconds!”
Let’s start by understanding why this recipe is a game‑changer. It’s not just about the ingredients; it’s about the synergy, the texture, and the sheer joy of creating something that feels both indulgent and light. Below, I’ve broken down the elements that set these truffles apart from any other recipe you’ve tried. Ready? Let’s dive in.
What Makes This Version Stand Out
- Flavor: The pineapple’s natural sweetness balances the mildness of white chocolate, creating a harmonious profile that feels both exotic and comforting. This contrast turns each bite into a delightful surprise.
- Texture: The toasted coconut adds a satisfying crunch that contrasts with the creamy interior, giving the truffle a multi‑sensory experience. It’s a play on crisp and melt‑in‑your-mouth that keeps you coming back.
- No‑Bake Simplicity: Skip the oven entirely—just a quick melt, mix, chill, and roll. This makes it a perfect last‑minute dessert that still feels sophisticated.
- Make‑Ahead Friendly: Chill for an hour or refrigerate overnight, and they’ll hold their shape for up to a week. Ideal for parties or when you’re short on time.
- Ingredient Quality: Using high‑grade white chocolate and fresh pineapple ensures each component shines. The difference is palpable in every bite.
- Visual Appeal: The glossy white shell and golden toasted coconut coating make for Instagram‑ready treats that look as good as they taste.
Alright, let’s break down exactly what goes into this masterpiece. Before we get into the gritty details, here’s a quick kitchen hack that will save you time and keep your counter clean.
Inside the Ingredient List
The Flavor Base
At the heart of these truffles is fresh pineapple, diced into small, bite‑size cubes. The pineapple provides a bright, tangy sweetness that cuts through the richness of the chocolate. If you can’t find fresh pineapple, a good quality canned pineapple (drained) works, but fresh is best for that natural juiciness. Remember, the pineapple’s acidity also helps balance the sweetness, so don’t skip it. When selecting pineapple, look for a fruit that’s firm yet slightly yielding; it will give a better texture.
The Texture Crew
Shredded coconut is the backbone of the truffle’s mouthfeel. I use a mix of unsweetened and sweetened shredded coconut to achieve a balanced sweetness and a slightly chewy texture. The unsweetened variety keeps the overall flavor from becoming too cloying, while the sweetened adds a subtle caramel note. If you’re vegan, opt for coconut flakes that are free from added sugars. A quick tip: toast the coconut lightly in a dry pan for a nutty aroma—this step is optional but adds depth.
The Unexpected Star
White chocolate may seem ordinary, but it’s the perfect partner for pineapple and coconut because of its mild flavor and smooth melt. I use high‑grade white chocolate chips, which contain cocoa butter, sugar, and milk solids. The cocoa butter ensures a glossy finish and a silky mouthfeel. If you can’t find white chocolate chips, you can melt a block of white chocolate, but the chips melt more evenly. The chocolate’s subtle vanilla undertone also enhances the tropical notes.
The Final Flourish
To finish, toasted coconut flakes give each truffle a golden crust. The toasted flakes add a nutty crunch that contrasts with the creamy interior. A pinch of sea salt brings out the flavors and balances the sweetness. Coconut oil is used to help bind the mixture and keep it pliable. Finally, a splash of coconut milk helps achieve the right consistency—too thick, and the truffles won’t set; too thin, and they’ll be too runny.
Everything’s prepped? Good. Let’s get into the real action. The method is straightforward, but each step is crucial for that perfect bite. Follow along, and you’ll see why this recipe is a crowd‑pleaser.
The Method — Step by Step
- First, melt the white chocolate in a double boiler or microwave in 30‑second bursts, stirring each time until silky. The chocolate should feel smooth, not gritty. I always keep a small bowl of cold water nearby; if the chocolate starts to seize, a splash of water will bring it back together. This step ensures a glossy finish on your truffles.
- While the chocolate is melting, toast the shredded coconut in a dry skillet over medium heat until fragrant and lightly golden—about 3 minutes. Stir constantly to avoid burning. The toasted coconut adds a nutty aroma that elevates the entire flavor profile. Once toasted, set aside to cool.
- In a large bowl, combine the diced pineapple, toasted coconut, and sweetened shredded coconut. Mix until the pineapple is evenly coated. This mixture will give the truffles their tropical bite. If you’re using canned pineapple, make sure it’s well drained to avoid excess moisture.
- Pour the melted chocolate over the coconut‑pineapple mixture. Add the coconut milk and vanilla extract. Stir vigorously until everything is fully incorporated and the mixture looks glossy and homogeneous. The chocolate should coat each piece, creating a smooth, creamy base.
- Add a pinch of sea salt and the coconut oil to the mixture. The salt enhances the sweetness, while the coconut oil helps the truffles hold their shape during rolling. Stir until the oil is fully integrated, and the mixture feels slightly sticky but not tacky.
- Transfer the mixture to a parchment‑lined tray and press it firmly into a 2‑inch square. Chill in the refrigerator for 20 minutes, or until it’s firm enough to cut. This step is critical; a too‑soft mixture will not hold its shape when rolled.
- Once the slab is firm, use a sharp knife to cut it into 1‑inch squares. You should now have about 16 pieces. Keep them chilled until you’re ready to roll.
- Take a piece of the slab and roll it between your palms to form a smooth ball. If the mixture sticks, dip your hands in a little coconut oil or water. Rolling should be gentle; you don’t want to crush the interior.
- Roll each ball in toasted coconut flakes until fully coated. The flakes should cling to the surface, creating a golden crust. This coating adds a delightful crunch with every bite.
- Place the finished truffles on a parchment‑lined tray and refrigerate for at least 30 minutes to set. If you’re preparing them in advance, store them in an airtight container in the fridge for up to a week.
That’s it—you did it. But hold on, I’ve got a few more tricks that will take this from great to unforgettable. These insider tips will help you avoid common pitfalls and elevate the final product.
Insider Tricks for Flawless Results
The Temperature Rule Nobody Follows
White chocolate is temperamental; if it’s too hot, it will lose its shine, and if it’s too cold, it won’t coat properly. The sweet spot is around 86°F (30°C). Use a candy thermometer or a kitchen thermometer to check. This small detail ensures a glossy finish and a smooth bite.
Why Your Nose Knows Best
Before you even touch the mixture, give it a sniff. The aroma should be a sweet, tropical blend of pineapple and coconut. If it smells off, it’s a sign that the pineapple might be past its prime. Freshness is key for flavor.
The 5‑Minute Rest That Changes Everything
After you’ve rolled the truffles, let them rest at room temperature for 5 minutes before refrigerating. This short rest allows the chocolate to set properly and prevents the coconut flakes from sticking to the surface. It’s a subtle step that makes a noticeable difference.
Avoiding the Sticky Mess
If your hands get sticky, dust them lightly with cocoa powder or a bit of powdered sugar. This keeps the truffles from sticking and makes rolling smoother. It also adds a subtle flavor contrast.
The Quick Chill Trick
If you’re short on time, place the tray on a metal rack over a bowl of ice water. The rapid cooling will set the truffles in minutes. This is ideal for last‑minute parties or when you need a quick dessert.
Creative Twists and Variations
This recipe is a playground. Here are some of my favorite ways to switch things up:
Tropical Lime Twist
Add a tablespoon of fresh lime zest to the mixture for a zesty kick. The citrus brightens the sweetness and adds a refreshing aftertaste. Pair with a drizzle of lime‑infused honey for extra flair.
Coconut‑Infused Chocolate
Replace white chocolate with dark chocolate infused with coconut oil. The result is a richer, slightly bittersweet truffle with a subtle coconut undertone. It’s a great option for chocolate lovers who want a deeper flavor.
Nutty Crunch Variation
Sprinkle chopped macadamia nuts or cashews into the mixture before rolling. The nuts add a buttery crunch that contrasts with the coconut flakes. This variation is perfect for a more complex texture.
Spiced Pineapple Delight
Add a pinch of ground ginger or cinnamon to the pineapple mixture. The spices give the truffles a warm, aromatic profile that pairs beautifully with the tropical base. It’s a subtle but effective way to add depth.
Almond‑Butter Surprise
Swap coconut oil for almond butter to introduce a nutty flavor and a slightly thicker consistency. The almond butter also adds a subtle protein boost. This variation is great for those who want a richer, more indulgent treat.
Storing and Bringing It Back to Life
Fridge Storage
Store the truffles in an airtight container at room temperature for up to 5 days. Keep them away from direct sunlight, which can cause the chocolate to bloom. If you notice any discoloration, it’s harmless but best to consume sooner.
Freezer Friendly
Wrap each truffle individually in parchment paper before freezing. This prevents them from sticking together and makes it easy to grab one when you’re craving a sweet treat. Freeze for up to 3 months.
Best Reheating Method
To revive frozen truffles, let them thaw at room temperature for 30 minutes. If they’re still too hard, microwave on low for 10‑15 seconds. Add a tiny splash of water before reheating to create steam, which keeps the interior moist and silky.