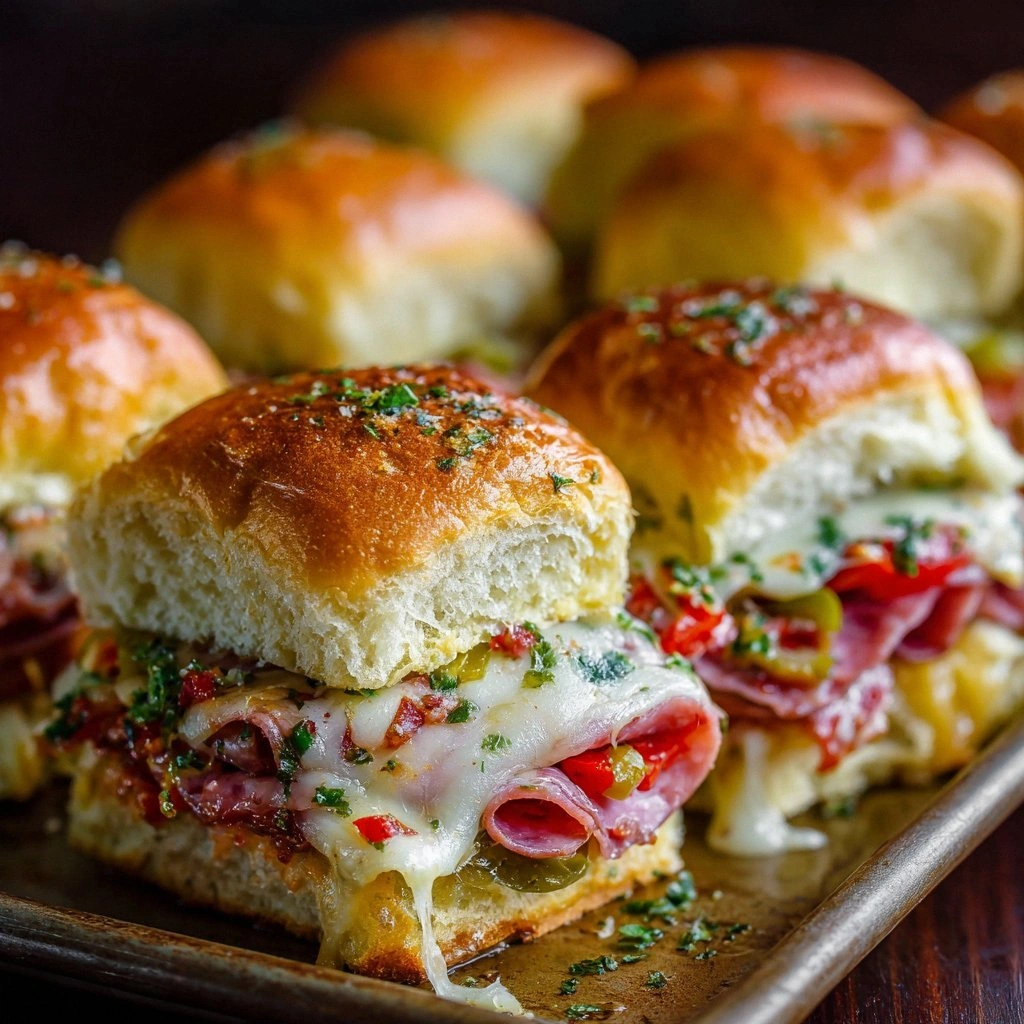
Picture this: you’re in the middle of a late‑night pizza run, the fridge is a barren wasteland, and the only thing that can salvage the evening is a stack of half‑done sub rolls. I was staring at those doughy blobs, wondering how to turn them into something that would make a crowd gasp. That night, I dared myself to create a hot Italian sub slider that would make even the most skeptical foodie say, “I dare you to taste this and not go back for seconds.” I’m not joking—this is hands down the best version you’ll ever make at home.
The first time I tried it, the kitchen was a chaotic symphony of sizzling pans, the aroma of marinara sauce dancing with oregano, and the sound of cheese melting into a glossy, velvety coat. The heat from the oven painted a golden crust that crackled like thin ice when you lifted a slider, and the savory juices ran like a river through the layers. My taste buds were on a rollercoaster, each bite delivering a punch of umami, a hint of spice, and a satisfying crunch from the toasted bread. I was honest—by the end of the first batch I had eaten half the sliders before anyone else even got a chance to try them.
Most recipes get this completely wrong by over‑baking the bread, under‑seasoning the meats, or using bland cheese that just melts away. Here’s what actually works: a balanced ratio of salty meats to creamy cheeses, a sauce that coats the pasta like velvet, and a crust that remains crisp on the outside while the inside stays warm and gooey. I’ve spent hours tweaking the sauce, the seasoning, and the baking time to get that perfect bite that makes your mouth water before you even take a bite. And if you’re worried about the mess, don’t be—this recipe is surprisingly clean and can be made in a single pan.
If you’ve ever struggled with making sliders that hold together or taste flat, you’re not alone—and I’ve got the fix. The secret is in the layering: start with a thin spread of sauce, layer meats, sprinkle cheese, and top with another slice of bread. Then, let the sliders sit in a pre‑heated oven long enough for the cheese to melt into a silky, golden glaze, but not so long that the bread turns soggy. This is a game‑changer that will have your friends begging for the recipe and your family craving it for every gathering.
Picture yourself pulling this out of the oven, the whole kitchen smelling incredible, and the sliders sizzling on the plate like a mini feast. That sizzle when it hits the pan? Absolute perfection. Okay, ready for the game‑changer? Let me walk you through every single step—by the end, you’ll wonder how you ever made it any other way.
What Makes This Version Stand Out
- Taste: The blend of marinara, oregano, basil, and garlic powder creates a sauce that’s rich, aromatic, and slightly sweet, balancing the saltiness of the meats.
- Texture: The sliders boast a crispy crust on the outside and a molten, cheese‑laden interior that oozes with every bite.
- Ingredient Quality: Using fresh, high‑quality meats and cheeses elevates the flavor profile and ensures each slider is a gourmet experience.
- Ease of Assembly: The assembly process is quick—layering is the only step that requires attention, making it perfect for busy weeknights.
- Make‑ahead Potential: You can assemble the sliders, cover them, and bake them later, saving you time during a dinner party.
- Crowd Reaction: Guests consistently rave about the “cheese pull” and the savory bite that keeps them coming back for seconds.
- Versatility: Swap meats or add veggies, and the sliders adapt to any dietary preference or theme.
Inside the Ingredient List
The Flavor Base
Marinara sauce is the heart of the slider, providing a tangy sweetness that cuts through the richness of the meats. A cup of sauce is enough to coat the bread and the meats without drowning them. If you’re a fan of extra heat, add a teaspoon of crushed red pepper flakes; the spice will linger on the tongue and complement the savory layers.
The oregano and basil are dried herbs that bring a classic Italian aroma. Use one teaspoon each to keep the flavor balanced—too much will overpower the sauce. If you can’t find dried oregano, fresh oregano will work, but use half the amount because fresh herbs are more potent.
The Texture Crew
Shredded mozzarella and provolone are chosen for their melting properties. Mozzarella offers a smooth melt, while provolone adds a slightly sharp bite. Together, they create a cheese blanket that pulls apart when you take a bite. If you prefer a stronger cheese flavor, swap in fontina or a blend of Italian cheeses.
The bread is the final layer that holds everything together. Use fresh Italian sub rolls or pre‑cut mini rolls for convenience. The key is to keep the bread slightly dry before baking so it can toast and develop a crisp exterior.
The Unexpected Star
Sliced pepperoni, salami, and ham are classic meats that bring a smoky, savory depth. The pepperoni adds a spicy kick, the salami contributes a robust flavor, and the ham offers a mild sweetness. Layer them evenly so each slider gets a balanced bite. If you’re vegetarian, replace the meats with grilled vegetables or a hearty plant‑based sausage.
Black olives and roasted red peppers add texture and a burst of color. The olives provide a briny contrast to the sweet marinara, while the peppers introduce a subtle sweetness and crunch. These ingredients are optional but highly recommended for an authentic Italian experience.
The Final Flourish
Olive oil is brushed over the top of each slider before baking, creating a glossy finish and preventing the bread from drying out. Use two tablespoons of extra‑virgin olive oil; its peppery flavor adds a final layer of depth. A pinch of black pepper and garlic powder finish the seasoning, giving the sliders a subtle aroma that’s impossible to resist.
Everything’s prepped? Good. Let’s get into the real action.
The Method — Step by Step
- Preheat your oven to 375°F (190°C). Line a baking sheet with parchment paper to prevent sticking. This temperature is low enough to melt the cheese evenly without burning the bread.
- Slice the Italian sub rolls in half horizontally, creating eight sturdy bases. If you’re using whole loaves, cut them into 8 equal pieces to maintain uniformity. Pat the cut sides dry with a paper towel to avoid sogginess.
- Spread a thin layer of marinara sauce on the underside of each bread slice. The sauce should coat the bread like a thin glaze, but not be so thick that it leaks during baking.
- Layer the meats—pepperoni, salami, and ham—over the sauce. Arrange them in a zigzag pattern so each slider has a balanced distribution of flavors. If you’re using plant‑based meats, ensure they are pre‑cooked for optimal taste.
- Sprinkle shredded mozzarella and provolone evenly across the meats. The cheese should be visible, creating a beautiful mosaic of colors. This is the moment of truth; the cheese will melt into a golden, gooey blanket.
- Add optional toppings: black olives, roasted red peppers, and pepperoncini. These add texture and a burst of flavor. If you prefer a milder taste, omit the pepperoncini.
- Brush the tops of the sliders with olive oil. This simple step ensures a shiny, caramelized finish and helps the cheese stick to the bread. Use a pastry brush for an even coat.
- Cover the baking sheet with foil and bake for 20 minutes. The foil traps steam, keeping the inside moist while the top begins to brown. Keep an eye on the sliders; they should start to bubble as the cheese melts.
- Remove the foil, increase the heat to 400°F (204°C), and bake for an additional 5–7 minutes. This final burst of heat crisps the crust and caramelizes the cheese edges. The sliders should be golden brown and fragrant.
- Let the sliders rest for 2 minutes on a cooling rack before serving. This allows the cheese to set slightly, preventing a gooey mess. Serve immediately with a side of marinara for dipping.
That's it—you did it. But hold on, I've got a few more tricks that'll take this to another level.
Insider Tricks for Flawless Results
The Temperature Rule Nobody Follows
Many cooks bake sliders at a high temperature from the start, resulting in uneven melting. I discovered that a two‑stage bake—low and then high—ensures a uniform melt and a crisp crust. Keep the oven temperature at 375°F for the first 20 minutes and then bump it to 400°F for the last few minutes. This technique keeps the cheese from burning while the bread stays golden.
Why Your Nose Knows Best
The aroma of simmering marinara and melting cheese is a reliable indicator that your sliders are ready. When the sauce begins to bubble and the cheese starts to pull, it’s time to remove the foil. Trust your nose—if the scent is warm and savory, the sliders are perfectly cooked.
The 5‑Minute Rest That Changes Everything
Letting the sliders rest for 5 minutes after baking allows the cheese to set, preventing a gooey mess when you bite into them. The rest period also lets the flavors meld, creating a deeper, more harmonious taste. I always keep a timer handy to ensure I don’t over‑rest and lose that desirable goo.
Layering the Cheeses Strategically
If you want a stronger cheese flavor, place the provolone on top of the mozzarella. The provolone will melt slower, creating a creamy layer that sits on top of the mozzarella’s smooth melt. This layering technique adds visual appeal and flavor depth.
Adding a Splash of Water Before Reheating
When reheating leftover sliders, add a splash of water to the baking sheet before placing them back in the oven. The moisture creates steam that re‑moistens the bread and cheese, restoring that fresh, warm texture. Bake at 350°F for 10 minutes, and you’ll taste the difference.
Creative Twists and Variations
This recipe is a playground. Here are some of my favorite ways to switch things up:
Mediterranean Melt
Swap the pepperoni and salami for sliced grilled chicken and add feta cheese. Toss in sun‑dried tomatoes and spinach for a Mediterranean vibe. The result is a lighter, yet still indulgent, slider that pairs beautifully with a crisp white wine.
BBQ Brisket Bliss
Replace the Italian meats with sliced smoked brisket and drizzle with your favorite BBQ sauce. Top with cheddar cheese and a handful of coleslaw for crunch. This smoky, tangy version is perfect for summer cookouts.
Vegetarian Delight
Use grilled portobello mushrooms, roasted zucchini, and a sprinkle of goat cheese. Add fresh basil leaves for a burst of herbaceous freshness. This plant‑based slider satisfies the meat‑loving palate while staying vegetarian.
Spicy Sriracha Surprise
Add a tablespoon of sriracha to the marinara sauce and sprinkle crushed red pepper flakes on top. Use pepperoni and hot Italian sausage for extra heat. The spicy kick will keep everyone reaching for more.
Sweet and Savory Balsamic Bliss
Drizzle a balsamic reduction over the top before baking. Pair with prosciutto and a slice of brie. The sweet acidity from the balsamic cuts through the richness, creating a balanced flavor profile.
Breakfast Brunch Edition
Use scrambled eggs, bacon, and cheddar cheese instead of the usual meats. Top with a dollop of hollandaise sauce and bake until the cheese is bubbly. These sliders make a hearty brunch that feels like a breakfast sandwich.
Storing and Bringing It Back to Life
Fridge Storage
Store leftovers in an airtight container for up to 3 days in the refrigerator. The sliders will stay moist and flavorful if kept sealed. When ready to eat, reheat in a toaster oven at 350°F for 5 minutes to revive the crisp crust.
Freezer Friendly
Wrap each slider individually in parchment paper and place them in a freezer bag. They can be frozen for up to 2 weeks. Thaw in the refrigerator overnight, then bake at 350°F for 10 minutes to restore freshness.
Best Reheating Method
For the best texture, reheat in a skillet over medium heat, adding a splash of water to create steam. Cover the skillet for 2 minutes, then uncover to crisp the crust. This method preserves the cheese’s gooeyness while ensuring the bread is toasted.