I was standing in my kitchen, a half‑finished batch of cookies cooling on the counter, when my roommate walked in and declared, “If you can make a peanut butter cookie that feels like a cloud, I’ll never order dessert again.” I laughed, because I’ve been chasing that perfect, pillow‑soft bite for years, and honestly, most recipes I tried turned out dense, dry, or just plain sad. The next night I decided to experiment with a few tweaks—adding a splash of milk, folding in a pinch of baking powder, and beating the butter and sugars until they sang. The moment those ingredients met the heat, the whole apartment filled with a nutty aroma that reminded me of a summer fair mixed with a cozy campfire, and I knew I had stumbled onto something magical.
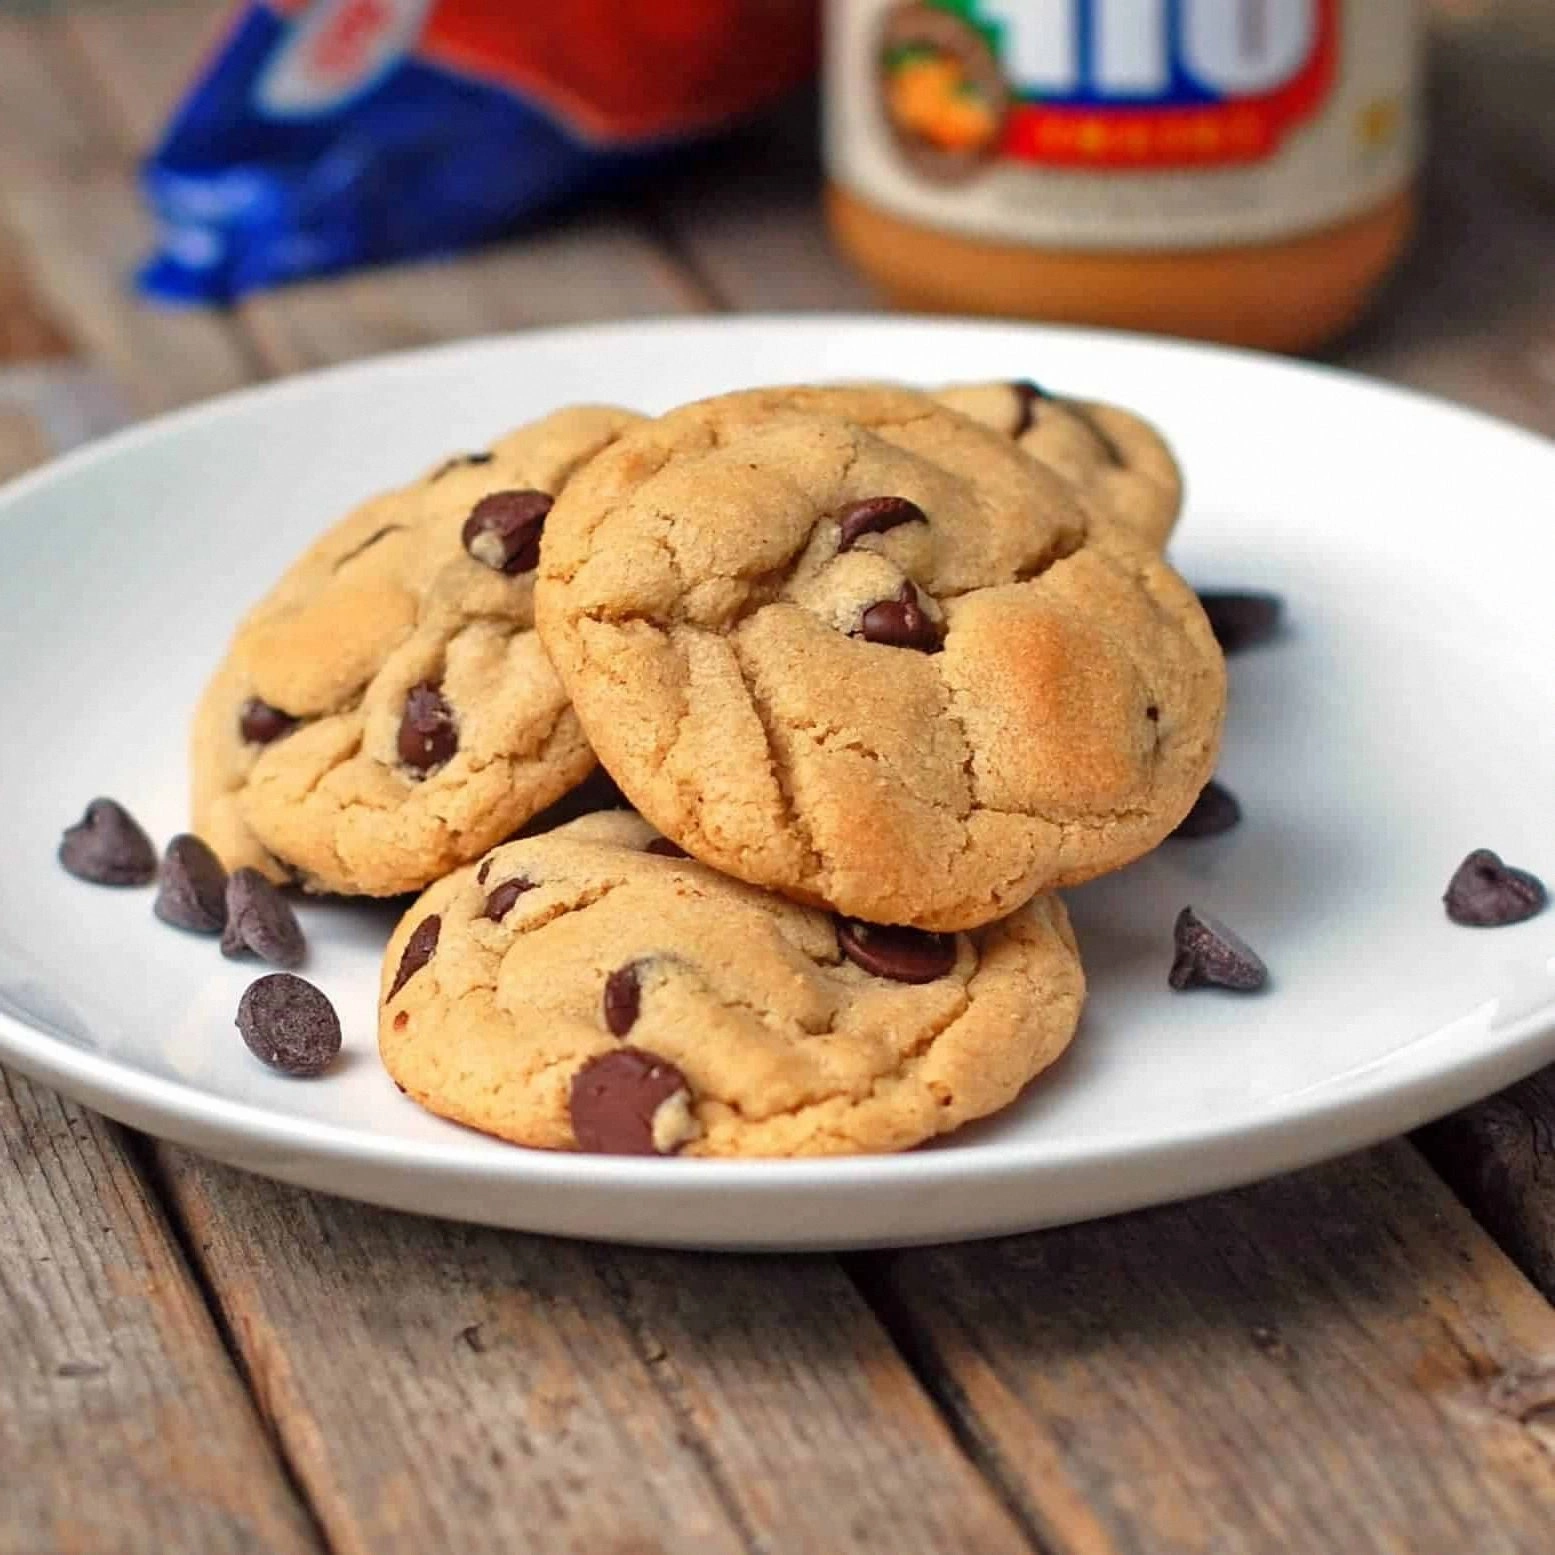
Picture this: the first cookie slides out of the oven, its surface golden‑brown, edges just beginning to crisp, while the center stays feather‑light and slightly glossy. You bite in and the texture is a paradox—crunchy on the outside, yet the interior melts like a marshmallow that’s been kissed by peanut butter. The flavor is bold without being overwhelming; the roasted peanuts shine through, balanced by a subtle caramel sweetness that lingers on the palate. I dare you to taste this and not go back for seconds, because once you’ve experienced that perfect balance, ordinary store‑bought cookies will feel like cardboard.
Most recipes get this completely wrong. They either over‑mix, which creates a tough crumb, or they skip the leavening agents that give the dough its lift. I’ve tried everything from adding extra egg whites to swapping butter for oil, and each time something was missing. The secret? A gentle, controlled aeration process combined with a tiny amount of milk that hydrates the flour just enough to keep the crumb airy without turning it soggy. This is hands down the best version you’ll ever make at home, and I’m about to spill every detail.
Let me walk you through every single step — by the end, you’ll wonder how you ever made it any other way. Okay, ready for the game‑changer? This next part? Pure magic. Stay with me here — this is worth it.
What Makes This Version Stand Out
- Fluffiness: The combination of baking powder and a splash of milk creates tiny air pockets that lift the dough, resulting in a cloud‑like interior that most peanut butter cookies lack.
- Flavor Depth: Using creamy peanut butter instead of the chunky kind lets the nutty flavor coat every crumb, while a touch of brown sugar adds a caramelized undertone.
- Simplicity: Only ten pantry staples are needed, and the method requires just one bowl for the wet ingredients and one for the dry, keeping cleanup minimal.
- Texture Contrast: The edges crisp just enough to give you that satisfying snap, while the center stays pillowy, delivering a dual‑texture experience in each bite.
- Crowd Reaction: I’ve served these at potlucks and the line forms before the first batch even hits the plate—people keep asking for the recipe.
- Ingredient Quality: A high‑quality, natural peanut butter makes all the difference; the oil in processed versions can weigh the cookie down.
- Cooking Method: Baking at a moderate 350°F (175°C) for just the right amount of time prevents over‑browning while still achieving that golden‑brown finish.
- Make‑Ahead Potential: These cookies store beautifully, staying soft for up to a week, and they even freeze well for future cravings.
Inside the Ingredient List
The Flavor Base
The star of the show is creamy peanut butter. It brings a rich, roasted nuttiness that’s impossible to replicate with any other ingredient. If you skimp on quality, you’ll notice a greasy aftertaste that dulls the overall flavor. I recommend choosing a natural, unsweetened variety that lists peanuts as the first ingredient; it will give you that authentic depth without excess sugar.
Next up, granulated sugar and brown sugar. The white sugar sweetens and helps with spreading, while the brown sugar adds moisture and a subtle molasses note that makes the cookie taste like a toasted marshmallow. Skipping the brown sugar will leave the crumb dry and the flavor one‑dimensional.
The Texture Crew
All‑purpose flour provides the structure, but the key is how much you handle it. Over‑mixing develops gluten, which can make the cookie tough. Instead, stir the flour in just until it disappears, preserving that tender crumb. If you’re gluten‑intolerant, a 1‑to‑1 swap with a gluten‑free blend works fine, though the texture will be slightly denser.
Unsalted butter, softened adds richness and helps create a slight spread. The butter should be at room temperature—soft enough to press a finger in but not melted. If you melt the butter, you’ll lose the air pockets that give the cookie its lift.
The Unexpected Star
Milk is the secret weapon that most recipes forget. A quarter cup of whole milk hydrates the flour just enough to keep the interior moist, while also adding a subtle creaminess that enhances the peanut butter flavor. You can substitute almond milk for a dairy‑free version, but the texture will be a shade lighter.
Baking powder and baking soda work together as a leavening duo. The powder provides a gentle rise, while the soda neutralizes the acidity from the brown sugar, ensuring the cookie doesn’t develop a metallic aftertaste. Skipping either will result in a flat, dense cookie that lacks the signature fluff.
The Final Flourish
Vanilla extract is the aromatic whisper that rounds out the flavor profile, adding a warm, sweet undertone that complements the peanuts perfectly. A single teaspoon is enough; more than that can overpower the delicate balance.
Salt may seem minor, but it amplifies every other taste. A pinch too much will make the cookie taste briny, while too little leaves the flavors muted. I use a precise ½ teaspoon for a balanced finish.
Everything's prepped? Good. Let's get into the real action...
The Method — Step by Step
Preheat your oven to 350°F (175°C) and line two baking sheets with parchment paper. While the oven warms, the kitchen fills with a faint, buttery scent that hints at the deliciousness to come. This is the moment of truth—if the oven isn’t hot enough, the cookies will spread too much and lose that coveted fluff.
In a large mixing bowl, combine the softened butter, granulated sugar, and brown sugar. Beat with an electric mixer on medium speed for about three minutes, until the mixture is pale, fluffy, and the sugars have dissolved. You’ll notice the mixture lightening in color; that’s the air being incorporated, which is crucial for the final texture.
Kitchen Hack: Scrape the sides of the bowl with a rubber spatula after each minute of mixing to ensure every speck of butter is fully emulsified.Add the egg, creamy peanut butter, and vanilla extract to the butter‑sugar mixture. Beat on low speed until everything is fully incorporated; the dough will look glossy and thick. This step is where the peanut butter truly melds with the butter, creating a unified base that will hold the leavening agents.
In a separate bowl, whisk together the flour, baking powder, baking soda, and salt. Whisking ensures the leaveners are evenly distributed, preventing pockets of soda that could create bitter spots. If you’re feeling fancy, sift this dry mixture into the wet ingredients for an extra airy result.
Gradually add the dry ingredients to the wet mixture, alternating with the milk. Start with a third of the flour, then a splash of milk, and continue this pattern until everything is just combined. The batter should be soft but not runny; it will hold its shape when scooped.
Watch Out: Over‑mixing at this stage will develop gluten, resulting in a tough cookie. Stop mixing as soon as the flour disappears.Cover the dough with plastic wrap and let it rest in the refrigerator for 15 minutes. This short chill relaxes the gluten and allows the leavening agents to activate gently, guaranteeing that the cookies rise just enough during baking. While you wait, the kitchen will be saturated with a sweet, nutty perfume that makes the timer feel like a tease.
Using a cookie scoop (or a tablespoon), portion out dough onto the prepared sheets, spacing them about 2 inches apart. Lightly press each mound with the back of a fork in a criss‑cross pattern—this not only creates the classic peanut‑butter cookie look but also helps the heat penetrate evenly.
Bake for 10‑12 minutes, or until the edges turn a light golden brown and the centers are still slightly soft. The cookies will continue to set as they cool, so pull them out just before they look fully firm. The aroma at this stage is intoxicating—think toasted peanuts meeting a buttery caramel swirl.
Allow the cookies to cool on the baking sheet for five minutes before transferring them to a wire rack. This short rest lets the steam escape, preserving the crisp edges while keeping the middle pillowy. As you lift the first cookie, notice how it gives way like a soft pillow—pure, unadulterated bliss.
Serve warm, or store in an airtight container once completely cooled. I’ll be honest — I ate half the batch before anyone else got to try it, and that’s because the texture is so addictive you’ll want to keep reaching for more. Picture yourself pulling this out of the oven, the whole kitchen smelling incredible, and sharing it with friends who will beg for the recipe.
That's it — you did it. But hold on, I've got a few more tricks that'll take this to another level...
Insider Tricks for Flawless Results
The Temperature Rule Nobody Follows
Never bake these cookies straight from a frozen dough ball. Let the dough sit at room temperature for a few minutes before scooping. The butter will be pliable enough to spread just right, and the leaveners will react more predictably, giving you a uniform rise. I once tried skipping this step and ended up with flat, rubbery cookies that looked like sad little discs.
Why Your Nose Knows Best
When the cookies are done, they’ll give off a faint nutty perfume that’s sweeter than the smell of raw dough. Trust that scent—if it’s aromatic and slightly caramelized, the cookies are ready, even if the timer says a second more. Over‑baking turns the interior dry, so rely on your nose more than the clock.
The 5‑Minute Rest That Changes Everything
After baking, let the cookies rest on the rack for exactly five minutes before stacking them. This short pause allows the steam inside to redistribute, preventing the bottom from becoming soggy while the top stays crisp. Skipping this rest is the reason many people end up with cookies that stick together in a mushy mess.
Butter Temperature is Not Optional
If your butter is too cold, the dough will be crumbly and won’t hold together; if it’s too warm, the cookies spread too thin. The sweet spot is room temperature—soft enough to leave an indentation when pressed with a fingertip. I once used melted butter and the result was a flat, greasy disc that lacked any lift.
The Secret of a Light Hand
When mixing the dry ingredients into the wet, use a spatula for the final fold instead of the mixer. This gentle hand prevents over‑mixing and keeps the gluten formation at a minimum, preserving that pillow‑soft crumb. The next time you see a dough that looks too thick, remember: a light hand is the difference between dense and divine.
Creative Twists and Variations
This recipe is a playground. Here are some of my favorite ways to switch things up:
Chocolate‑Swirl Delight
Swirl in ¼ cup of melted dark chocolate just before scooping. The chocolate adds a bittersweet contrast that pairs beautifully with the sweet peanut butter, creating a marbled masterpiece that looks as good as it tastes.
Banana‑Boosted Bliss
Mash a ripe banana and fold it into the wet mixture, reducing the sugar by two tablespoons. The banana adds natural sweetness and extra moisture, turning the cookie into a soft, banana‑infused treat that’s perfect for brunch.
Spicy Peanut Crunch
Add a pinch of cayenne pepper and a tablespoon of chopped roasted peanuts to the dough. The heat tickles the palate while the extra peanuts give an unexpected crunch, making the cookie a bold, adventurous bite.
Oat‑Infused Hearty Version
Replace ½ cup of flour with rolled oats. The oats add a chewy texture and a nutty depth that makes the cookie feel more filling, perfect for an after‑school snack.
White‑Chocolate Dream
Stir in ½ cup of white chocolate chips right before the final mix. The creamy sweetness of white chocolate melts into the cookie, creating pockets of melt‑in‑your‑mouth goodness that complement the peanut butter’s earthiness.
Storing and Bringing It Back to Life
Fridge Storage
Place cookies in an airtight container with a slice of bread on top. The bread releases moisture slowly, keeping the cookies soft for up to five days. If you notice any dryness, a quick toss of the container in the fridge for 15 minutes will revive the fluff.
Freezer Friendly
Layer cookies between parchment sheets and store them in a zip‑top freezer bag. They freeze beautifully for up to three months. When you’re ready to indulge, let them thaw at room temperature for 20 minutes, then give them a quick warm‑up in the oven for 5 minutes.
Best Reheating Method
To bring a refrigerated or frozen cookie back to its original glory, preheat the oven to 300°F (150°C), place the cookie on a baking sheet, and add a tiny splash of water (about a teaspoon) to the tray. The steam revives the interior, while the gentle heat restores the crisp edge. In just 5‑7 minutes you’ll have a cookie that tastes like it just left the oven.