Picture this: I’m in the middle of a chaotic Sunday afternoon, the kitchen smelling like a burnt pizza, and my roommate shouts, “We need something quick, but wow!” My brain went into overdrive, and I remembered the last time I tried a chimichanga. The tortilla was soggy, the filling bland, and the whole thing felt like a culinary flop. I promised myself I would never settle for that again.
So I set out to create a version that would make your taste buds sing, your friends ask for a second helping, and your pantry thank you for the clever ingredient choices. I mixed shredded chicken with refried beans, salsa, a dash of coriander, and a sprinkle of chili powder, then wrapped it all in a buttery tortilla that crisps to a golden finish. The result? A bite that delivers a smoky, spicy kick followed by a creamy, melty cheese cascade that feels like a hug in every mouthful. It’s the kind of dish that turns a simple dinner into a family fiesta.
What sets this recipe apart is the balance of flavors and textures: the beans give depth, the chicken adds protein, the salsa offers brightness, and the butter creates that coveted crunch. I dared you to taste this and not go back for seconds, because it’s so good that you’ll want to keep the plate empty. Most recipes get this completely wrong by over‑seasoning or under‑cooking the tortilla, but I’ve fine‑tuned the heat and timing to hit the sweet spot every time.
I’ll be honest — I ate half the batch before anyone else got a chance to try it, and the kitchen smelled like a Mexican fiesta for an hour after. If you’ve ever struggled with a soggy tortilla or a bland filling, you’re not alone, and I’ve got the fix. The secret? A buttery spread that melts into the tortilla, a subtle coriander that cuts through the heat, and a generous layer of cheese that ties everything together.
Let me walk you through every single step — by the end, you’ll wonder how you ever made it any other way. Picture yourself pulling this out of the oven, the whole kitchen smelling incredible, the edges crisping like thin ice, and the aroma filling the air. Ready? Let’s dive in.
What Makes This Version Stand Out
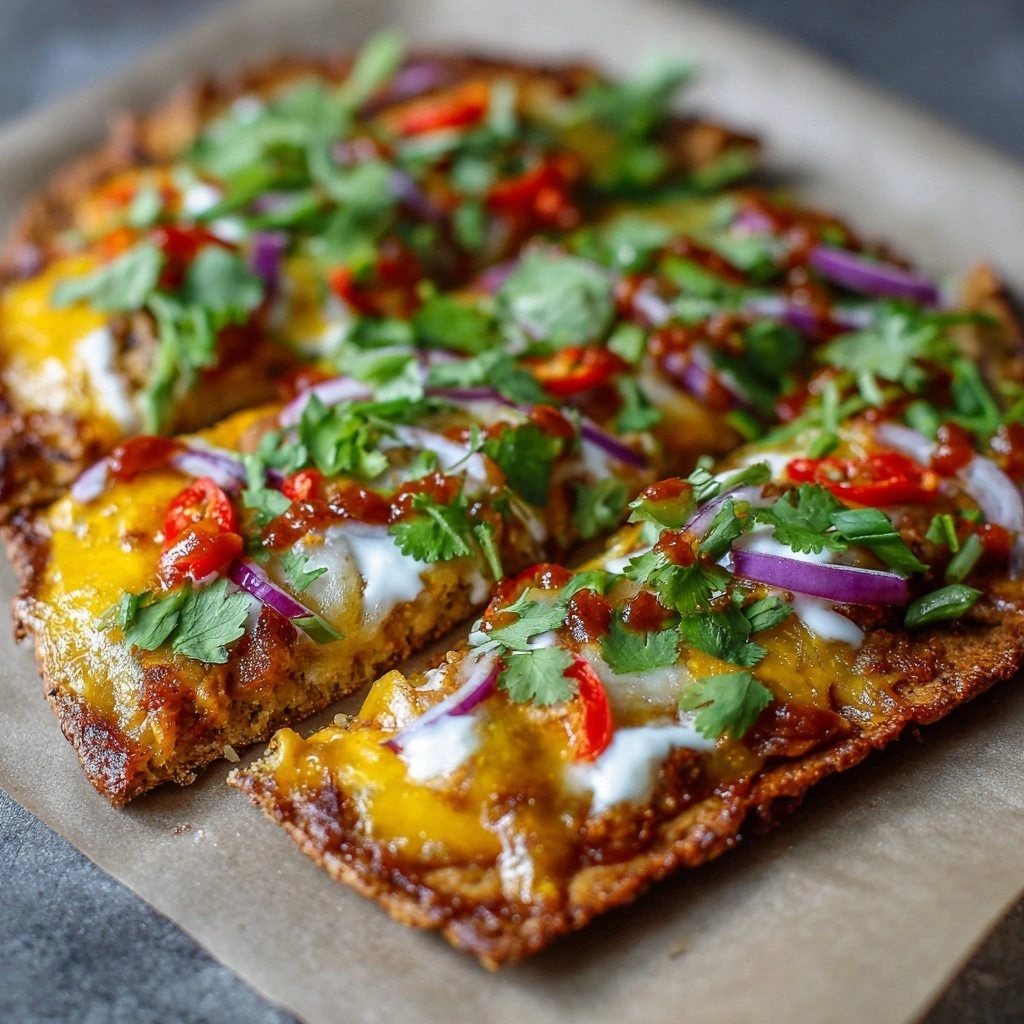
- Flavor: The combination of shredded chicken, refried beans, and salsa creates a complex taste profile that is both hearty and refreshing. The coriander adds a subtle citrusy note that lifts the heat from the chili powder. Each bite feels layered, not one-dimensional.
- Texture: The butter‑soaked tortilla crisps to a golden edge while the filling stays moist and gooey. The cheese melts into a velvety coating that clings to the chicken and beans. The result is a satisfying crunch that breaks with a creamy center.
- Ease: All the ingredients are pantry staples that you can find in any grocery store. No special equipment is required – just a baking sheet and an oven. This dish is perfect for busy weeknights or a last‑minute dinner party.
- Flexibility: You can swap the chicken for ground beef, pork, or even tofu, and the recipe still shines. The beans can be replaced with black beans or chickpeas for a different flavor profile. The chili powder level can be adjusted to suit your heat tolerance.
- Crowd‑Pleaser: The bright colors and bold flavors make it visually appealing. Guests will rave about the crisp edges and the melt‑in‑your‑mouth cheese. It’s a dish that invites conversation and compliments.
- Make‑Ahead Potential: Assemble the chimichangas the night before, refrigerate, and bake in the morning. The flavors deepen overnight, and the tortillas keep their crispness. It’s a convenient solution for busy families.
Alright, let's break down exactly what goes into this masterpiece. I’ll walk you through each ingredient, why it matters, and how you can tweak it if you’re feeling adventurous.
Inside the Ingredient List
The Flavor Base
The shredded chicken is the heart of this dish. It provides protein and a subtle savory depth that anchors the other flavors. If you skip the chicken, you lose the main source of protein, and the dish feels more like a bean burrito than a chimichanga.
Refried beans act as the creamy backbone. They absorb the spices and keep the filling moist. Choosing a high‑quality canned bean can make a noticeable difference in texture; a smooth bean is key for a silky interior.
Salsa brings brightness and a hint of acidity. It cuts through the richness of the butter and cheese. If you prefer a milder salsa, opt for a mild or medium variety; for more heat, choose a salsa roja with extra jalapeños.
The Texture Crew
Butter is the secret weapon for crispness. When melted into the tortilla, it creates a golden crust that snaps when you bite. Using unsalted butter allows you to control the saltiness of the final dish.
Shredded cheese melts into a gooey coating that holds the filling together. Cheddar or Monterey Jack works best; avoid mozzarella as it melts too quickly and can become stringy.
Green onions add a fresh, oniony crunch that balances the richness. They also provide a pop of color that makes the dish look as good as it tastes. If you’re not a fan of green onions, you can substitute with chives.
The Unexpected Star
Coriander, or cilantro leaves, offers a citrusy undertone that brightens the dish. It’s a subtle note that you’ll notice after the first bite, adding a layer of complexity. If you’re allergic, replace it with fresh parsley for a similar herbal touch.
Chili powder brings a gentle heat without overwhelming the palate. It’s a blend of spices that provides depth and warmth. Adjust the amount to match your heat tolerance; a pinch more can turn the dish into a fiery experience.
The Final Flourish
Jalapeños add a fresh, peppery bite that cuts through the richness. They’re also a source of vitamin C, giving the dish a nutritional boost. For a milder option, use sliced bell pepper instead.
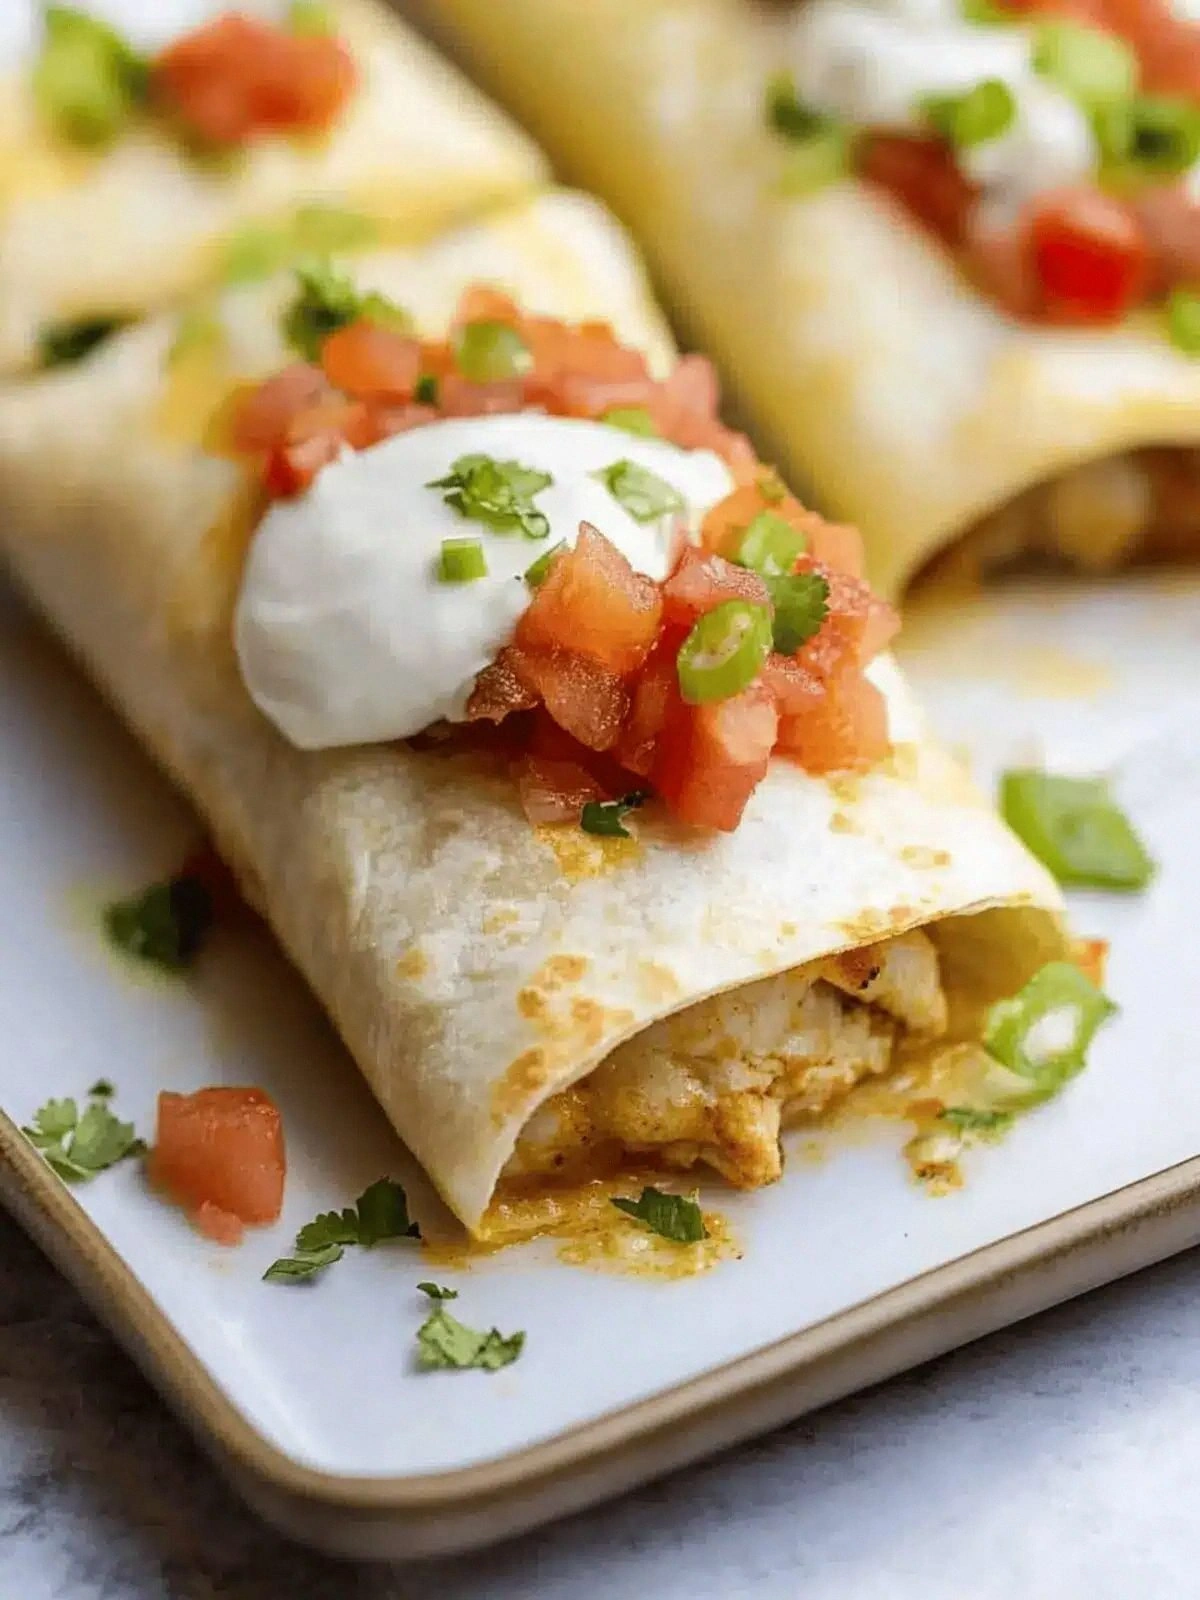
Large flour tortillas are the vessel that holds everything together. They’re pliable and easy to fold, ensuring the filling doesn’t spill out during baking. If you prefer a gluten‑free version, use corn tortillas, but they’ll be less flexible.
Everything's prepped? Good. Let's get into the real action.
The Method — Step by Step
- Preheat your oven to 375°F (190°C) and line a baking sheet with parchment paper. A well‑lined sheet prevents sticking and makes cleanup a breeze. This step also ensures even heat distribution for a perfectly crisp tortilla.
- Melt the butter in a small saucepan over medium heat until it turns a light amber hue. This slight browning adds nutty flavor to the crust. Keep a close eye on it – butter can burn quickly.
- Spread a thin, even layer of melted butter over each tortilla, leaving a small border around the edges. This coating creates a protective barrier that locks in moisture and prevents sogginess. The butter also gives the tortilla a rich, golden sheen.
- In a large bowl, combine the shredded chicken, refried beans, salsa, coriander, chili powder, shredded cheese, green onions, and jalapeños. Stir until everything is evenly coated and the mixture is moist enough to hold together. The mixture should feel slightly sticky but not wet.
- Place a generous spoonful of the filling in the center of each buttered tortilla. Spread it out, leaving a 1-inch margin on all sides. This margin is essential for a neat fold and prevents the filling from leaking during baking.
- Fold the sides of the tortilla inwards and roll tightly, ensuring the edges seal. If you’re worried about leaks, press the seam with a fork or your fingers. The roll should be snug but not overly tight; you want the filling to expand slightly during baking.
- Place the rolled chimichangas seam‑side down on the prepared baking sheet. Arrange them in a single layer, leaving a little space between each one. This spacing allows heat to circulate, ensuring even browning.
- Bake for 25–30 minutes, or until the tortillas are crisp, golden brown, and the cheese has melted into a bubbly, golden top. Flip them halfway through to promote even cooking. The aroma that fills the kitchen during this step is the first hint of the deliciousness to come.
- Remove the chimichangas from the oven and let them rest for 5 minutes. This rest period allows the filling to set, preventing the cheese from sliding out when you cut into them. While they rest, you can prepare your favorite dipping sauce.
- Slice each chimichanga into quarters and serve immediately with salsa, guacamole, or a dollop of sour cream. The hot, melted cheese should ooze out when you take a bite, creating a satisfying, gooey experience. Enjoy the crunch, the heat, and the burst of flavors.
That’s it — you did it. But hold on, I’ve got a few more tricks that will take this to another level.
Insider Tricks for Flawless Results
The Temperature Rule Nobody Follows
Many cooks bake chimichangas at 400°F, but I’ve found 375°F gives a better balance between crispness and melt. The lower temperature allows the cheese to melt fully without burning the tortilla. It also ensures the filling stays hot without drying out.
Why Your Nose Knows Best
As the chimichangas bake, the aroma will shift from buttery to smoky to slightly sweet. Trust your nose; when the smell becomes nutty and the edges start to brown, you’re close to perfection. This sensory cue is more reliable than a timer alone.
The 5‑Minute Rest That Changes Everything
After removing the chimichangas from the oven, let them sit for exactly five minutes. This pause allows the cheese to set and the filling to thicken slightly, preventing a runny mess when you cut. It also lets the flavors meld together.
Layering for Extra Crunch
If you love an extra crunch, sprinkle a thin layer of breadcrumbs on top of the cheese before baking. The breadcrumbs will toast to a golden crisp, adding a delightful textural contrast. Just make sure to use fine breadcrumbs for a smooth finish.
Finishing Touch: A Splash of Lime
Right before serving, squeeze a fresh lime over each chimichanga. The citrus zest cuts through the richness and adds a bright, refreshing note. It’s a simple step that elevates the dish from good to unforgettable.
Make‑Ahead Magic
Assemble the chimichangas the night before, wrap them tightly in foil, and refrigerate. When you’re ready to serve, bake them straight from the fridge; they’ll still crisp up beautifully. This method saves time on busy evenings while keeping the flavors intact.
Creative Twists and Variations
This recipe is a playground. Here are some of my favorite ways to switch things up:
Tex‑Mex Taco Chimichangas
Swap the refried beans for black beans, add a handful of corn kernels, and sprinkle taco seasoning. This version delivers a crunchy, corn‑sweet flavor that feels like a taco in every bite.
Greek‑Inspired Chimichangas
Replace the salsa with a tomato‑based tzatziki sauce, add crumbled feta, and sprinkle oregano. The result is a Mediterranean twist that’s surprisingly harmonious.
Vegan Chimichangas
Use plant‑based shredded “chicken” or lentils, vegan cheese, and a dairy‑free butter alternative. The flavor profile remains the same, but the dish becomes cruelty‑free.
Breakfast Chimichangas
Fill with scrambled eggs, chorizo, and a handful of spinach. Top with a drizzle of hot sauce and bake. It’s a hearty breakfast that feels like a brunch treat.
Spicy Korean Chimichangas
Add gochujang to the filling, replace the salsa with kimchi, and sprinkle sesame seeds. The spicy, umami flavors create a fusion dish that’s both bold and comforting.
Dessert‑Style Chimichangas
Use sweetened red beans, a drizzle of chocolate sauce, and a sprinkle of powdered sugar. The sweet version feels like a dessert taco and is perfect for a fun family treat.
Storing and Bringing It Back to Life
Fridge Storage
Store leftover chimichangas in an airtight container for up to three days. Wrap them loosely in foil before refrigerating to keep the tortillas from drying out. When ready to reheat, let them sit at room temperature for 10 minutes.
Freezer Friendly
Freeze assembled chimichangas (before baking) for up to two months. Wrap each tightly in plastic wrap and place in a freezer bag. When you’re ready, bake directly from the freezer, adding 5 minutes to the cooking time.
Best Reheating Method
Reheat in a 350°F oven for 10–12 minutes, or until the cheese is melted and the tortilla is crisp. Add a tiny splash of water before reheating to create steam, which helps restore moisture without making the tortilla soggy.