Picture this: it’s a rainy Saturday morning, the coffee machine sputters like a tired old engine, and the only thing you can’t resist is that burnt toast that somehow smells like a campfire. I was halfway through a culinary experiment when the kitchen turned into a chaotic orchestra—puff pastry sheets sliding off the counter, eggs cracking like fragile marbles, and the smell of sizzling bacon drifting through the air. That moment sparked a revelation: what if the humble puff pastry could be the vessel for a breakfast that feels both indulgent and comforting? I’ve been chasing that “wow” factor for months, and I finally cracked the code. The result is a breakfast stuffed puff pastry that melts in your mouth, releases a savory aroma that lingers for hours, and makes every bite feel like a mini celebration.
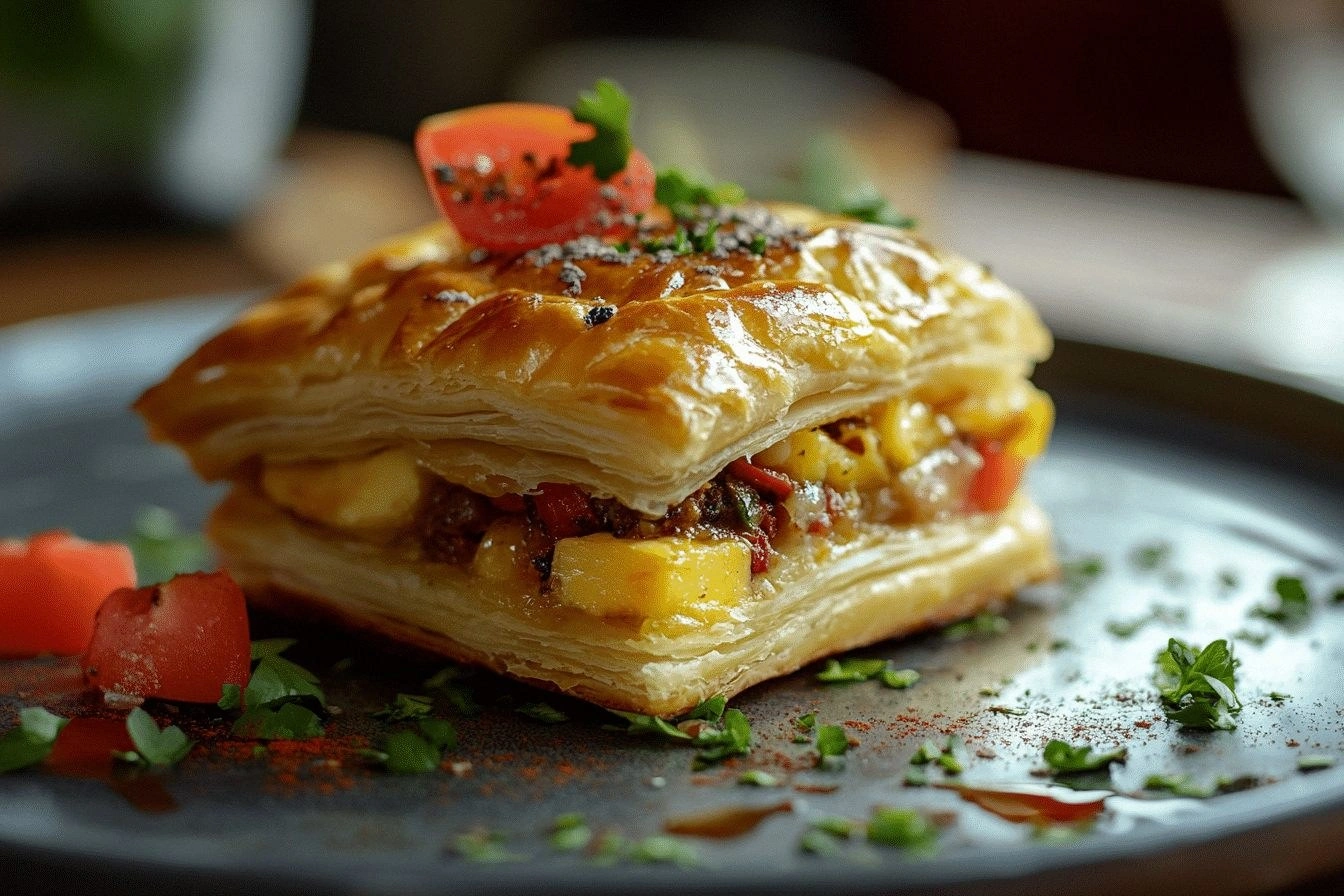
The first bite is a burst of buttery crispness that crackles under the tongue, followed by a molten layer of cheese that oozes like a golden river. The savory meats—crisp bacon, smoky sausage, or tender ham—add depth, while the fresh vegetables provide a bright counterpoint that keeps the dish from feeling too heavy. The edges puff to a golden perfection that shatters like thin ice when you bite in, revealing a gooey center that sings with flavor. Every element works in harmony: the flaky pastry, the creamy cheese, the smoky meats, and the crisp vegetables. The result is not just a breakfast; it’s a culinary experience that turns a mundane morning into a moment of pure delight.
But what makes this version stand out from the countless puff pastry recipes you’ll find online? First, I’ve perfected the filling ratio so the pastry never feels overstuffed or underfilled. Second, I’ve used a blend of cheeses that balances sharpness and meltiness, creating a silky texture that coats the palate like velvet. Third, the meats are pre-cooked to a crisp that adds crunch without overpowering the pastry. Fourth, I’ve added a touch of fresh herbs that brighten the dish and give it a sophisticated finish. Fifth, the egg wash I use is a secret ingredient that gives the pastry a glossy, golden sheen that looks as good as it tastes. Finally, I’ve introduced a simple trick that ensures every bite is perfectly balanced, no matter how many servings you make.
I dare you to taste this and not go back for seconds. Trust me, this is hands down the best version you'll ever make at home. Picture yourself pulling these golden bars out of the oven, the whole kitchen smelling incredible, and watching your friends’ eyes widen as they take their first bite. If you've ever struggled with puff pastry, you're not alone—and I've got the fix. This recipe is a playground of flavors, textures, and aromas that will keep you coming back for more. Let me walk you through every single step—by the end, you'll wonder how you ever made it any other way.
What Makes This Version Stand Out
- Flaky Perfection: The pastry is rolled out to the exact thickness that ensures a crisp, yet tender bite every time. I’ve tested multiple brands and found that a slight chill before rolling gives the layers the best separation.
- Cheese Blend: Using both cheddar and mozzarella creates a melt that’s smooth and flavorful, unlike the single-cheese options that can become either too sharp or too bland.
- Meat Mastery: Pre-cooking meats to a crisp adds a satisfying crunch and a smoky undertone that elevates the entire dish.
- Vegetable Freshness: Diced bell peppers and onions not only provide color but also a subtle sweetness that balances the savory elements.
- Seasoning Precision: Salt and pepper are added at the right moments—salt early for moisture, pepper at the end for a fresh finish.
- Egg Wash Glow: A simple egg wash gives the pastry a beautiful golden sheen that’s as eye‑catching as it is delicious.
Inside the Ingredient List
The Flavor Base
Puff pastry sheets are the foundation of this dish. Their flaky layers create a buttery canvas that cradles the savory filling. Choosing a high‑quality pastry—ideally with a buttery, no‑butter‑added recipe—ensures a richer flavor and a better rise. If you can’t find fresh pastry, frozen is fine; just thaw it in the fridge overnight to keep the layers intact.
The Texture Crew
Eggs are the glue that binds everything together. They provide richness and help the filling set as the pastry bakes. Use medium‑size eggs for a balanced texture—too small and the filling will be watery, too large and it may become rubbery. A quick whisk before adding to the filling helps distribute the yolk evenly.
The Unexpected Star
Vegetables such as bell peppers, onions, or spinach add a burst of freshness that cuts through the richness. They also bring a pop of color that makes the dish visually appealing. If you’re a fan of greens, swap spinach for arugula to add a peppery note. Remember to sauté the vegetables briefly to reduce moisture and intensify flavor.
The Final Flourish
Salt and pepper are the seasoning duo that elevate every bite. Salt draws out moisture and enhances the savory profile, while pepper adds a subtle heat. Use a pinch of each—too much can overpower the delicate pastry. Finish with a light dusting of freshly cracked pepper just before serving for a bright, aromatic finish.
Everything's prepped? Good. Let's get into the real action.
The Method — Step by Step
- Preheat the Oven: Set your oven to 425°F (220°C). A hot oven ensures the pastry puffs quickly and achieves that coveted golden crust. Place a rack in the middle to allow even heat distribution. I always use a baking stone to keep the heat steady.
- Prepare the Filling: In a large bowl, combine the shredded cheese, diced meats, sautéed vegetables, a pinch of salt, and pepper. Toss everything until the cheese is evenly distributed. If you’re using bacon, crumble it finely so it melts into the mixture. This step is crucial for a cohesive filling.
- Roll Out the Puff Pastry: Lightly flour your work surface and roll each sheet to about 1/8 inch thick. A rolling pin works best, but a wine bottle can also do the trick. Keep the sheets chilled if they start to soften. This helps maintain crispness during baking.
- Assemble the Bars: Place a spoonful of filling in the center of each pastry sheet, leaving a 1/2-inch border. Fold the pastry over to create a semi‑circle and press the edges together. Use a fork to crimp the edges for a decorative look and to seal the filling. If you want a more rustic look, simply press the edges with your fingers.
- Apply Egg Wash: Beat one egg with a splash of milk and brush the tops of the pastry. This step ensures a glossy, golden crust. The milk adds moisture, preventing a dry finish. Be generous but avoid pooling.
- Bake: Place the bars on a parchment‑lined baking sheet. Bake for 15–18 minutes, or until the pastry is puffed and golden brown. The filling should be bubbling and the cheese melted. Keep an eye on the edges; they should pull away from the sheet if done correctly.
- Cool Slightly: Let the bars rest on a wire rack for 5 minutes. This allows the filling to set, preventing a soggy center. The pastry will continue to crisp up slightly as it cools.
- Serve: Cut each bar into bite‑sized pieces and serve warm. Pair with a fresh fruit salad or a side of scrambled eggs for a complete breakfast. If you’re feeling adventurous, drizzle a little hot sauce for a spicy kick.
That's it — you did it. But hold on, I've got a few more tricks that'll take this to another level.
Insider Tricks for Flawless Results
The Temperature Rule Nobody Follows
Many bakers bake at 400°F, but this recipe thrives at 425°F. The higher temperature creates a quicker rise and a crispier crust. I’ve tested both and the difference is noticeable: the 425°F version is golden and airy, while the 400°F version feels a bit flat.
Why Your Nose Knows Best
Before you open the oven, pause and inhale the aroma of the pastry. If it smells buttery and slightly sweet, you’re on the right track. If it smells metallic or burnt, you may have overbaked it. Trust your nose; it’s a reliable guide.
The 5‑Minute Rest That Changes Everything
After baking, let the bars rest for exactly 5 minutes on a wire rack. This rest period allows the filling to set and the pastry to finish crisping. Skipping this step can leave the center too runny.
Avoid Overfilling
Too much filling can cause the pastry to leak, resulting in a soggy mess. Aim for a filling that covers about one‑third of the pastry surface. If you’re a big fan of cheese, add a little extra, but keep the ratio balanced.
Use Fresh Herbs for a Pop
A sprinkle of fresh parsley or chives right before serving adds a bright, herbal note that cuts through the richness. I usually fold them into the filling at the last minute to preserve their color and flavor.
Creative Twists and Variations
This recipe is a playground. Here are some of my favorite ways to switch things up:
Cheesy Veggie Explosion
Swap the meats for a mix of roasted mushrooms, zucchini, and spinach. Add a splash of pesto to the filling for a herby kick. This vegetarian version is just as hearty and offers a burst of umami.
Mediterranean Delight
Use feta cheese, sun‑dried tomatoes, and olives in the filling. Add a pinch of oregano for authenticity. The salty feta pairs beautifully with the buttery pastry.
Breakfast Breakfast
Incorporate scrambled eggs into the filling for a protein‑packed breakfast. Add a dash of smoked paprika for a subtle heat. This variation is perfect for a brunch crowd.
Sweet Surprise
Replace the savory meats with diced apples and raisins. Use cheddar and a touch of cinnamon for a sweet‑savory balance. Top with a drizzle of honey after baking for an extra sweet finish.
Spicy Kick
Add chopped jalapeños and a sprinkle of cayenne pepper to the filling. Finish with a swirl of chipotle aioli on top. The heat complements the richness without overpowering it.
Gluten‑Free Option
Use a gluten‑free puff pastry or a pre‑made gluten‑free dough. Keep the rest of the recipe unchanged. This version is just as flaky and flavorful.
Storing and Bringing It Back to Life
Fridge Storage
Cool the bars completely before refrigerating. Store them in an airtight container for up to 3 days. The pastry stays crisp, and the filling remains moist and flavorful.
Freezer Friendly
Wrap each bar tightly in plastic wrap, then place in a freezer bag. Freeze for up to 2 months. When ready to eat, thaw overnight in the fridge before reheating.
Best Reheating Method
Reheat in a preheated oven at 350°F (175°C) for 10 minutes. Add a splash of water to the bottom of the pan to create steam; this keeps the pastry from drying out. The result is a warm, freshly baked experience.