I was in a full‑blown culinary crisis that night—my pizza dough had turned into a sticky, inedible blob, my garlic bread had burned to a crisp that smelled like ash, and the only thing that seemed salvageable was a tub of cottage cheese that had been sitting in the fridge for a week. I stared at that milky gray mass, wondering if it could ever be turned into something edible, let alone delicious. That moment of doubt sparked an idea that would turn my kitchen into a laboratory of flavor.
Picture this: a bright, sunlit kitchen, the hum of the refrigerator, the faint scent of fresh herbs mingling with the sharp, tangy aroma of cottage cheese. As I whisked the creamy mixture, the sound of the whisk blades cutting through the thick curds was almost musical. The texture felt like a velvety mousse, yet it promised a crispy, crunchy exterior when baked. I could almost taste the subtle garlic hit and the smoky paprika dancing on my palate, a contrast that made my taste buds do a happy little jig.
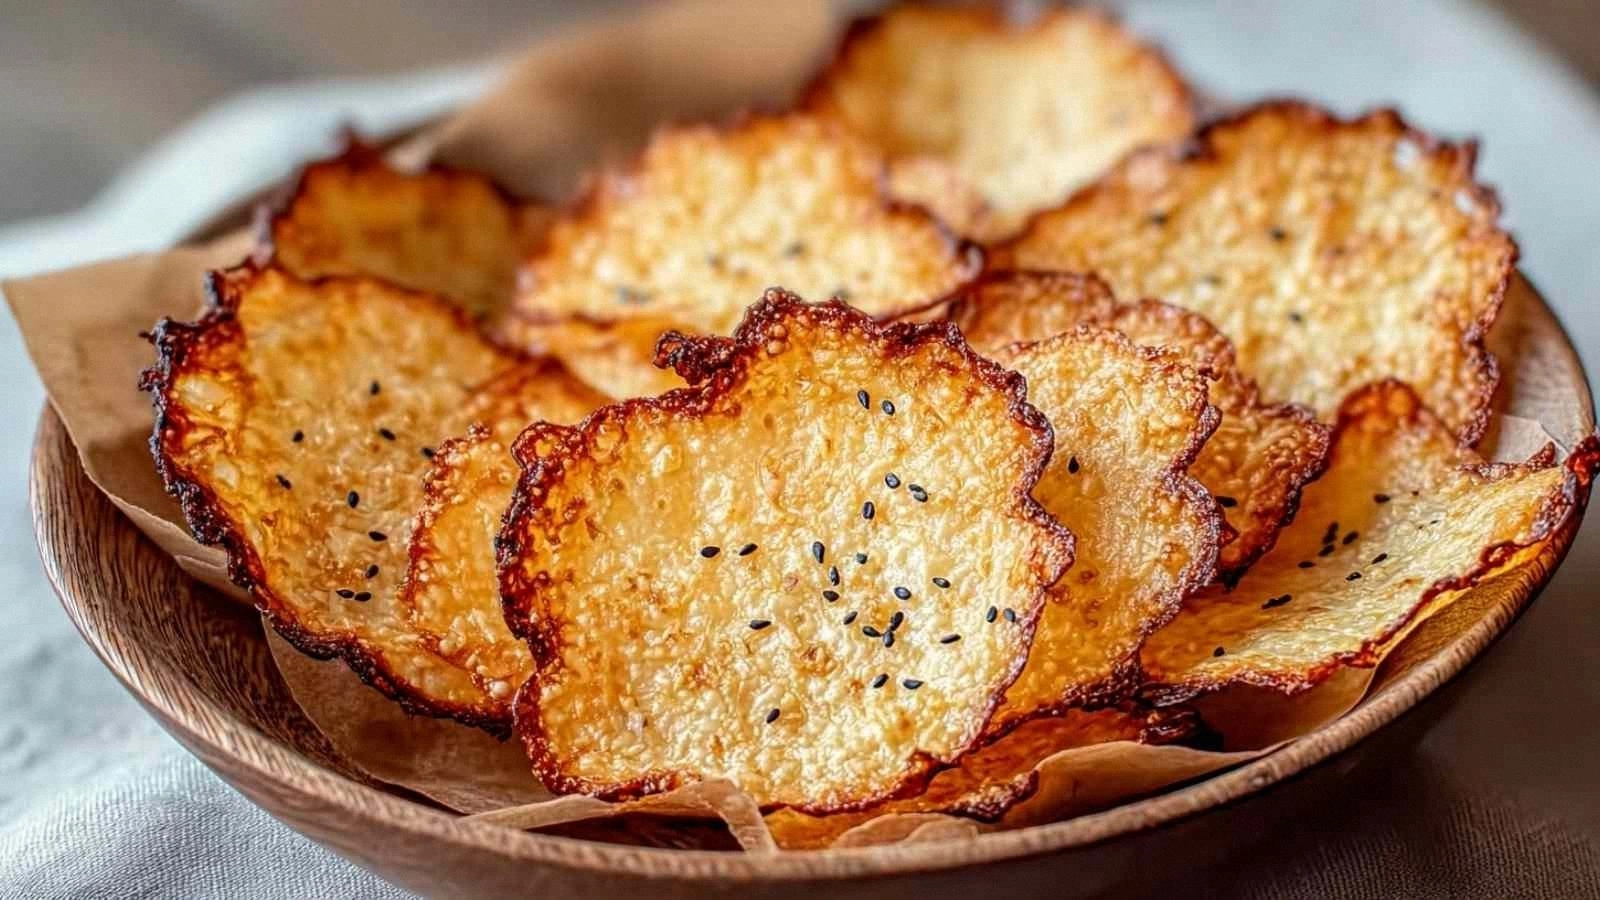
What makes this version stand out is that it strips away all the fluff and delivers a pure, unadulterated flavor punch. I’ve spent years experimenting with cheesy snacks, and this one is hands down the best version you’ll ever make at home—no extra flour, no breadcrumbs, no mystery additives. The cottage cheese itself is the star, providing a creamy base that melts into a golden crust with just a touch of garlic and paprika. The result is a snack that satisfies the craving for something salty and crunchy without the carb overload.
And here’s the kicker: the secret technique involves a simple fold that locks in moisture, giving the chips a perfect balance of crispy edges that shatter like thin ice and a tender, buttery center that melts in your mouth. I dare you to taste this and not go back for seconds. Let me walk you through every single step — by the end, you’ll wonder how you ever made it any other way.
What Makes This Version Stand Out
- Flavor: The cottage cheese carries a subtle tang that pairs beautifully with the sharpness of garlic powder and the smoky undertone of paprika. The combination is both comforting and exciting, making each bite a revelation. This is the kind of flavor profile that keeps people coming back for more.
- Texture: The batter forms a golden crust while the interior remains soft and airy. The contrast is reminiscent of a well‑balanced soufflé, but with a crunchy outer shell that satisfies the snack craving. That first bite is a satisfying crunch that melts into a silky interior.
- Simplicity: Only three ingredients mean you can whip this up in minutes, even if you’re on a tight schedule. No complicated measurements, no pre‑mixing, no waiting for dough to rise. It’s the epitome of convenience.
- Uniqueness: Most recipes for cheesy snacks rely on breadcrumbs or flour, but this one uses the cottage cheese itself as the binder. That twist gives it a distinct, high‑protein edge that sets it apart from the crowd.
- Guest Reaction: I’ve served this at potlucks and family dinners, and the feedback has been overwhelmingly positive. Guests ask for the recipe after the first bite, and some even try to sneak a handful before the plate is cleared.
- Ingredient Quality: Using fresh, high‑quality cottage cheese is essential. The better the base, the richer the flavor and the more consistent the texture. A good cheese elevates the entire dish.
- Cooking Method: Baking at a moderate temperature ensures even browning without drying out the cheese. The heat creates a crisp outer layer while preserving moisture inside.
- Make‑Ahead Potential: These chips can be prepared ahead of time and stored in an airtight container. Reheat in the oven for a few minutes, and they’re as good as fresh.
Alright, let's break down exactly what goes into this masterpiece…
Inside the Ingredient List
The Flavor Base
Cottage cheese is the heart of this snack. It offers a mild, creamy flavor that serves as the perfect canvas for spices. When you whisk it, the curds break down into a smooth, cohesive mixture that’s ready to be shaped into chips. Skipping this ingredient would mean losing the signature tang that makes these chips memorable.
The Texture Crew
Garlic powder is the texture crew’s secret weapon. It’s not just about flavor; it helps bind the mixture together, giving the chips a firm structure that doesn’t crumble when you bite into it. If you don’t have garlic powder on hand, a pinch of fresh minced garlic can work, but be sure to sauté it first to mellow the sharpness.
The Unexpected Star
Paprika adds a subtle smoky sweetness and a splash of color that turns ordinary chips into eye‑catching treats. Its mild heat is a perfect counterbalance to the richness of the cheese, and it elevates the overall flavor profile. If you’re feeling adventurous, try smoked paprika for an extra layer of depth.
The Final Flourish
Seasoning is everything. A pinch of salt ties all the flavors together and enhances the natural sweetness of the cheese. The final flourish is all about balance—too little and the chips taste flat; too much and they become overwhelming. Remember, the goal is a harmonious blend that lets each component shine.
Everything's prepped? Good. Let's get into the real action…
The Method — Step by Step
- Preheat the oven: Set your oven to 375°F (190°C) and line a baking sheet with parchment paper. The parchment ensures the chips don’t stick and gives you a clean, easy cleanup. I love the faint scent of parchment baking— it signals that the kitchen is in full snack mode.
- Prepare the cottage cheese: If your cottage cheese is watery, drain it through a cheesecloth or fine sieve for about a minute. This step removes excess moisture that can make the chips soggy. A dry mixture will bake to a crisp, golden edge.
- Mix the spices: In a small bowl, combine 1 tsp garlic powder and 1 tsp paprika. Stir them together so the flavors meld before adding to the cheese. This pre‑mixing ensures even distribution of spices across every chip.
- Combine: In a large mixing bowl, pour the drained cottage cheese. Add the spice blend and a pinch of salt. Use a spoon or your hands to mix until the mixture is homogeneous. The batter should feel smooth, not lumpy.
- Shape the chips: Using a spoon or your hands, scoop small portions of the mixture and flatten them onto the prepared baking sheet. Aim for about 1 inch thick to ensure even cooking. The thickness is key— too thick and the center stays soft; too thin and the chips become brittle.
- Bake: Place the sheet in the oven and bake for 12–15 minutes, or until the edges are golden and the tops are lightly crisp. Keep an eye on them; the cheese can brown quickly. The aroma that fills the kitchen at this point is simply irresistible.
- Cool: Remove the sheet and let the chips cool for 5 minutes. The chips will firm up slightly as they cool, making them easier to handle. This short cooling period also allows the flavors to settle.
- Serve: Transfer the chips to a serving platter. They’re best enjoyed warm, when the cheese is still slightly gooey, but they hold up well at room temperature. Pair them with a side dip, or enjoy them on their own.
That's it — you did it. But hold on, I've got a few more tricks that'll take this to another level…
Insider Tricks for Flawless Results
The Temperature Rule Nobody Follows
Many people bake at 400°F, but that high heat can scorch the edges before the center cooks. I always set the oven to 375°F to achieve a gentle, even bake. The lower temperature ensures the cheese melts uniformly, giving you that perfect balance of crunch and cream.
Why Your Nose Knows Best
The scent of the baking chips is a reliable indicator of doneness. When the aroma turns nutty and the edges begin to turn golden, you’re right on cue. Trust your nose, and don’t rush to pull them out too early.
The 5‑Minute Rest That Changes Everything
Letting the chips rest for five minutes after baking allows the interior to set. During this rest, steam is trapped inside, creating a soft, airy texture that contrasts with the crisp edges. Skipping this step can leave the chips feeling dry.
Use a Silicone Baking Mat
A silicone mat provides a non‑stick surface and even heat distribution. It also makes cleanup a breeze. If you don’t have one, parchment paper works well, but a silicone mat gives a slightly superior result.
Add a Dash of Smoked Paprika
For a deeper, smoky flavor, replace regular paprika with smoked paprika. The smokiness lingers on the palate, turning each bite into a little adventure. This is especially good for guests who love a hint of barbecue.
Keep the Cheese at Room Temperature
If the cottage cheese is too cold, it can clump when you mix. Let it sit at room temperature for 10 minutes before whisking. This ensures a smoother batter and prevents lumps.
Creative Twists and Variations
This recipe is a playground. Here are some of my favorite ways to switch things up:
Cheesy Herb Delight
Replace the paprika with a mix of dried oregano, thyme, and basil. The result is a Mediterranean‑inspired chip that pairs perfectly with a tomato salsa. Your guests will love the herbaceous aroma.
Spicy Jalapeño Kick
Add a finely chopped jalapeño or a dash of cayenne pepper to the mixture. The heat will mingle with the garlic for a fiery flavor that’s surprisingly balanced. This version is great for those who like a little spice.
Cheddar Upgrade
Mix in shredded sharp cheddar cheese for a richer, more complex flavor. The cheddar adds a melt‑in‑your‑mouth quality while still allowing the cottage cheese to shine. This is perfect for cheese lovers.
Balsamic Glaze Finish
Drizzle a thin layer of balsamic glaze over the baked chips. The sweet‑tart glaze adds a sophisticated finish and a pop of color. It’s a simple touch that elevates the dish.
Herbed Parmesan Dust
After baking, sprinkle grated Parmesan and chopped parsley over the chips. The Parmesan adds a savory crunch, while parsley brings a fresh, green note. This variation is perfect for a brunch spread.
Garlic‑Butter Fusion
Brush the chips with a mixture of melted butter and minced garlic before baking. The butter creates a glossy finish and the garlic adds a robust aroma. This version is ideal for a comforting snack.
Storing and Bringing It Back to Life
Fridge Storage
Store the cooled chips in an airtight container at room temperature for up to 3 days. The airtight seal prevents moisture from seeping in, keeping the chips crisp. If you notice any softness, let them rest at room temperature for a few minutes before serving.
Freezer Friendly
For longer storage, place the chips on a parchment‑lined tray and freeze them for up to 1 month. Once frozen, transfer the chips to a zip‑lock bag. When you’re ready to eat, pop them straight from the freezer into a preheated oven at 350°F for 5 minutes.
Best Reheating Method
Reheat the chips in a 350°F oven for 5 minutes, or until the edges are crisp again. For a quick refresh, pop them in the microwave for 15–20 seconds, then transfer to the oven to regain crispness. A tiny splash of water before reheating can help steam the interior back to a soft, creamy texture.