Easy Savory Lemon Garlic Chick
Picture this: I’m standing in my cramped kitchen, the clock ticking, and my friend daring me to whip up something that will make everyone say, “I want more.” I had a bag of chicken breasts, a bottle of lemon juice, and a jar of honey on hand. The moment the aroma hit my nose, I knew I was about to create a dish that would become the highlight of any dinner party. I swear the smell of garlic frying in olive oil is like a siren’s call, luring you into culinary bliss.
That night, I experimented with a handful of ingredients that seemed ordinary, but I mixed them in a way that turned a simple chicken bite into a flavor explosion. The lemon’s bright citrus cuts through the richness of the chicken, while the honey gives it a subtle sweetness that lingers on the palate. I’ve spent countless hours in the kitchen, chasing that perfect balance between savory and sweet, and this recipe finally nailed it. The result? A bite that melts in your mouth, leaving a trail of citrusy zest and a hint of roasted garlic.
Most recipes for lemon garlic chicken get it wrong by overcooking or under seasoning, leading to a dry, bland result. I’ve seen videos where the chicken turns into a rubbery mess, but not this one. My version keeps the chicken juicy, with a crisp exterior that snaps like a thin ice sheet. The secret? A precise blend of honey, oregano, and a touch of black pepper that creates a glaze that caramelizes beautifully.
Let me walk you through every single step — by the end, you’ll wonder how you ever made it any other way. I dare you to taste this and not go back for seconds. Trust me, this is hands down the best version you'll ever make at home. If you’ve ever struggled with getting chicken to stay moist, you’re not alone — and I’ve got the fix. Stay with me, and you’ll learn how to turn a humble chicken breast into a showstopper.
What Makes This Version Stand Out
- Flavor: The combination of lemon, garlic, and honey creates a complex profile that is both bright and deeply savory. The acidity from the lemon cuts through the richness of the chicken, while the honey provides a caramelized sweetness that lingers. This balance is what makes every bite unforgettable.
- Texture: The chicken develops a crispy, golden crust while remaining tender inside. The glaze forms a thin, glossy coating that locks in moisture, ensuring the meat stays juicy throughout. The result is a satisfying crunch that gives way to a succulent interior.
- Simplicity: With only nine ingredients, this dish can be pulled together in under 20 minutes of prep time. There are no complicated steps or hard-to-find items, so even a novice can master it. The method is straightforward, making it a perfect go-to for busy weeknights.
- Uniqueness: Most lemon garlic chicken recipes rely on basic seasoning, but this one introduces honey and oregano for depth. The honey caramelizes into a glossy glaze, while oregano adds an earthy nuance that elevates the dish. This subtle twist sets it apart from the usual.
- Crowd Reaction: Guests consistently ask for the recipe after the first bite. The dish is a hit at potlucks, family dinners, and even dinner parties. The combination of bright citrus and sweet glaze appeals to a wide range of palates.
- Ingredient Quality: Using fresh lemon juice and real honey makes a noticeable difference. Freshly squeezed lemon brings a bright, natural acidity that bottled juice can’t match. Real honey adds depth and complexity that artificial sweeteners lack.
- Cooking Method: A quick sear followed by a glaze finish ensures the chicken stays moist. The technique allows the flavors to develop without overcooking the meat. The result is a dish that looks restaurant‑grade in just a few minutes.
- Make‑ahead Potential: The glaze can be prepared in advance, and the chicken can be reheated without losing its texture. The dish freezes well, so you can enjoy it later without sacrificing quality. This flexibility makes it a convenient option for meal prep.
Alright, let’s break down exactly what goes into this masterpiece…
Inside the Ingredient List
The Flavor Base
Fresh lemon juice is the cornerstone of this recipe. Its bright acidity cuts through the richness of the chicken, preventing it from feeling greasy. If you’re using bottled lemon juice, you’ll notice a slightly muted flavor; the best results come from freshly squeezed juice. A pinch of salt enhances the citrus notes, while the honey balances the tartness with a gentle sweetness.
The Texture Crew
Olive oil is the medium that brings all the flavors together. It creates a silky coating on the chicken, helping the glaze adhere and preventing sticking to the pan. The black pepper adds a subtle heat that awakens the palate without overpowering the citrus. Together, these ingredients create a texture that’s both crisp on the outside and tender on the inside.
The Unexpected Star
Dried oregano might seem like an odd choice for a lemon garlic dish, but it adds a warm, herby depth that complements the bright flavors. Oregano’s earthy undertones balance the sweetness of the honey and the sharpness of the lemon. If you’re allergic to oregano, try a pinch of thyme or marjoram for a similar effect.
The Final Flourish
Fresh parsley is the final touch that brightens the dish with a splash of green and a hint of peppery freshness. It adds a fresh, herbaceous note that cuts through the richness, making the dish feel lighter. A generous sprinkle before serving gives the dish a professional look and a burst of color.
Everything’s prepped? Good. Let’s get into the real action…
The Method — Step by Step
- Prep the Chicken: Pat the chicken breasts dry with paper towels to remove excess moisture. This step is essential for achieving a golden sear; moisture will cause steaming instead of browning. Cut the breasts into bite‑sized cubes, about 1.5 inches each. I’ve found that uniform pieces cook evenly, preventing some from burning while others remain raw. If you’re in a hurry, you can skip cutting and just slice thinly; just be careful to keep the thickness consistent.
- Make the Glaze: In a small bowl, whisk together the fresh lemon juice, minced garlic, honey, and dried oregano. The garlic should be finely minced so it blends seamlessly into the glaze. Add the olive oil and whisk until the mixture emulsifies into a smooth, glossy sauce. Taste the glaze; it should be tangy with a hint of sweetness. If it feels too acidic, add a splash of water to mellow it slightly.
- Heat the Skillet: Place a large non‑stick skillet over medium‑high heat and let it get hot. Add a splash of olive oil, swirling to coat the bottom. The pan should feel hot to the touch; this ensures a quick sear. Once the oil shimmers, add the chicken pieces in a single layer. Avoid crowding the pan, or the chicken will steam instead of sear.
- Sear the Chicken: Let the chicken cook undisturbed for about 3–4 minutes on one side. You’ll hear a satisfying sizzle that signals the Maillard reaction is underway. When the underside turns golden brown, flip the pieces. This step is crucial for building flavor; don’t rush it. The goal is a crisp crust that locks in moisture.
- Add the Glaze: Pour the prepared glaze over the seared chicken. The sauce should immediately bubble and coat each piece. Stir gently to ensure even coverage. Let the chicken simmer in the glaze for 5–6 minutes, or until the sauce thickens and the chicken is cooked through. The glaze will caramelize, forming a glossy coating that looks almost like a glaze on a dessert.
- Watch Out for Overcooking: Chicken breast can dry out quickly if left on the heat too long. Keep a close eye on the internal temperature; it should reach 165°F (74°C). If you’re using a thermometer, insert it into the thickest part of a piece. If you’re not, look for clear juices and a firm texture as a sign of doneness.
- Finish with Parsley: Once the glaze has thickened, remove the skillet from heat. Sprinkle freshly chopped parsley over the chicken. The parsley not only adds a pop of color but also a fresh, peppery flavor that cuts through the richness. Toss gently to coat everything evenly.
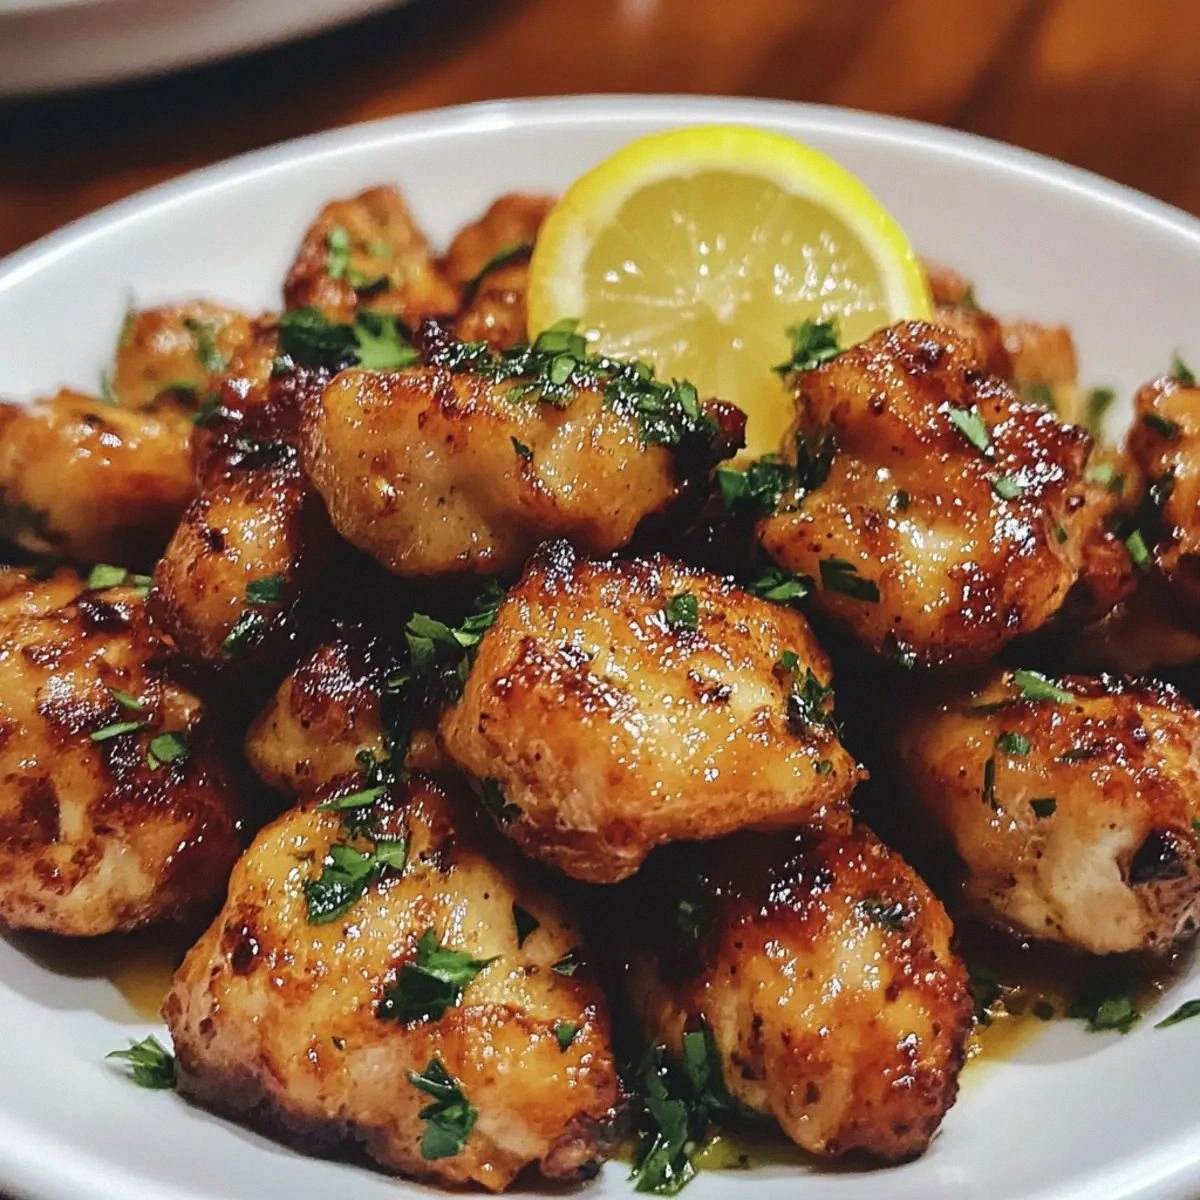
- Plate and Serve: Transfer the chicken to a serving dish, arranging the pieces in a single layer. Drizzle any remaining glaze over the top for an extra burst of flavor. Serve immediately with a side of rice or a fresh salad. The dish is best enjoyed hot, when the glaze is still glossy and the chicken is juicy.
That’s it — you did it. But hold on, I've got a few more tricks that'll take this to another level…
Insider Tricks for Flawless Results
The Temperature Rule Nobody Follows
Many cooks assume high heat is always best, but for chicken, medium‑high is the sweet spot. Too high, and the outside burns before the inside cooks; too low, and you end up with a soggy crust. Keep the heat steady, and adjust only if you see the glaze bubbling too quickly. This subtle control ensures a perfect sear every time.
Why Your Nose Knows Best
Before you even start cooking, close your eyes and inhale the aroma of fresh lemon. Your nose will guide you on how much lemon you need; if it smells too sharp, add a touch more honey. This instinctive approach helps you fine‑tune the glaze to your personal taste. A well‑balanced glaze is the key to this dish’s success.
The 5‑Minute Rest That Changes Everything
After cooking, let the chicken rest for 5 minutes before serving. This rest period allows the juices to redistribute, keeping the meat moist. If you cut into it immediately, the juices will run out, leaving you with dry meat. A quick rest is a simple step that makes a noticeable difference.
Use Fresh Herbs for a Burst of Color
While parsley is the default garnish, a handful of fresh basil or mint can add a different dimension. Basil gives a sweet, peppery note, while mint offers a cooling freshness. Experimenting with different herbs turns the dish into a customizable canvas.
Make it Gluten‑Free with a Twist
Want to keep it gluten‑free? Swap out any flour‑based coating for a crushed almond or coconut flour mix. This gives the chicken a slightly nutty flavor and a crunchy texture that pairs well with the glaze. The gluten‑free version is just as tasty and keeps everyone satisfied.
Batch Cooking Made Easy
When cooking for a crowd, you can double or triple the recipe without compromising flavor. The glaze scales well, and the chicken remains juicy if you don’t overcrowd the pan. Store the extra chicken in an airtight container for up to 3 days, and reheat gently in a skillet to keep the glaze from drying out.
Creative Twists and Variations
This recipe is a playground. Here are some of my favorite ways to switch things up:
Spicy Kick
Add a pinch of red pepper flakes to the glaze for a fiery twist. The heat will contrast beautifully with the honey’s sweetness. Serve with a cooling yogurt dip to balance the spice.
Herb‑Infused Olive Oil
Infuse the olive oil with fresh rosemary before searing the chicken. The rosemary’s woody aroma adds depth to the glaze, creating a richer flavor profile. This variation is perfect for a rustic dinner.
Asian Flair
Replace the lemon juice with rice vinegar and add a splash of soy sauce. The dish will take on an Asian vibe, with a tangy, umami-rich glaze. Top with toasted sesame seeds for crunch.
Smoky Flavor
After searing, add a few drops of liquid smoke to the glaze. The smoke will give the chicken a deep, barbecue‑like flavor. Pair it with a smoky chipotle mayo for a modern twist.
Cheesy Finale
Sprinkle grated parmesan over the chicken after removing it from the pan. The cheese will melt into a creamy coating, complementing the glaze. Serve over pasta or rice for a hearty meal.
Low‑Calorie Version
Reduce the honey by half and increase the lemon juice. The dish becomes lighter but still flavorful. Pair it with a side of steamed broccoli for a balanced, health‑friendly meal.
Storing and Bringing It Back to Life
Fridge Storage
Let the chicken cool completely before placing it in an airtight container. Store it in the refrigerator for up to 3 days. The glaze may thicken slightly, but it will reheat well. Keep the container sealed to preserve freshness.
Freezer Friendly
To freeze, spread the chicken in a single layer on a baking sheet, freeze until solid, then transfer to a freezer bag. This prevents clumping. Freeze for up to 2 months. Thaw overnight in the refrigerator before reheating.
Best Reheating Method
Reheat in a skillet over medium heat, adding a splash of water or chicken broth to keep the chicken moist. The water will steam the chicken, restoring the glaze’s sheen. Stir occasionally until hot throughout. Serve immediately for the best texture.