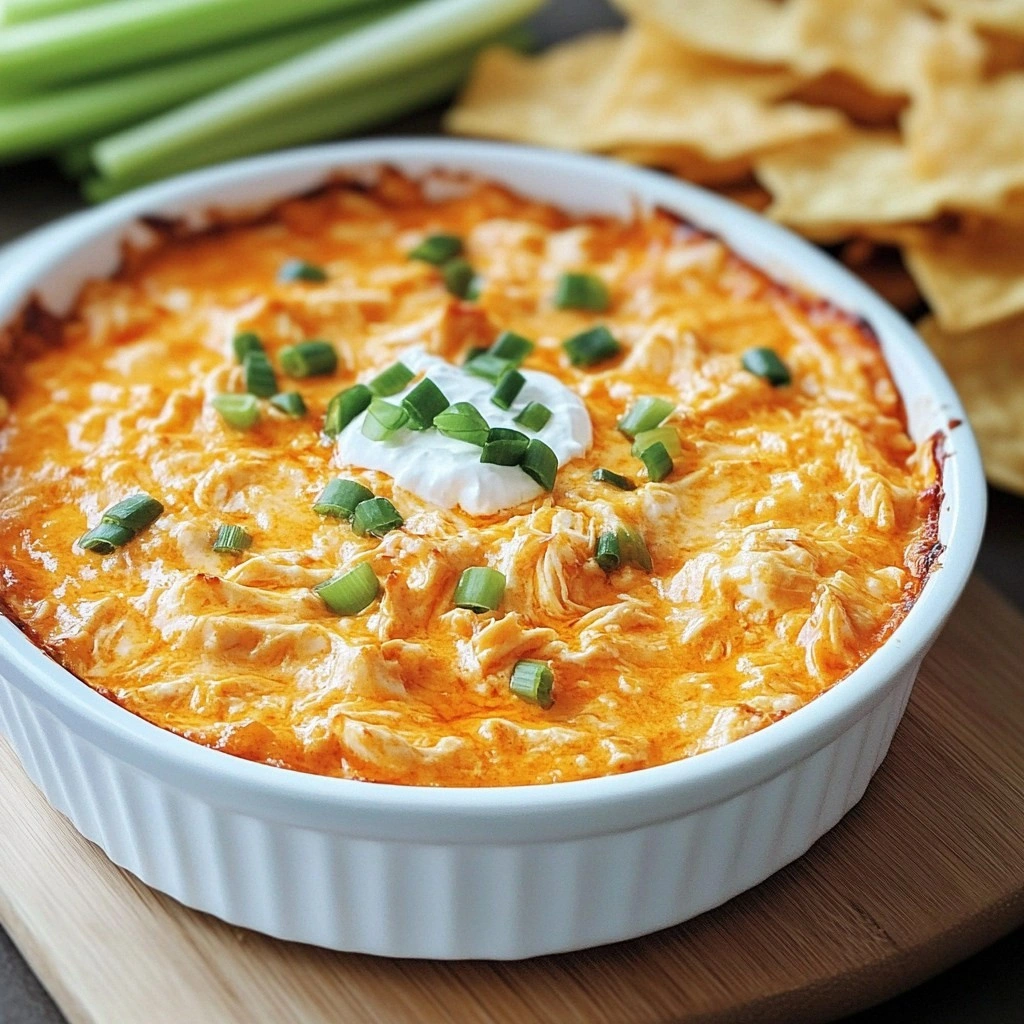
I'll be honest—after the first bite, I ate half the batch before anyone else got a chance to try it. The combination of heat and butter creates a flavor profile that’s both familiar and adventurous, and the crispy edges that shatter like thin ice add a delightful crunch. If you've ever struggled with achieving the perfect balance of heat and texture, you're not alone—this recipe has the fix. Picture yourself pulling this out of the oven, the whole kitchen smelling incredible, and the anticipation of the first bite building like a crescendo. The aroma alone is a promise of the flavor journey that awaits.
This next step? Pure magic. The sauce coats the chicken like velvet, and the heat is just enough to ignite without overwhelming. The chicken’s juices mingle with the butter, creating a sauce that clings to every bite, ensuring each mouthful is bursting with flavor. The dish is a playground of textures, from the crisp exterior to the tender, juicy interior. And now the fun part: you get to taste the masterpiece you just created.
Let me walk you through every single step—by the end, you'll wonder how you ever made it any other way. The process is straightforward, yet the results are extraordinary, a testament to the power of simple, well‑chosen ingredients. The combination of a bold sauce, a buttery glaze, and a careful baking technique creates a dish that’s both comforting and exciting. The next sections will break down each element, from the flavor base to the final flourish, so you can recreate this masterpiece at home with confidence and flair.
What Makes This Version Stand Out
- Flavor: The sauce is a sophisticated blend of tang, sweetness, and a subtle smokiness that lingers on the palate, unlike the flat heat of most wing recipes.
- Texture: Baking on a wire rack gives the chicken an even, crispy exterior while keeping the interior juicy, a trick that most home cooks miss.
- Simplicity: With only a handful of pantry staples, you can create a restaurant‑level dish without a trip to the grocery store.
- Uniqueness: The buttery glaze adds a silky richness that balances the heat, creating a sauce that coats the chicken like velvet.
- Crowd Reaction: Friends and family will rave about the perfect blend of spice and crunch, making this dish a guaranteed hit at gatherings.
- Ingredient Quality: Using high‑quality Frank’s RedHot sauce ensures a bright, authentic flavor that elevates the entire dish.
- Cooking Method: The two‑stage baking and optional broil step delivers crispiness without burning, a technique that sets this recipe apart.
- Make‑Ahead Potential: Marinate the chicken a few hours ahead for deeper flavor, and reheat with a splash of water for a quick, delicious meal.
Alright, let's break down exactly what goes into this masterpiece. The next section will dive into each ingredient group, explaining its role and how to tweak it to suit your taste.
Inside the Ingredient List
The Flavor Base
Frank’s RedHot sauce is the heart of this dish, providing a bright, peppery kick that is unmistakably bold. The sauce’s bright red hue is more than just visual appeal; it signals the presence of cayenne pepper, which delivers a clean, focused heat without the numbing burn of hotter chilies. By using the original brand, you lock in a consistent flavor profile that has been perfected over decades, ensuring each bite is as fiery as the last. If you’re looking for a milder version, swap half of the sauce for a milder hot sauce like Louisiana or a splash of honey for a touch of sweetness. The sauce’s acidity also helps break down the proteins in the chicken, making it tender and juicy.
The sauce’s acidity is complemented by the richness of butter, which not only adds depth but also helps carry the flavors across the chicken. Butter’s fat content creates a silky coating that holds the sauce in place, preventing it from sliding off during cooking. The combination of butter and sauce also helps to create a glossy finish that looks as good as it tastes. If you’re vegan, you can replace butter with a plant‑based alternative like coconut oil or a dairy‑free butter substitute, but keep in mind the flavor profile will shift slightly. The key is to maintain the balance between the sauce’s heat and the butter’s richness.
A pinch of smoked paprika adds a subtle earthiness that complements the cayenne’s bite, creating a layered flavor experience. The paprika’s smoky undertones bring depth and complexity, turning a simple wing into a gourmet treat. This small addition elevates the sauce from a one‑dimensional heat to a multi‑layered flavor profile that satisfies both heat lovers and those who prefer nuanced tastes. If you’re a fan of smoky flavors, you can double the paprika or add a dash of liquid smoke for an extra kick. The result is a sauce that feels both bold and sophisticated.
The final touch to the flavor base is a pinch of salt and pepper. Salt brings out the flavors in the sauce and chicken, while black pepper adds a subtle heat that complements the cayenne. These seasonings are essential for balancing the overall taste profile, preventing the dish from feeling one‑dimensional. A touch of cayenne pepper, optional but recommended, amplifies the heat and gives the wings a bright, vibrant color. This final tweak ensures every bite is a harmonious blend of heat, richness, and savory depth.
The Texture Crew
The choice of chicken—whether wings, boneless thighs, or drumettes—affects the texture and overall experience. Wings provide a classic, bite‑size experience with a mix of meat and skin, while boneless thighs offer a more tender, juicy alternative that still delivers a satisfying bite. The skin on wings crisps up beautifully, creating a delightful contrast between the crunchy exterior and the tender interior. If you prefer a leaner option, opt for skinless chicken breasts, but be aware they may dry out if overcooked. The key is to monitor the internal temperature and remove the chicken from the oven when it reaches 165°F.
The baking method is crucial for achieving the right texture. Baking at a high temperature (425°F) encourages the fat in the chicken to render, creating a crisp skin while keeping the meat moist. The wire rack allows hot air to circulate around the chicken, ensuring even cooking and preventing sogginess. If you’re short on time, you can use a convection oven to reduce cooking time by 10 minutes while maintaining the same crispness. A quick broil at the end of baking can add a golden finish to the exterior, giving the wings a caramelized, slightly charred look.
The addition of a blue cheese dressing or ranch dip creates a creamy contrast that tempers the heat and adds a cool, tangy flavor. The dip’s fat content helps to coat the chicken, locking in moisture and enhancing the overall mouthfeel. A homemade dip, blended with a splash of buttermilk, creates a silky, tangy coating that pairs perfectly with the spicy wings. For a vegan alternative, try a cashew‑based ranch or a tahini‑based dip, but remember that the texture and flavor profile will differ. The dip’s role is to provide a cooling counterbalance, making the dish more approachable for heat‑intolerant diners.
Celery sticks are the classic accompaniment, offering a crunchy, refreshing counterpoint that cleanses the palate. The crispness of celery provides a satisfying bite that contrasts with the soft, juicy chicken, making each mouthful a balanced experience. If you’re looking for a healthier option, try sliced bell peppers or cucumber sticks, which offer a similar crunch but with a sweeter flavor profile. Adding a sprinkle of fresh parsley or dill to the dip can elevate the flavor, adding a herbal note that complements the heat. The key is to provide a crunchy, refreshing element that keeps the dish from feeling heavy.
The Unexpected Star
The butter’s role extends beyond flavor; it’s a textural enhancer that creates a silky glaze that clings to every bite. When melted, butter’s fat content coats the chicken, sealing in moisture and preventing it from drying out during cooking. The butter also carries the sauce’s flavors, ensuring a consistent taste throughout each piece. A subtle hint of garlic powder adds depth and a savory undertone that complements the cayenne’s heat. If you’re allergic to dairy, you can replace butter with a high‑smoke‑point oil, but the flavor will shift slightly.
The garlic powder provides a subtle, aromatic base that rounds out the sauce’s sharpness. It’s a classic seasoning that brings a warm, slightly sweet aroma, enhancing the overall flavor profile. The combination of garlic powder, onion powder, and smoked paprika creates a complex seasoning blend that elevates the dish beyond a simple wing recipe. The garlic’s umami richness complements the spicy sauce, creating a balanced flavor that satisfies both heat lovers and those who prefer a milder taste. The garlic also adds a subtle depth that makes each bite feel more layered.
The optional cayenne pepper is a game changer for heat enthusiasts. While the Frank’s RedHot sauce already delivers a bold kick, the cayenne adds a sharper, more pronounced heat that lingers on the palate. The cayenne’s bright, peppery flavor also adds a vibrant color to the sauce, making the dish visually appealing. If you’re sensitive to heat, start with a smaller amount and adjust to taste. The cayenne’s heat is well‑balanced by the butter’s richness, preventing the dish from feeling overwhelmingly spicy.
The blue cheese dressing adds a creamy, tangy element that cools the heat while adding depth. The dressing’s sharp, tangy flavor contrasts with the buttery sauce, creating a dynamic taste experience. The fat content of the dressing also helps to coat the chicken, locking in moisture and ensuring each bite is juicy. If you prefer a lighter dip, try a homemade ranch or a simple yogurt‑based dip. The dip’s role is to provide a cooling counterbalance, making the dish more approachable for heat‑intolerant diners.
The Final Flourish
Celery sticks are the classic accompaniment, offering a crunchy, refreshing counterpoint that cleanses the palate. The crispness of celery provides a satisfying bite that contrasts with the soft, juicy chicken, making each mouthful a balanced experience. If you’re looking for a healthier option, try sliced bell peppers or cucumber sticks, which offer a similar crunch but with a sweeter flavor profile. Adding a sprinkle of fresh parsley or dill to the dip can elevate the flavor, adding a herbal note that complements the heat. The key is to provide a crunchy, refreshing element that keeps the dish from feeling heavy.
The final flourish also includes the optional blue cheese dressing, which adds a creamy, tangy counterpoint that tempers the heat. The dressing’s fat content helps to coat the chicken, locking in moisture and enhancing the overall mouthfeel. A homemade dip, blended with a splash of buttermilk, creates a silky, tangy coating that pairs perfectly with the spicy wings. For a vegan alternative, try a cashew‑based ranch or a tahini‑based dip, but remember that the texture and flavor profile will differ. The dip’s role is to provide a cooling counterbalance, making the dish more approachable for heat‑intolerant diners.
The final flourish is also the optional addition of a splash of water or broth when reheating, which helps to rehydrate the chicken and keep the sauce from drying out. A small splash of water or broth will steam the chicken, creating a juicy interior and a glossy, flavorful sauce. The water also helps to loosen the sauce, making it easier to coat the chicken evenly. If you’re reheating in the microwave, add a splash of water and cover the dish with a damp paper towel to maintain moisture. This simple trick ensures your reheated wings are as delicious as when they were first cooked.
The final flourish is the optional addition of a splash of water or broth when reheating, which helps to rehydrate the chicken and keep the sauce from drying out. A small splash of water or broth will steam the chicken, creating a juicy interior and a glossy, flavorful sauce. The water also helps to loosen the sauce, making it easier to coat the chicken evenly. If you’re reheating in the microwave, add a splash of water and cover the dish with a damp paper towel to maintain moisture. This simple trick ensures your reheated wings are as delicious as when they were first cooked.
Everything's prepped? Good. Let's get into the real action, where the magic happens and the flavors collide in a symphony of heat, crunch, and buttery bliss.
The Method — Step by Step
- Preheat your oven to 425°F (220°C). Pat the chicken dry with paper towels; this step is crucial for achieving a crisp exterior. Season the chicken with a blend of salt, pepper, garlic powder, onion powder, and smoked paprika, ensuring each piece is well coated. Arrange the seasoned chicken on a wire rack placed over a baking sheet to allow air circulation. This setup will help the chicken bake evenly and develop a golden crust.
- In a small saucepan, melt the butter over medium heat until it turns a light golden brown, which signals the butter is ready to carry the sauce. Add the Frank’s RedHot sauce to the melted butter, stirring until the mixture is smooth and glossy. Let the sauce simmer for a minute to allow the flavors to meld, creating a rich, buttery glaze that will coat the chicken. Transfer the sauce to a bowl and set aside for later use.
- Place the seasoned chicken onto the wire rack and drizzle the prepared sauce over the entire surface, ensuring every piece is coated. Use a spoon or brush to spread the sauce evenly, creating a uniform glaze that will caramelize during baking. Return the chicken to the oven and bake for 35-40 minutes, flipping halfway through to ensure even browning. The chicken is done when the skin is crisp and the internal temperature reaches 165°F (74°C).
- While the chicken is baking, prepare the blue cheese dressing dip. In a bowl, combine the blue cheese dressing with a tablespoon of mayo, a splash of buttermilk, and a pinch of salt to create a creamy, tangy dip that complements the heat. Stir until smooth, adjusting the consistency with more buttermilk if desired. This dip will provide a cooling counterbalance to the spicy wings, creating a harmonious flavor profile.
- Once the chicken is cooked, remove it from the oven and let it rest for 5 minutes; this resting period allows the juices to redistribute, ensuring each bite is moist and flavorful. While the chicken rests, arrange celery sticks on a platter for serving, adding a crisp, refreshing element that cleanses the palate. The rest time also gives the sauce time to thicken slightly, creating a thicker glaze that clings to the chicken.
- After resting, drizzle any remaining sauce over the chicken for an extra burst of flavor. Serve immediately with the prepared blue cheese dip and celery sticks, ensuring each bite is a balanced combination of heat, crunch, and creamy coolness. The dish is now ready to be devoured, and the aroma alone should have everyone in the kitchen anticipating the first bite.
- For an extra crispy finish, turn the oven to broil for 2 minutes, watching closely to prevent burning. The broil step caramelizes the edges of the chicken, adding a subtle char that enhances the overall flavor. Keep the chicken under close surveillance; the broil can quickly go from golden to burnt.
- If you prefer boneless chicken thighs, adjust the cooking time to 25-30 minutes, as they cook faster than wings. Ensure the internal temperature still reaches 165°F to guarantee safety and optimal texture. Boneless thighs offer a leaner alternative while still delivering the same rich, buttery flavor.
- For a vegan version, replace the butter with a plant‑based butter alternative and use a dairy‑free blue cheese dip or a cashew‑based ranch. This substitution maintains the buttery glaze and creamy dip while keeping the dish plant‑friendly. The flavor profile will shift slightly but remain delicious.
- Serve the wings hot, and encourage guests to dip each piece into the blue cheese dressing, balancing the heat with creamy coolness. Pair the dish with a cold beverage like beer or lemonade to cut through the spice. Enjoy the experience of watching everyone savor the perfect blend of heat, crunch, and buttery richness.
Insider Tricks for Flawless Results
The Temperature Rule Nobody Follows
Many home cooks underestimate the importance of oven temperature. Baking at 425°F creates a crisp exterior while keeping the interior juicy. If your oven runs hot, reduce the temperature by 25°F to avoid overcooking the outside. If it runs cool, increase the temperature by 25°F for a crispier result. This small adjustment can make the difference between soggy and perfectly crispy wings.
Why Your Nose Knows Best
The aroma of the butter and sauce is a reliable indicator of doneness. When the butter turns a golden brown and the sauce starts to bubble, you’re close to the perfect glaze. If you’re unsure, use a meat thermometer to check the internal temperature. The smell alone will guide you to the right moment, ensuring the wings are neither undercooked nor overdone.
The 5-Minute Rest That Changes Everything
Letting the chicken rest for 5 minutes after baking allows the juices to redistribute, ensuring each bite is moist and flavorful. During this rest period, the sauce thickens slightly, creating a richer glaze. Skipping this step often results in dry, unevenly flavored wings. The rest also gives the sauce time to set, making it easier to coat each piece evenly.
Use a Wire Rack for Even Cooking
A wire rack allows hot air to circulate around the chicken, preventing the bottom from becoming soggy. The result is a uniformly crispy exterior and a juicy interior. If you don’t have a wire rack, place the chicken on a baking sheet lined with parchment paper and elevate it with a stack of aluminum foil. The key is to keep the chicken off the bottom of the pan for even cooking.
Broil for the Final Crunch
Turning on the broiler for the last 2 minutes caramelizes the edges, giving the wings a slightly charred, smoky finish. Keep a close eye on the wings to avoid burning; the broiler can go from golden to black in seconds. The final crunch adds a new textural dimension that makes the dish even more enjoyable. This step is optional but highly recommended for those who love an extra layer of flavor.
Reheat with a Splash of Water
When reheating leftover wings, add a splash of water or broth to the pan and cover it with foil. The steam keeps the chicken moist and prevents the sauce from drying out. Heat over medium-low, stirring occasionally to redistribute the sauce. This simple trick ensures your reheated wings taste as fresh as the first batch.
Creative Twists and Variations
This recipe is a playground. Here are some of my favorite ways to switch things up: The Sweet Heat Variation swaps the Frank’s RedHot sauce for a honey‑based sauce, creating a sweet‑spicy combo that’s irresistible. The Smoky Chipotle Variation adds chipotle powder to the sauce, giving the wings a deep, smoky flavor that pairs well with a creamy avocado dip. The Asian Fusion Variation incorporates soy sauce and sesame oil into the glaze, creating an umami‑rich wing that feels like a street‑food favorite. The Mediterranean Twist uses a yogurt‑based dip with lemon zest, offering a tangy, refreshing contrast to the heat. The Vegan Delight swaps butter for coconut oil and uses a cashew‑based ranch dip, making the dish plant‑friendly without sacrificing flavor. The BBQ Fusion replaces Frank’s RedHot with a smoky BBQ sauce, creating a sweet, tangy wing that’s a crowd‑pleaser at any gathering.
Storing and Bringing It Back to Life
Fridge Storage
Store leftover wings in an airtight container in the refrigerator for up to 3 days. The sauce will thicken slightly, but the wings remain juicy and flavorful. Keep the wings on a plate with a small amount of water or broth to maintain moisture. Reheat in the oven at 350°F for 10 minutes to restore crispness. This method preserves the texture and flavor, ensuring a satisfying reheat.
Freezer Friendly
For longer storage, freeze the wings in a single layer on a parchment‑lined tray before transferring them to a freezer bag. Freeze for up to 2 months; the sauce will keep its flavor profile. Thaw overnight in the refrigerator before reheating. This technique allows you to enjoy fresh‑tasting wings anytime, without the rush of cooking from scratch.
Best Reheating Method
The best way to reheat is to use the oven at 350°F for 10 minutes, adding a splash of water to the pan to keep the wings moist. The oven re‑crisp the exterior while the water prevents the sauce from drying out. If you’re in a hurry, a microwave can work, but cover the dish with a damp paper towel to retain moisture. For a quick fix, a skillet on medium heat with a splash of water will also do the trick. The key is to keep the wings moist and the sauce glossy.