I was staring at the kitchen counter, a mound of flour, a jar of caramel, and a half‑finished cookie dough that had somehow turned into a sticky, unmanageable mess. The last time I tried to bake caramel cookie bars, the batch was a sad, soggy slab that looked more like a caramel‑coated mud pie than a dessert. My friend, who has a taste for everything sweet and crunchy, dared me to create a version that would make even the most skeptical palate swoon. And that dare sparked a culinary adventure that ended with a batch so buttery, sweet, and caramel‑laden that I still dream of its glossy surface.
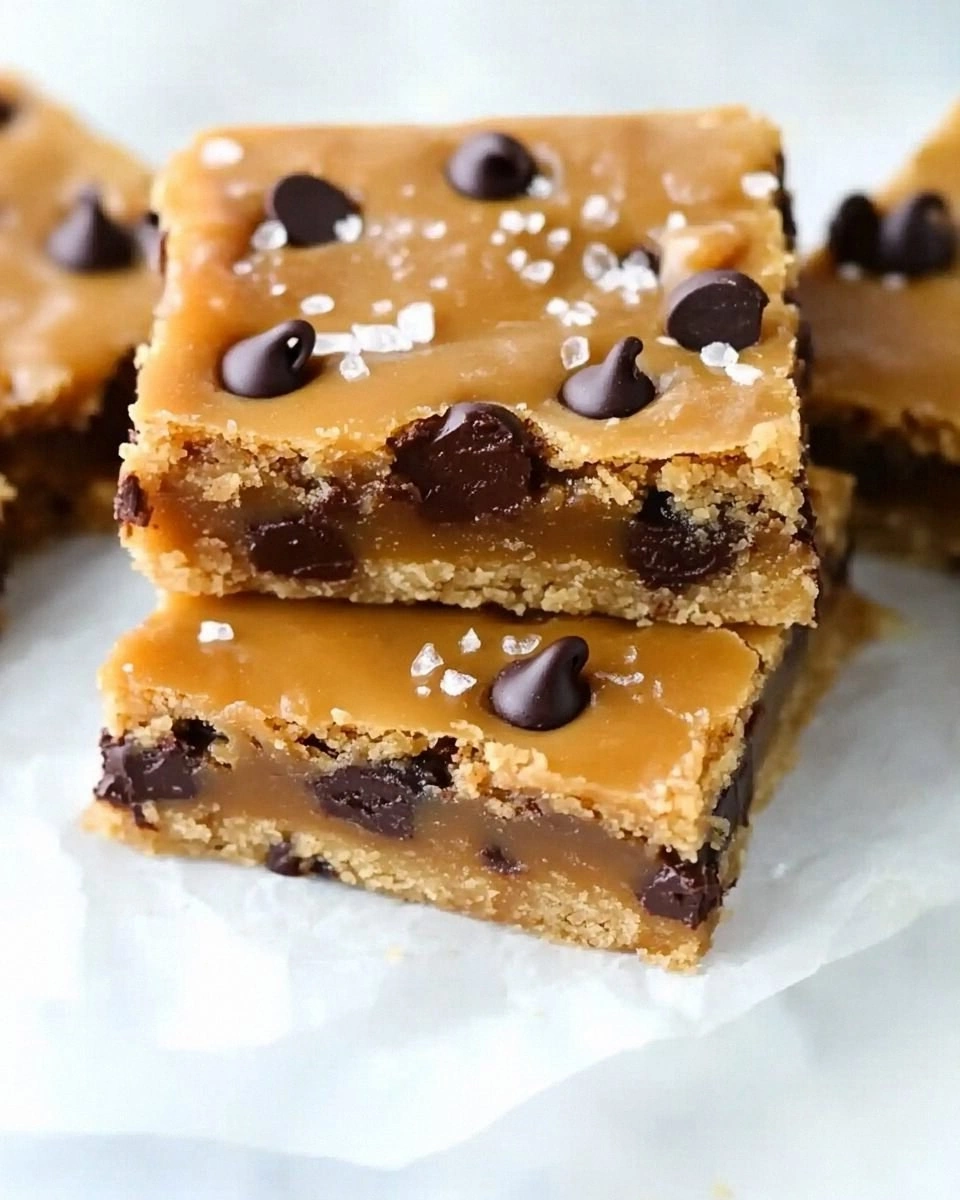
Picture this: the dough, a perfect blend of golden brown sugar and soft butter, glistening under the kitchen lights; the caramel sauce, thick as molasses and dripping with caramelized sugar crystals; the aroma, a heady mix of toasted sugar and vanilla that rises from the oven like a sweet perfume. I can still hear the sizzle as the dough hits the pan, the gentle pop of butter melting into a glossy coating. The texture is a delicate dance between crisp edges that crackle like thin ice and a chewy center that melts in your mouth, releasing a cascade of caramel flavor. If you close your eyes, you can almost taste the buttery richness and feel the warm, sticky coating on your tongue.
What sets this version apart isn’t just a tweak in the recipe; it’s a philosophy. I’ve stripped away the fluff, replaced the generic butter with a high‑quality unsalted variety, and introduced a caramel glaze that’s been simmered to the perfect consistency. The result is a cookie bar that’s not only a treat for your taste buds but also a work of art, with a glossy sheen that glistens like liquid gold. Every bite is a revelation, a burst of caramel that envelops the buttery base, followed by a satisfying crunch that gives way to a chewy center.
And here’s the kicker: this isn’t just another cookie recipe. It’s a game‑changer. I’ve discovered a technique that turns ordinary caramel into a silky, glossy glaze that clings to the bars without making them soggy. The secret? A touch of sea salt and a precise cooking time that locks in flavor. If you’ve ever struggled with caramel that turns into a hard candy or a gooey mess, you’re not alone — and I’ve got the fix. Let me walk you through every single step — by the end, you’ll wonder how you ever made it any other way.
What Makes This Version Stand Out
- Flavor: The caramel glaze is simmered to a luxurious consistency, delivering a rich, buttery sweetness that coats the dough like velvet.
- Texture: The bars boast crisp, golden edges that crackle with every bite, while the interior remains chewy and gooey, a contrast that keeps you reaching for more.
- Ingredient Quality: Using premium unsalted butter and high‑grade caramel ensures a depth of flavor that store‑bought versions can’t match.
- Make‑Ahead Friendly: Once baked, the bars keep their texture and flavor for up to a week in the fridge, and they freeze beautifully for later indulgence.
- Crowd‑Pleaser: Whether you’re serving a crowd at a party or just treating yourself, these bars are guaranteed to become the highlight of any gathering.
- Visual Appeal: The glossy caramel glaze gives each bar a professional, glossy finish that looks as good as it tastes.
- Simplicity: With only a handful of ingredients and a straightforward method, you can master this recipe in under an hour.
- Versatility: The base can be customized with nuts, chocolate chips, or spices, making it a canvas for endless flavor experiments.
Alright, let's break down exactly what goes into this masterpiece…
Inside the Ingredient List
The Flavor Base
The foundation of these bars is a classic cookie dough, but with a twist: we use 2 cups of all‑purpose flour, 1 cup of unsalted butter (softened to room temperature), 1 cup of packed brown sugar, and 1/2 cup of granulated sugar. The butter melts into a silky base that locks in moisture, while the sugars caramelize during baking to create that signature golden crust. If you skip the brown sugar, the bars lose that deep, molasses‑like undertone; the texture becomes flatter and less chewy.
Choosing the right butter is crucial. Opt for a high‑fat, unsalted variety to avoid unwanted saltiness and to allow the natural butter flavor to shine. If you’re using European butter, you’ll notice a richer, creamier finish that elevates the entire dish. The granulated sugar is added for a subtle crunch and to help the dough hold together during baking.
The Texture Crew
Eggs bind the dough and give it structure. One large egg is enough to hold everything together without making the bars too dense. The vanilla extract (1 teaspoon) infuses the dough with a warm, aromatic note that balances the sweetness. A pinch of sea salt (1/2 teaspoon) is essential; it brings out the caramel’s complexity and prevents the bars from becoming cloyingly sweet.
If you prefer a vegan version, you can substitute the egg with a flaxseed mixture (1 tablespoon ground flaxseed + 3 tablespoons water). The result will be slightly denser, but the caramel glaze will still work its magic. Remember, the key to a chewy center is to keep the dough moist, so avoid overmixing once the flour is added.
The Unexpected Star
Caramel sauce isn’t just a topping; it’s the heart of this recipe. One cup of thick, homemade caramel sauce is folded into the dough, creating pockets of molten sweetness that burst in your mouth. The sauce is simmered until it reaches 245°F (118°C), ensuring it’s thick enough to coat but still pourable. Skipping the caramel would reduce the bars to ordinary shortbread cookies, losing the signature gooey center.
A quick tip: if you’re short on time, use store‑bought caramel sauce, but stir it well before mixing to ensure it’s smooth. The sauce’s flavor profile is robust enough to carry the entire dish, so don’t be afraid to experiment with different brands; the result will still be delicious.
The Final Flourish
Optional additions like 1/2 cup of dark chocolate chips or 1 tablespoon of lemon zest can add a surprising twist. Chocolate chips provide a bittersweet contrast that pairs beautifully with the caramel, while lemon zest introduces a bright, citrusy lift that cuts through the sweetness. These additions are not necessary, but they elevate the bars into a multi‑layered experience.
When choosing chocolate chips, go for a high‑cocoa content to avoid a sugary aftertaste. Lemon zest should be fresh; dried zest loses its bright aroma. The trick is to balance the flavors so that none overwhelms the caramel’s dominance.
Everything's prepped? Good. Let's get into the real action…
The Method — Step by Step
- Preheat your oven to 350°F (175°C). Line a 9×13 inch baking pan with parchment paper, leaving an overhang on the sides for easy removal. The parchment ensures even baking and prevents sticking. This step is crucial because a properly preheated oven guarantees consistent browning.
- Mix Dry in a large bowl: combine 2 cups flour, 1/2 cup granulated sugar, and 1/2 teaspoon sea salt. Stir until evenly distributed. This creates the backbone of the dough, giving it structure and preventing it from becoming overly soft.
- Blend Butter and Sugars in a separate bowl: beat 1 cup softened butter with 1 cup packed brown sugar until the mixture is light and fluffy. The butter should be at room temperature; if it’s too hard, it won’t incorporate properly. The sugar will help the dough caramelize during baking.
- Add Egg and Vanilla to the butter mixture. Beat until the egg is fully incorporated and the mixture is smooth. Add 1 teaspoon vanilla extract for a warm aroma that complements the caramel. This step is where the dough begins to take on its final texture.
- Combine Wet and Dry by slowly adding the dry mix to the wet mixture. Stir gently until just combined; overmixing will develop gluten and make the bars tough. The dough should be cohesive but still slightly sticky.
- Fold in Caramel gently, using a spatula to incorporate 1 cup of thick caramel sauce. The caramel should be smooth and pourable; if it’s too thick, whisk in a teaspoon of warm water. The result is a dough with pockets of molten caramel that melt during baking.
- Optional Add-ins now is the time to fold in 1/2 cup dark chocolate chips or 1 tablespoon lemon zest, if desired. These additions will create new flavor layers without overpowering the caramel.
- Press into Pan using a flat spatula or your palms. Ensure an even layer, about 1/2 inch thick. The evenness ensures uniform baking and prevents overcooked edges.
- Bake for 30 minutes, or until the edges are golden brown and the center is set but still slightly soft. The bars should smell like toasted sugar and butter. Check the center with a toothpick; it should come out with a few moist crumbs.
- Cool on a wire rack for 10 minutes, then lift using the parchment overhang. Slice into bars while slightly warm; this prevents them from cracking. Let them cool completely before serving.
That's it — you did it. But hold on, I've got a few more tricks that'll take this to another level…
Insider Tricks for Flawless Results
The Temperature Rule Nobody Follows
Many bakers bake caramel cookie bars at 375°F, hoping for a quicker bake. The truth is, 350°F gives a slower, more even rise, allowing the caramel to melt into the dough without burning. The bars will have a slightly softer center and a more pronounced caramel flavor. If you’re using a convection oven, reduce the temperature by 25°F to avoid over‑browning.
Why Your Nose Knows Best
When you first open the oven, a sweet, buttery scent should envelop the kitchen. This is the signal that the caramel is caramelizing just right. If the scent is more of burnt sugar, the oven is too hot. Trust your nose; it’s your best judge of doneness.
The 5-Minute Rest That Changes Everything
After removing the bars from the oven, let them rest on the pan for five minutes. This short period allows the caramel to set, making the bars easier to cut without sticking. During this rest, the interior will firm up slightly, giving a pleasant chew that’s not too sticky.
The Parchment Overhang Trick
Using parchment with an overhang is a simple but effective trick. It lets you lift the entire batch out of the pan in one go, preserving the shape and preventing cracks. If you don’t have parchment, lightly grease the pan and use a silicone mat to achieve the same effect.
The Cooling Rack Secret
Cooling the bars on a wire rack allows air to circulate around them, preventing a soggy bottom. If you place them on a flat surface, moisture can accumulate and make the edges soft. The rack ensures a crisp bottom that complements the caramel top.
Creative Twists and Variations
This recipe is a playground. Here are some of my favorite ways to switch things up:
Nutty Crunch
Fold in 1/2 cup chopped pecans or walnuts before baking. The nuts add a satisfying crunch and a nutty flavor that pairs beautifully with caramel. Toast the nuts lightly for extra depth.
Spiced Caramel
Add 1/4 teaspoon cinnamon or a pinch of nutmeg to the dough. The spices create a warm, aromatic profile that’s perfect for fall gatherings. The caramel’s sweetness is balanced by the subtle heat of the spices.
Chocolate Swirl
Swirl in 1/4 cup melted dark chocolate before baking. The chocolate layers create a marbled effect and add a bittersweet contrast to the caramel. This variation is great for chocolate lovers.
Sea Salt Caramel
Increase the sea salt to 1 teaspoon. The extra salt enhances the caramel’s sweetness and adds a savory edge that makes each bite unforgettable.
Lemon‑Zest Brightness
Add 1 tablespoon lemon zest to the dough. The citrus note cuts through the richness, giving the bars a bright, fresh finish. This is a perfect pairing for a summer afternoon.
Vegan Version
Replace butter with coconut oil, use a flaxseed egg, and opt for a vegan caramel sauce. The texture will be slightly denser, but the caramel flavor remains intact. This variation makes the bars suitable for plant‑based diets.
Storing and Bringing It Back to Life
Fridge Storage
Store the bars in an airtight container at room temperature for up to 5 days. The caramel will soften slightly, making them extra chewy. Keep them away from direct sunlight to preserve the buttery flavor.
Freezer Friendly
Wrap each bar individually in plastic wrap and place them in a freezer bag. They’ll keep for up to 3 months. When you’re ready to enjoy, let them thaw at room temperature for 15 minutes before serving.
Best Reheating Method
To revive frozen bars, place them on a baking sheet and warm in a preheated 300°F (150°C) oven for 5 minutes. Add a splash of water to the pan to create steam, which will help the caramel stay moist and prevent it from drying out.